Cyberpunk 2077 Photomode Pose Creation Guide
In this guide I will show you how to make poses for photomode in Cyberpunk 2077. This guide is written in small steps with images so it's really long but it covers every little step in detail. I also cover things for people who have no experience with anything which adds to the length of it. Skip parts if they do not apply to you.I would like to note I learned pose making with the redmodding wiki tutorial and my partner explaining things when I didn't understand. So this basically covers what is in that tutorial but in smaller steps with more images for those who need that (like myself). Still a massive thank you to Manavortex for their work.If anything is unclear or you have any questions at all about pose making in general you can always shoot me a message on any of the websites linked below or Discord (you will have to send a friend request first). I am happy to help. :)
Discord: deavenexe
Last Updated: February 27th 2026
What to know/get before starting
- This guide is written assuming someone is completely new to modding Cyberpunk and working with Blender. Some parts may not apply to everyone if they already have experience with the programs.- Download Wolvenkit. Scroll down the page to assets and get the Wolvenkit zip and Wolvenkit.Console. You will find the program in the zip file all the way at the bottom of the file with the red face icon. Run through any setup that appears.- Download Blender. Quick note that I am on 4.1 because I am too concerned things will break if I update (as blender and cyberpunk have a tendency to do). Screenshots may look a little different because of that.- Download the Cyberpunk Blender Add On. Install it into Blender. Installation steps can be found in the add-on read me.- Download xBaebsae Anim Templates. This contains the blender files for the bodies so you can make poses.- Last download is my source file that I set up for easy use in Wolvenkit.- If you can't properly read an image just right click and open in a new tab. Some will be bigger and easier to read.
Disclaimer
Stating this separately just to be safe. This tutorial shows how I make poses. I am not all knowing on pose making and still learn new little things with every pose pack I make and I am aware that my process is not fully the same as other pose makers and sometimes my way may not be the best way for everyone or even in general. It's however a process that works for me. If anything changes in my process to be quicker or more streamlined I will edit the guide to reflect that, especially if I think it can help others. We all find our own preferred way of making poses as we go so absolutely adjust how you do things as you get comfortable making them and find what works best for you. Just have fun with it! That's really the most important thing at the end of the day.If you were hoping to also learn how to retarget then I am sorry to disappoint. I definitely do retargeting all wrong but I just copy and paste the poses from one body to the next and edit where need be. 😅 I followed a tutorial way back when I started by Halkuonn that you can find here that is clear and easy to follow with a retarget tool. I just ended up not using this method anymore at some point for no real reason. So now I just copy-paste or if that somehow doesn't work I just make the pose again on the new body. If there are better/easier ways to do retargeting I would love to know!One last thing, I am sorry if you don't like how I write things and don't use , or . properly. Grammar has never been my strong suit and English is also not my native language.
Tutorial Setup
This guide is split up in several parts. Click any of the titles below to instantly be taken to that part of the guide.Creating the Wolvenkit Project
Posing in Blender
Exporting to Wolvenkit
Quick Tool option
Paperwork
Last Things
Creating the Wolvenkit Project
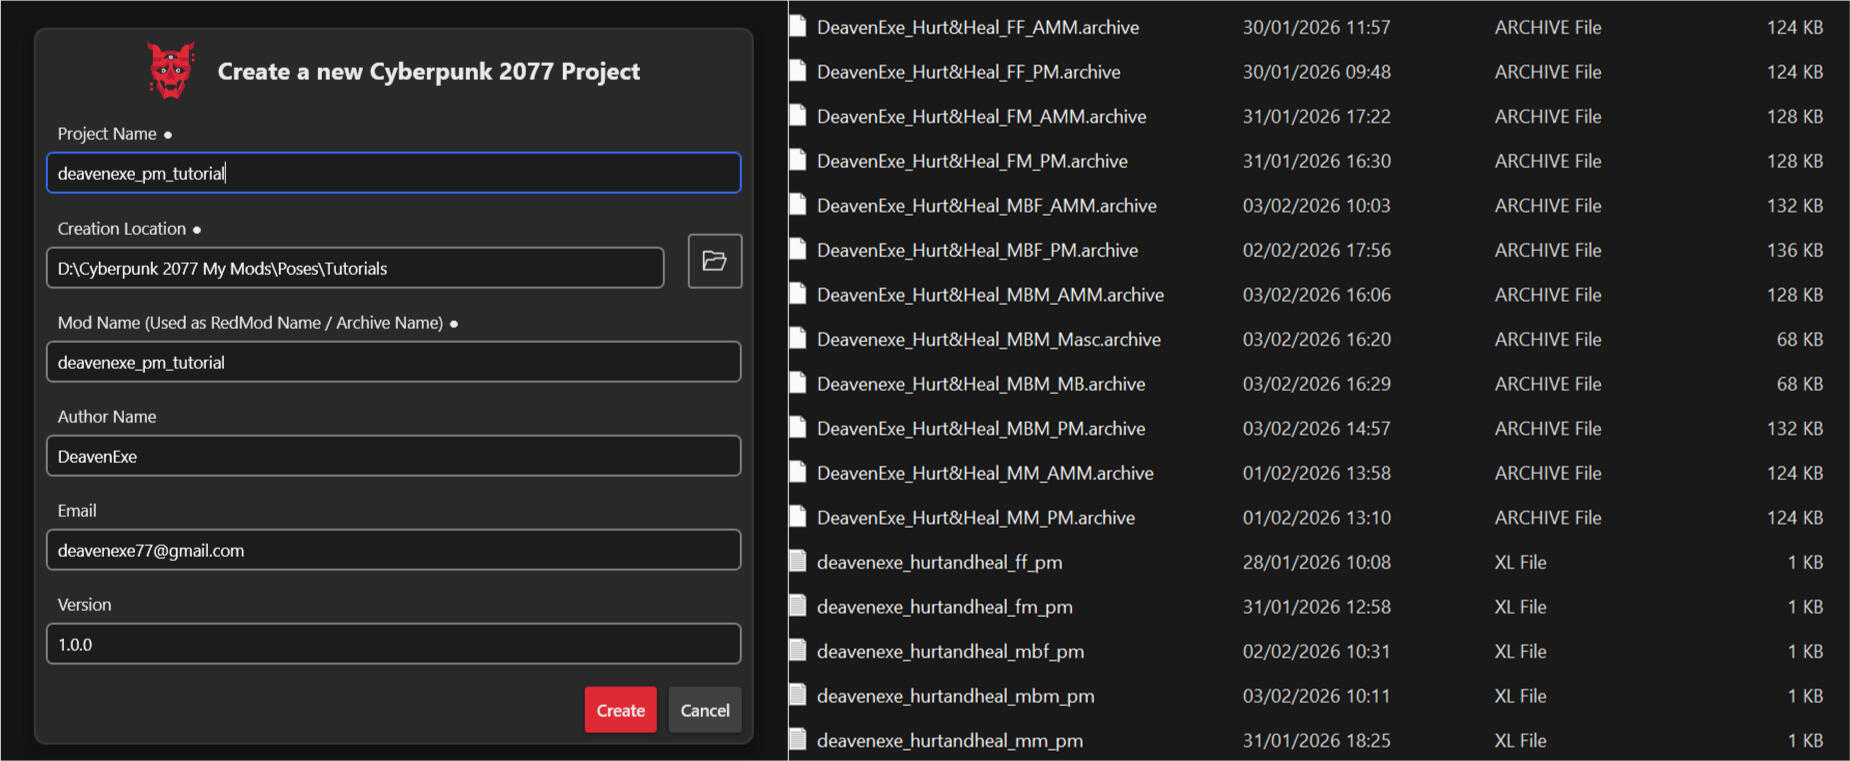
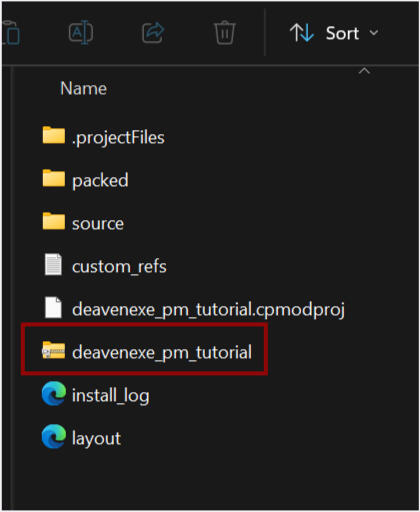
Alright open up Wolvenkit and select Create New Project on the right side. This will open a new window. Your project name will automatically be the same as the Mod Name but you can change the Mod Name if you want. Project Name is really just for you and Wolvenkit so make it whatever fits for your project.Creation Location will probably be the wolvenkit project file if it's your first time. You can change it to any location you want.Mod Name will be visible to others if you upload your file to nexus. This is what your archive file will be called, it's your main file and what will hold your poses basically. Make it something that can be easy for people to find in their mod folder. I added an extra screenshot to show you the archive file that will go into the mod folder eventually. So yeah the name is very visible there.Author Name, Email and Version speak for themselves right? You don't need to fill these in if you don't want to, it's absolutely optional.Once you filled it in press create!
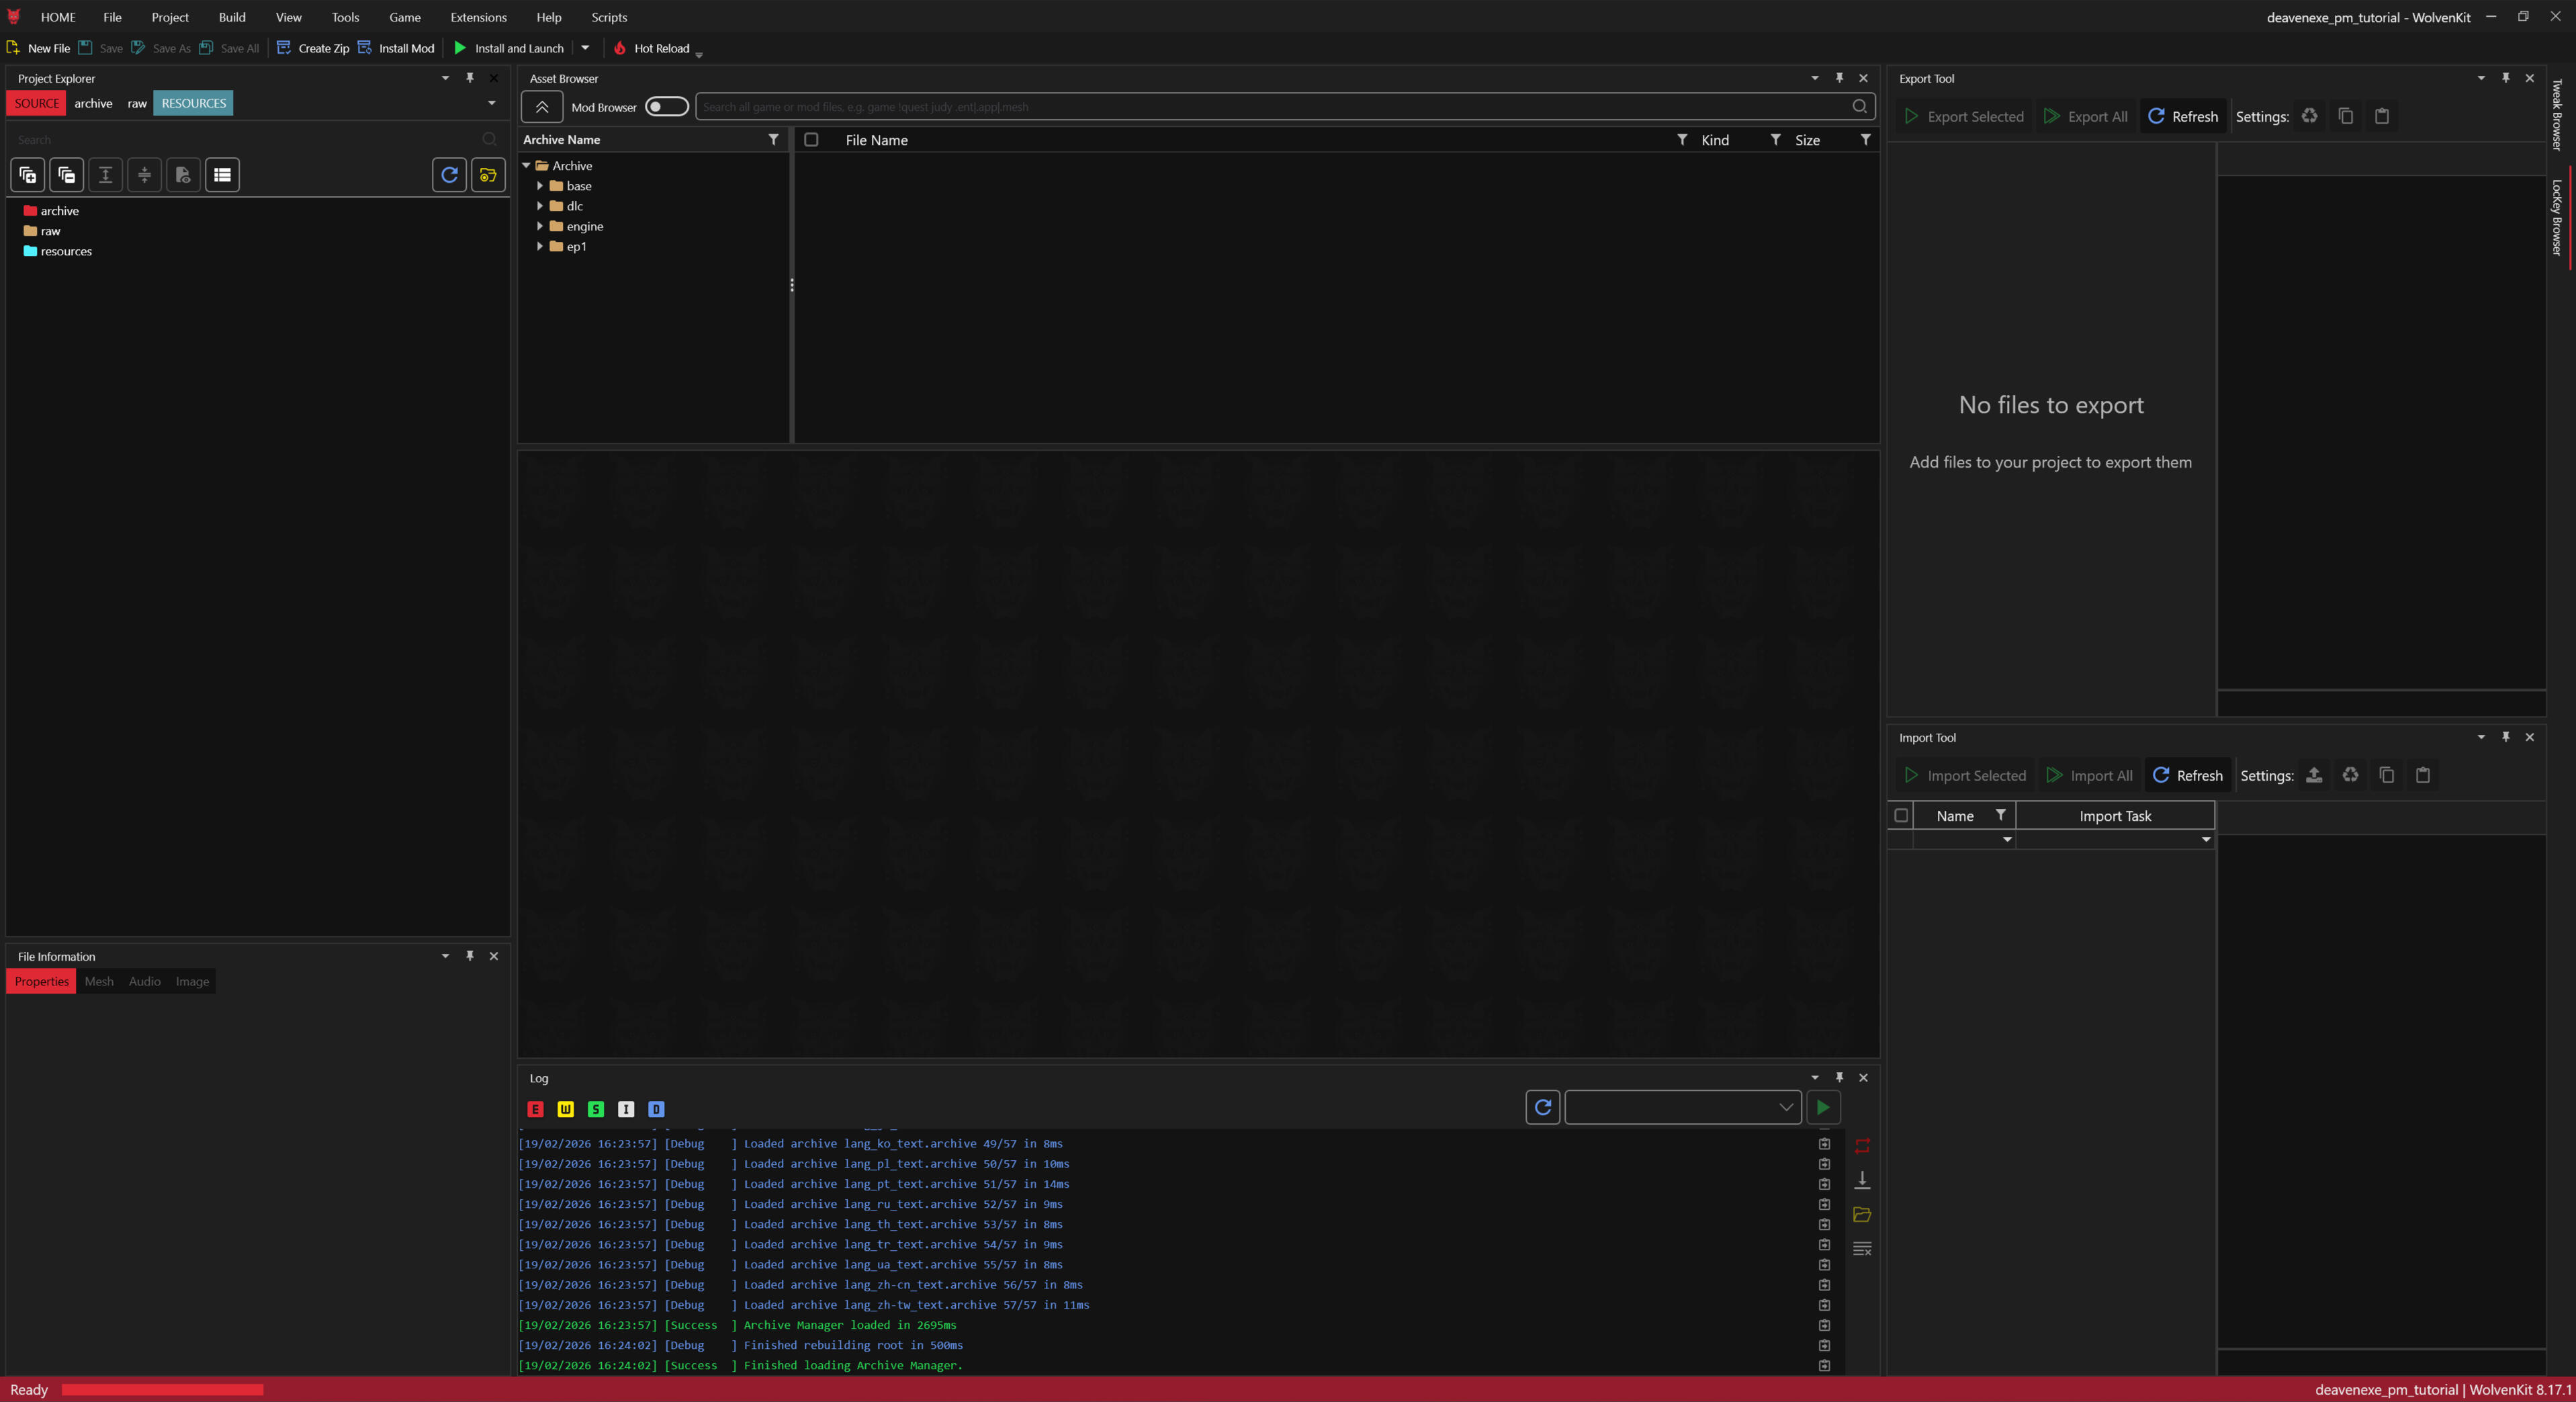
Okay so if you already have experience with Wolvenkit you can ignore this but if you are new your screen may look a little different from mine as seen below (I don't remember if this is just the original window or not). All the parts are separate windows so you can literally grab a window and move it around. So I could grab the export window in the top right and put it elsewhere. This is my preferred setup in general for pose making and other mods.You don't need to read the following if you don't want to but it's just some info on the windows. You can go through the tutorial without knowing all this.To the left is your project explorer where your files will be, below it is file information which isn't that needed for poses but I just keep it there.In the middle we have the asset browser at the top. You can find pretty much and file in the game there. You won't need it for pose making but I like it there. If you switch it to Mod Browser it will load all the mods you have installed so you can see those files. It's useful for a lot of other things just not poses.The middle empty screen is where you can see your file details once you have them in your project. You want that there.The log is at the bottom middle and will show you when you save things and it's done saving or that something is exported or it will scream at you with red letters when things are breaking. We avoid mean reds.Then on the right side I have the export and import tools. Both will be needed for pose making so its handy to have them there.In the end it's entirely your choice what you want where. Play around with it and see what you prefer.
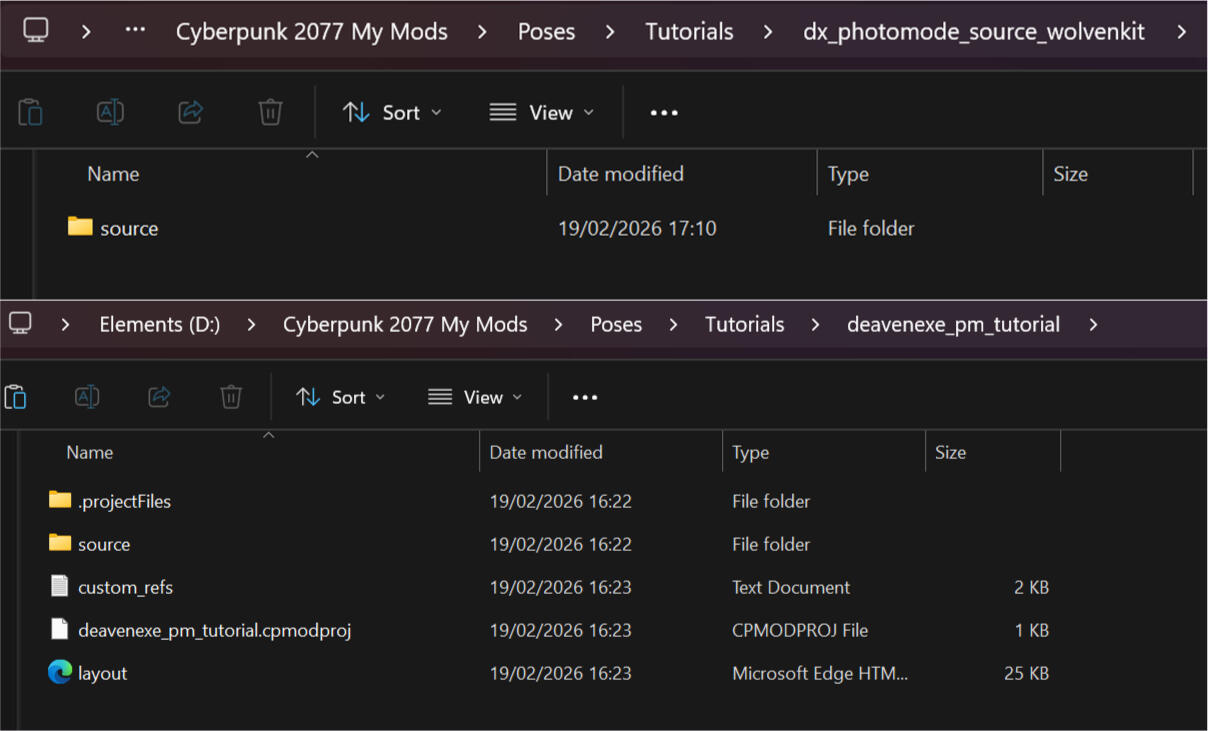
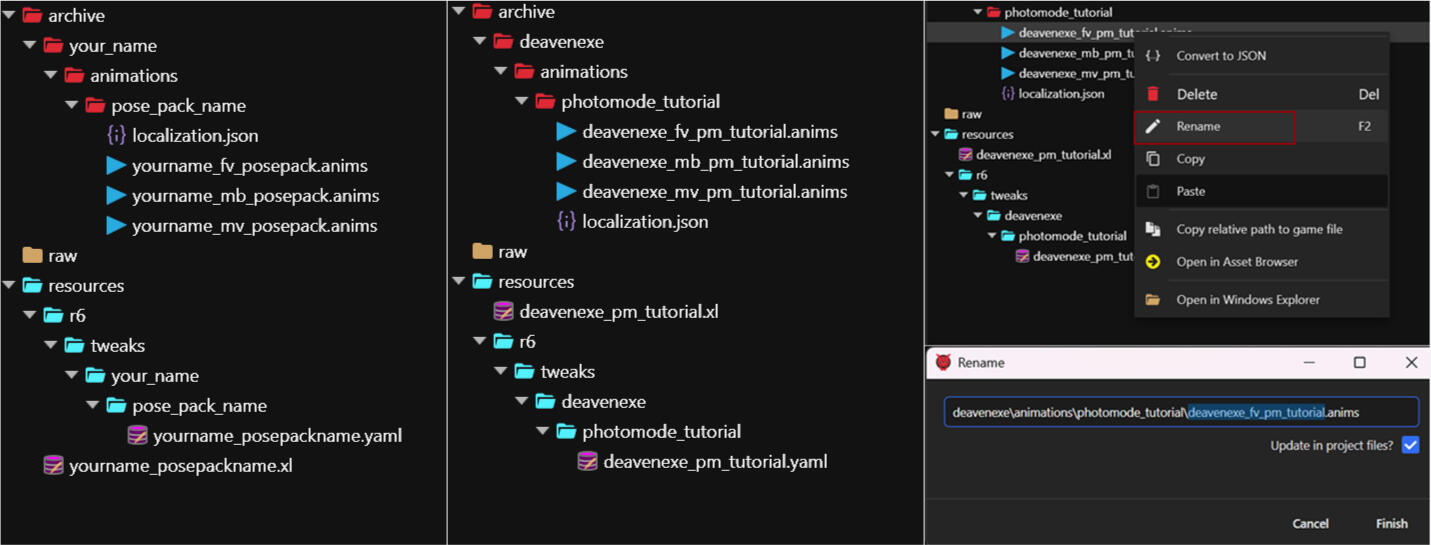
For just a moment minimize Wolvenkit and open your Wolvenkit project file (usual it's in the project folder in the Wolvenkit unless you changed the location in the beginning) and the source file I told you to download. Copy the source file from the deavenexe_wolvenkit_photomode_source folder that you downloaded and paste it into your wolvenkit project file. This will add all the files you need to make poses for photomode in one go and ready to edit for use.
Now the next step is to rename every part that says your name and pose pack by right clicking each file and selecting rename. A new window will open and you will notice that parts will already be highlighted and show blue. Those are the parts to edit, do not edit the rest in the renaming. You absolutely want to check update in project files for quick edits in some other files.You don't have to rename to your name or pose pack name, you can make it whatever you want but those are just suggestions to keep it personal and unique to you. You can remove anim files if you just plan on making it for one body type. That's the step in small. However if you would like more info on every single thing you can read the wall of text below. If you'd rather move on in the tutorial go to the next step.Files explained
The folders should be pretty clear. Leave all the folders under archive in just rename them except the animations one. As for the files under resources you want to keep r6 and tweaks as they are. Those folders are a must have for the yaml to be read and your poses to show up. Technically you don't need the your name and pose pack name folders however this makes it easier for people to find your stuff if they need to. If you don't want them click and drag the yaml file over to the tweaks folder so you keep that file and remove the folders you don't want.Your localization.json is the file that has your pose pack name in it. We will get to that later. You can technically change the name of this but it's really not necessary. It won't cause any issues with other pose packs if you keep the name as is.The anim files will hold your poses and be packed into the archive file in the end. I have added the fem, masc and male big anims. You can remove any of them if you don't need them, it won't break anything if you do. You can absolutely make poses for all three in one project if you want to! It won't create any issues and gives you one handy mod with all the files in it.Rename the anim files to whatever you want just make sure you can tell for which body type it is.Further down we have the yaml file. This file will help make your poses visible in photomode along with the xl file below it.The xl file will hold the pathing to your localization and anim files. It lets Cyberpunk know what to load. It is under resources but do not move it elsewhere or into any folder like the yaml file is. This file will end up in the same place as your archive file in the end and they need to be there for the mod to work (you can see the xl files in the first screenshot of the tutorial with the archive files). So rename it to fit your pose pack but leave it where it is.
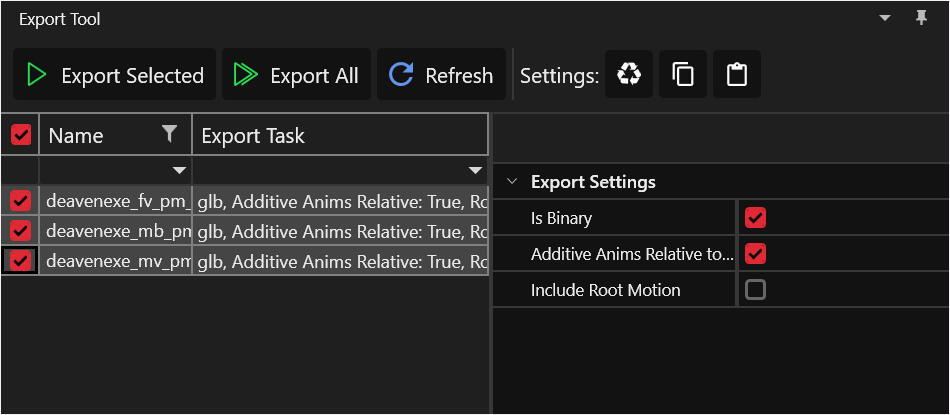
If you have changed the file names let's export our anim files to get to blender. We can get to the rest of Wolvenkit later. If you don't see the files in the export window hit refresh and they should show up. Select the file(s) you want to export and check that the settings match what you see in the screenshot below. If it matches hit export selected. If they don't match make them match by simply clicking them. Once that is done we move on the blender!
Posing in Blender
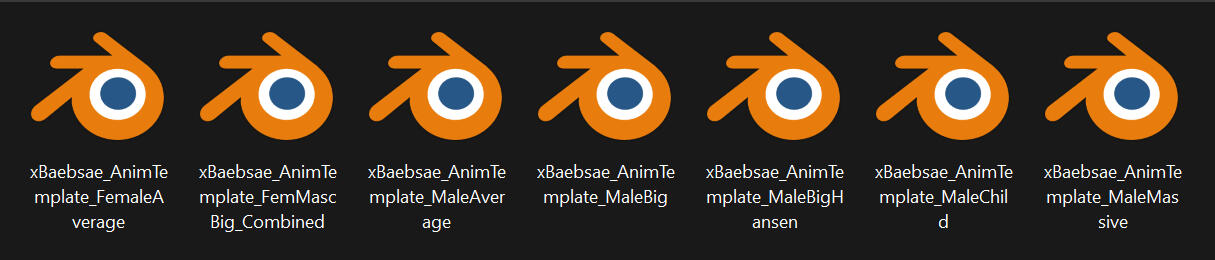
Alright open up the xBaebsae Anim Templates folder. The names should speak for themselves. I very rarely see MaleChild used and MaleMassive is for Smasher and is rarely used either so if you have no plans for those you can ignore them.MaleBig and MaleBigHansen are clearly different as well. The thing with Male Big is that all the guys that fall under Male Big are not all the same shape, it's not just Hansen. The differences are small but when making couples poses rather noticeable. You can just use MaleBig for Hansen as well if you don't want make more anims for it because it is more work.MaleAverage and FemaleAverage are the player bodies and most common NPC bodies so you will be using those the most.FemMascBig_Combined is the three body types in one file and can be comfortable to work in if you are making poses for all three of them. Heck even if you are just making Fem and Masc it can be comfortable to have them in one file.
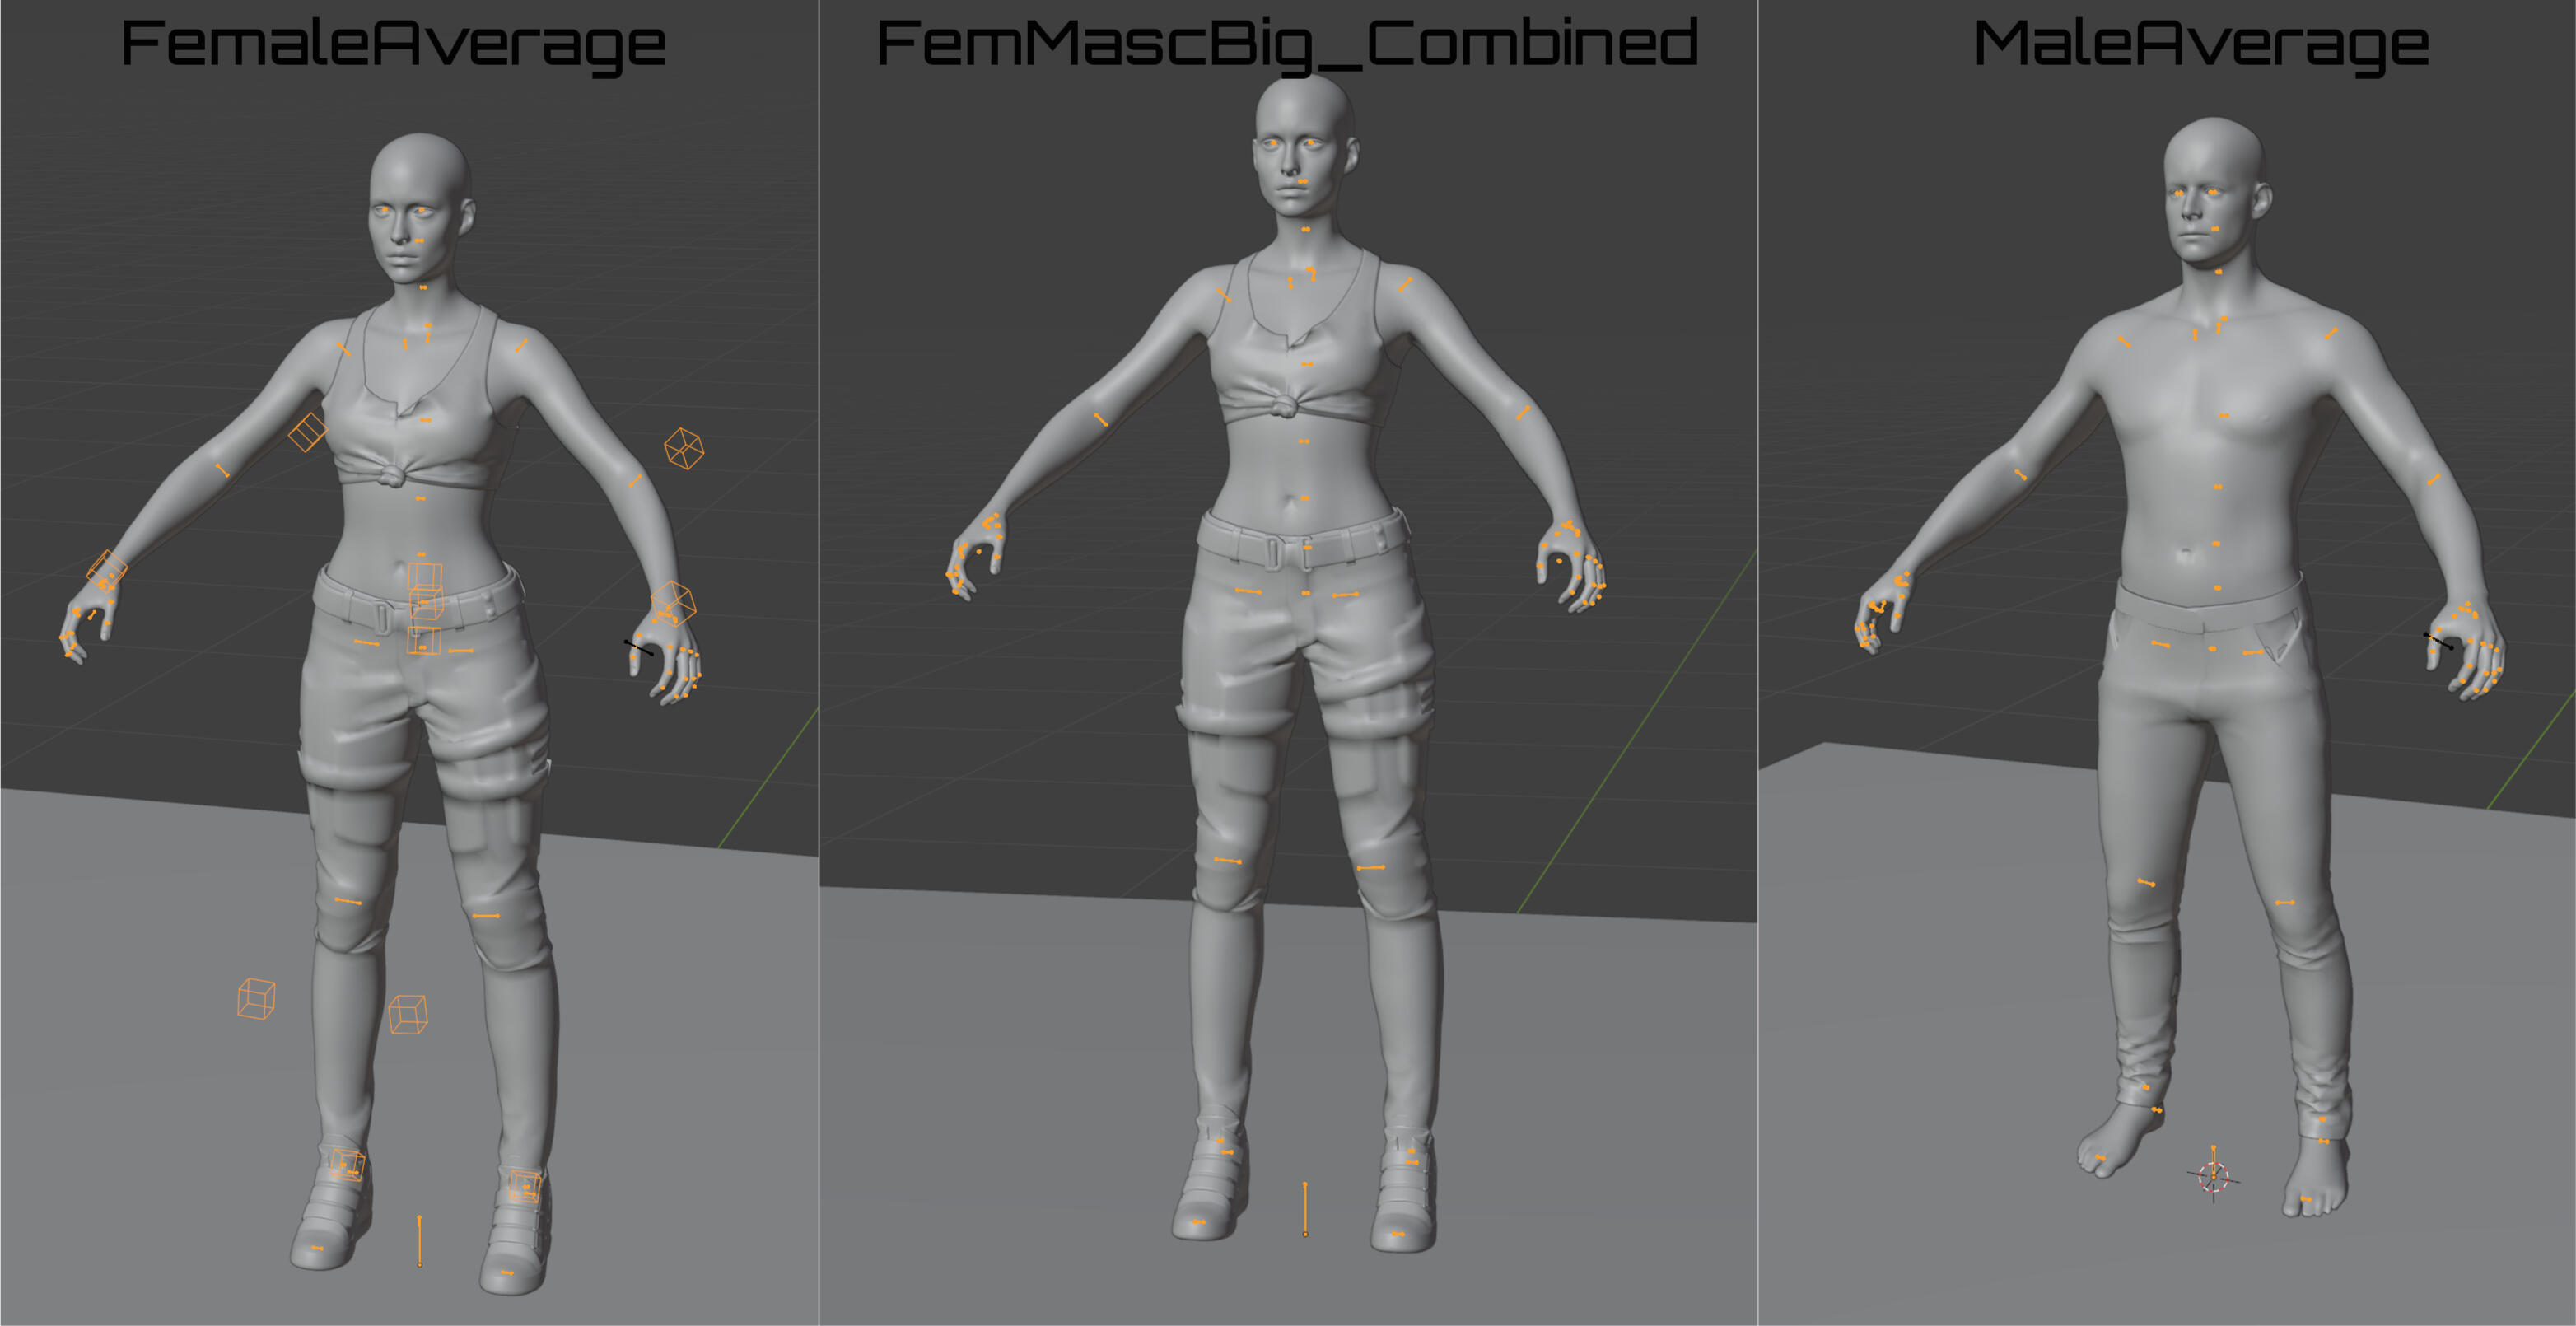
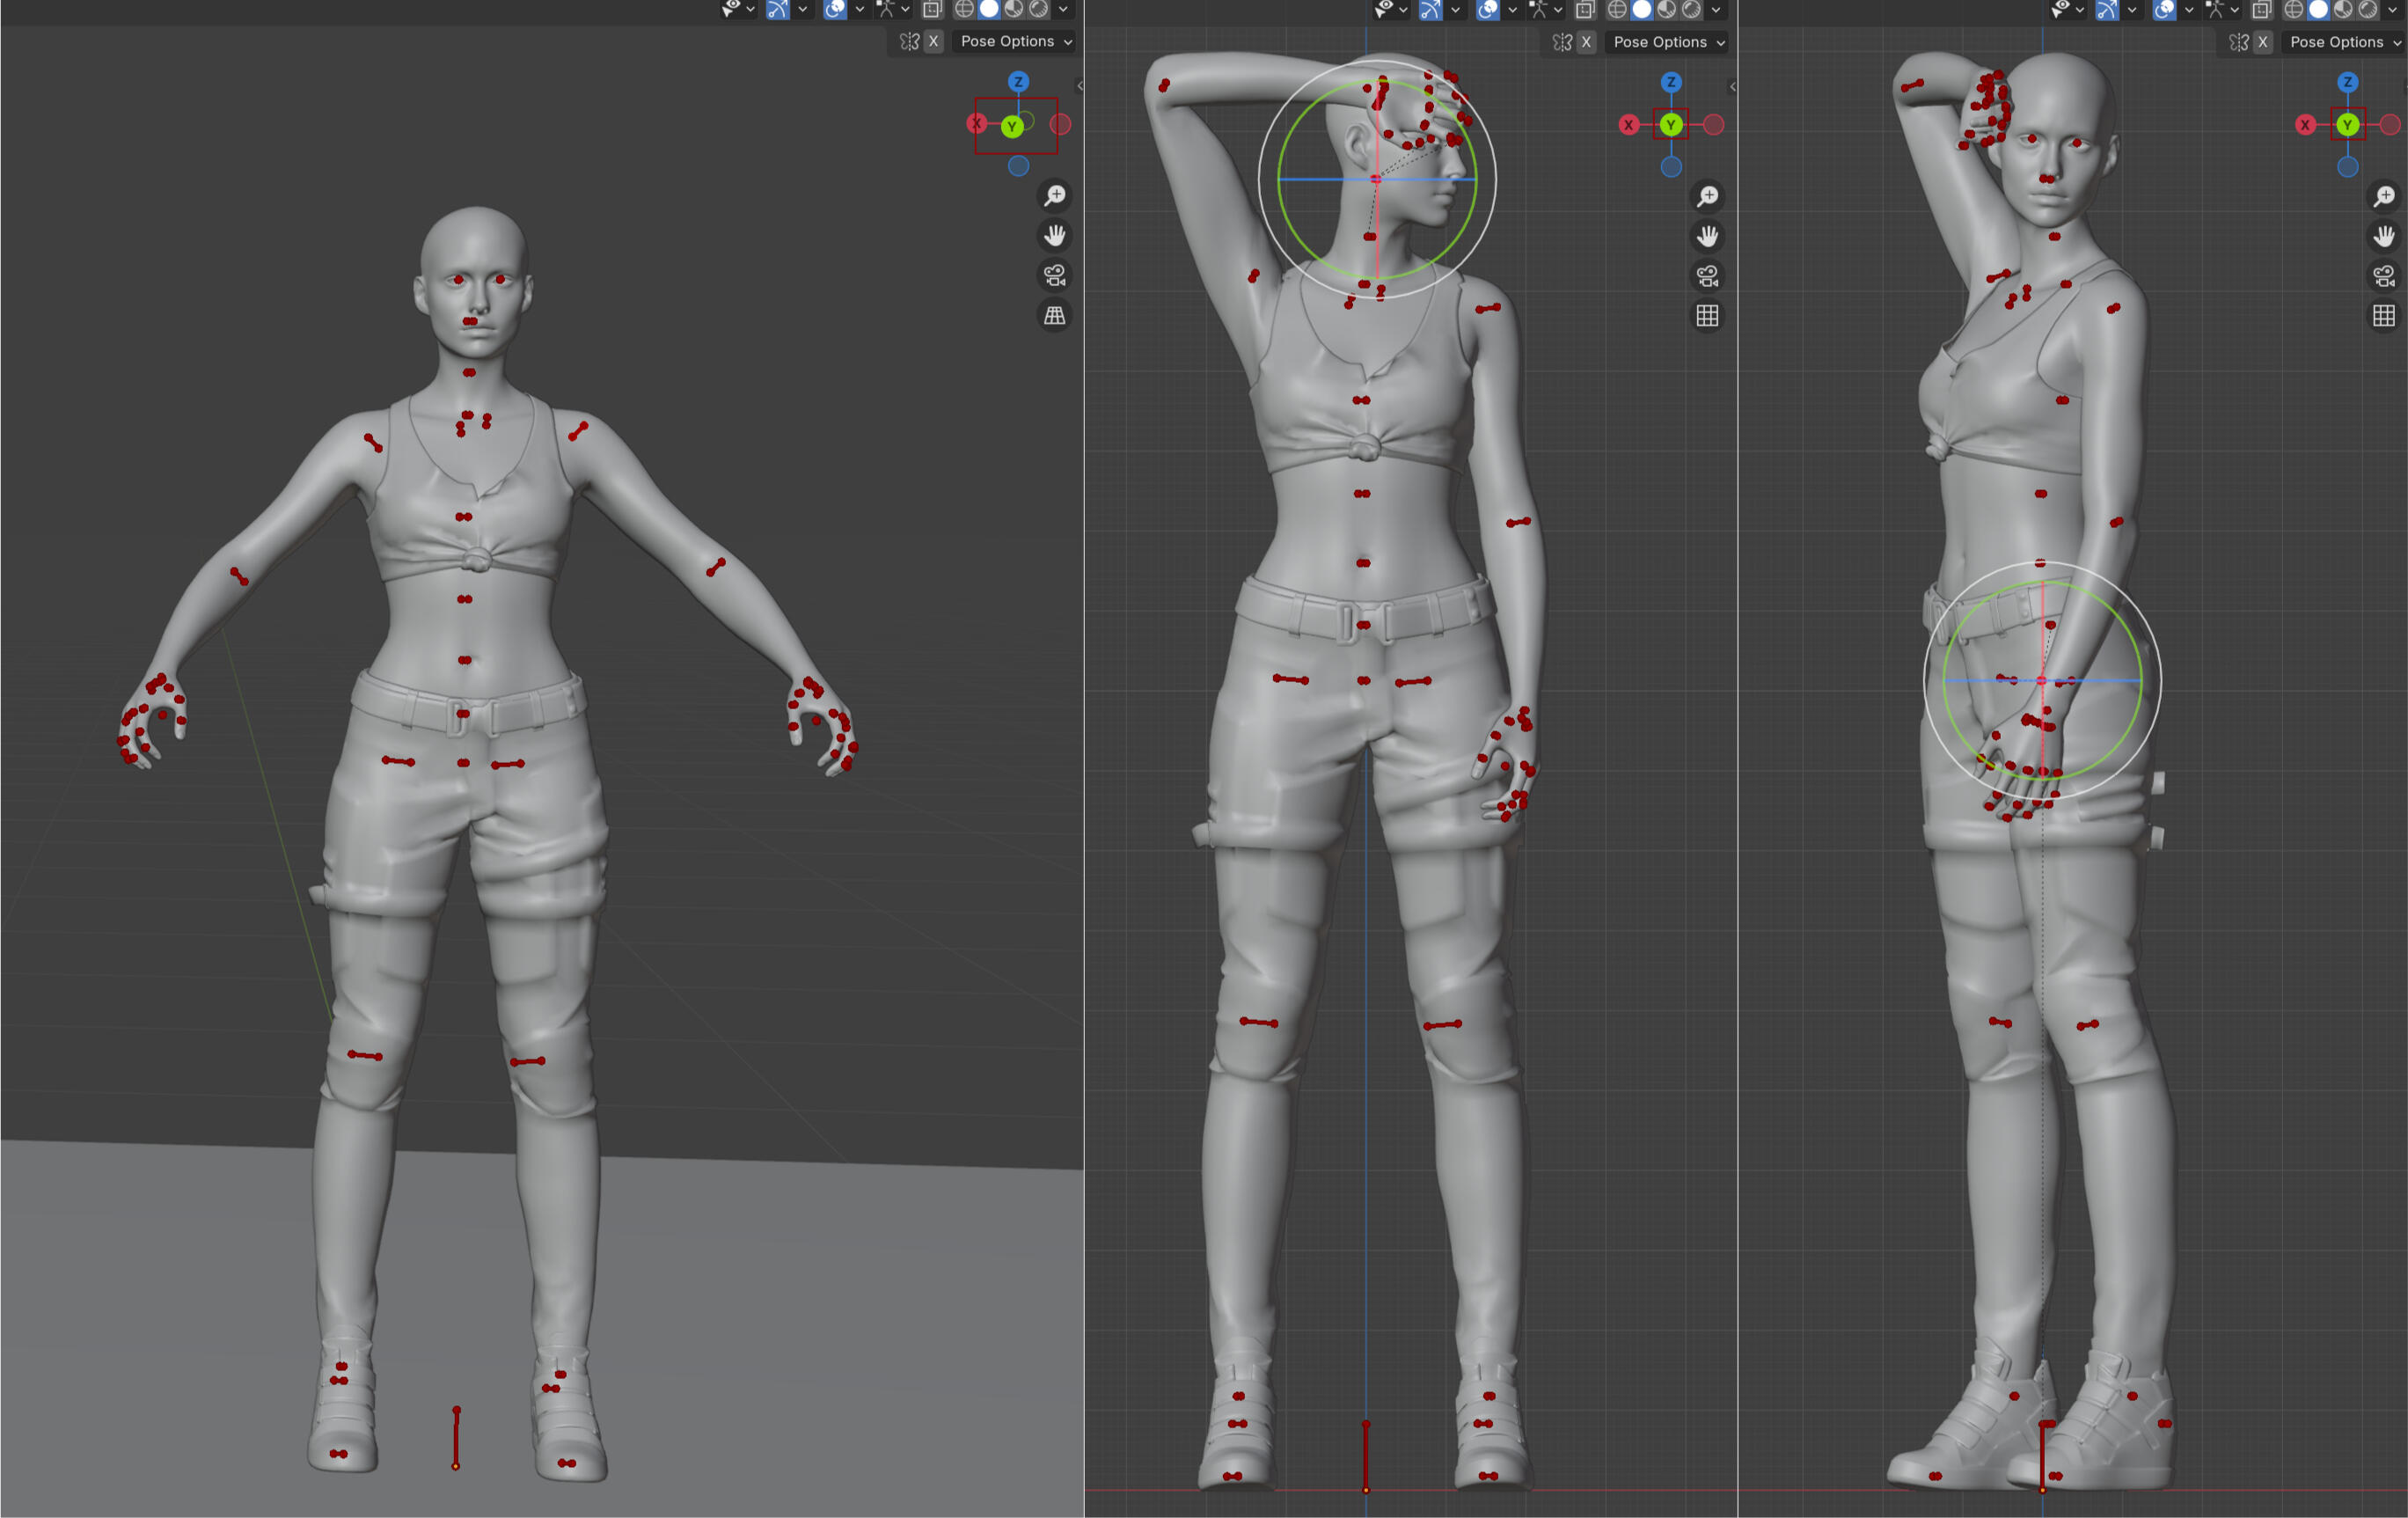
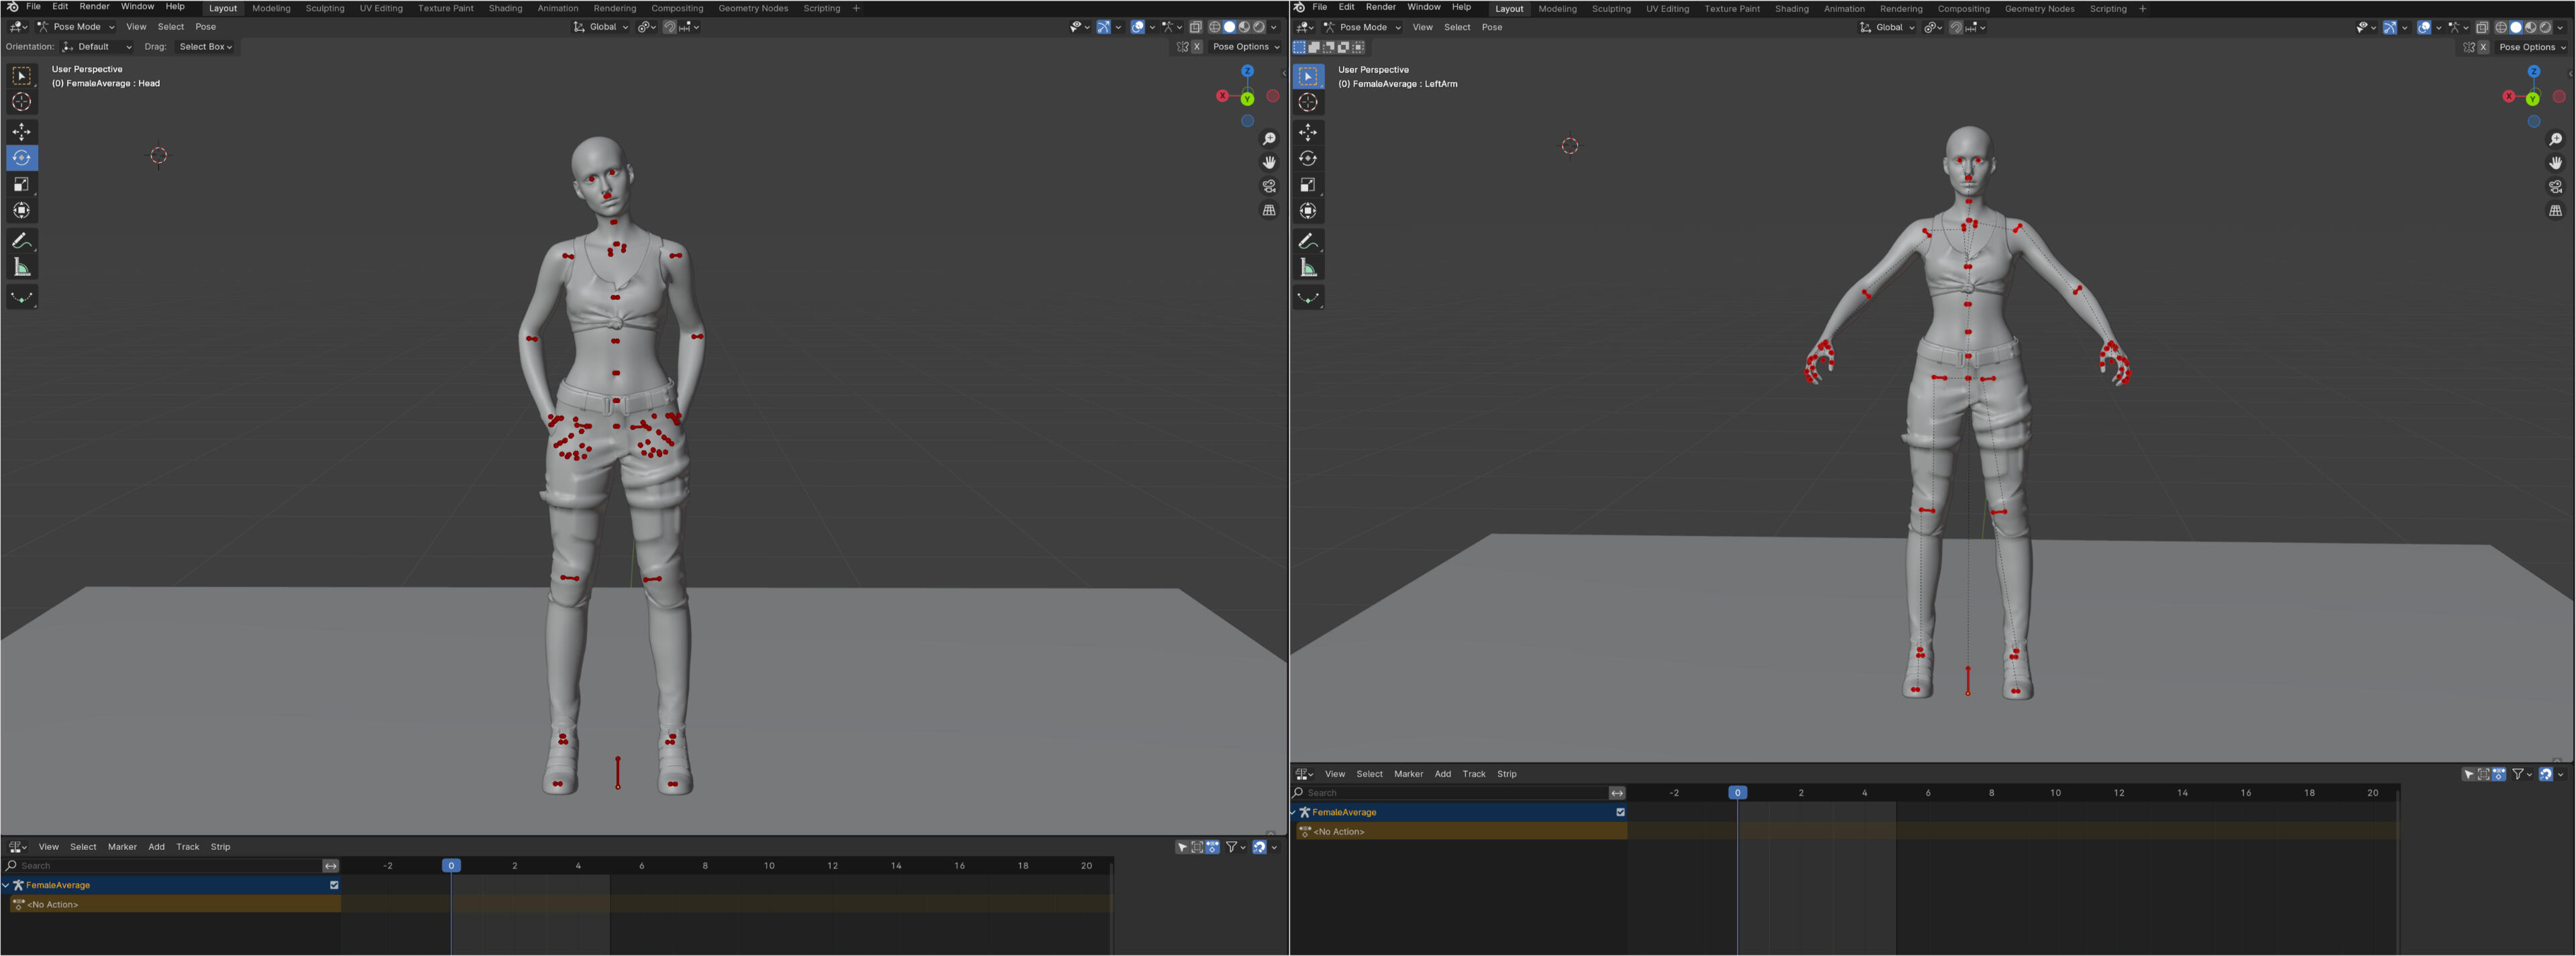
Now we run into a small snaffu here. FemaleAverage does not have the same posing method as the one in FemMascBig_Combined and MaleAverage. FemaleAverage uses IK bones. Now you might think well I can use the one from the combined file which is true but you will not be able to use that one if you plan on making poses with props as it is missing the props bones. You can see the black line in the hand of FemaleAverage and MaleAverage, that's the prop bone.So for this tutorial we will use the Combined file just to keep it simple as we aren't using props. However it is absolutely worth it to, at a later time, try out the IK bones model. xbaebsaes has a tutorial for how to use those models and also links to the male and male big IK version. It is important to read the tutorial as exporting IK versions is also different from the other bodies.I personally switch between the different body types depending on what type of poses I am making. I tend to lean towards IK bodies when making solo standing and moving poses and the other bodies for solo sitting and couples. This is all just a preference though so play around with both bodies to see what you prefer.
Okay so opening up the FemMascBig_Combined files shows you this window and if this is your first time using Blender this looks like a lot but don't worry I am going to walk you through everything and it really won't be so much in the end. If you are already used to working in Blender some of these explanations can be skipped and you can move on to the actual posing. Just go down to the area that says Posing Time.
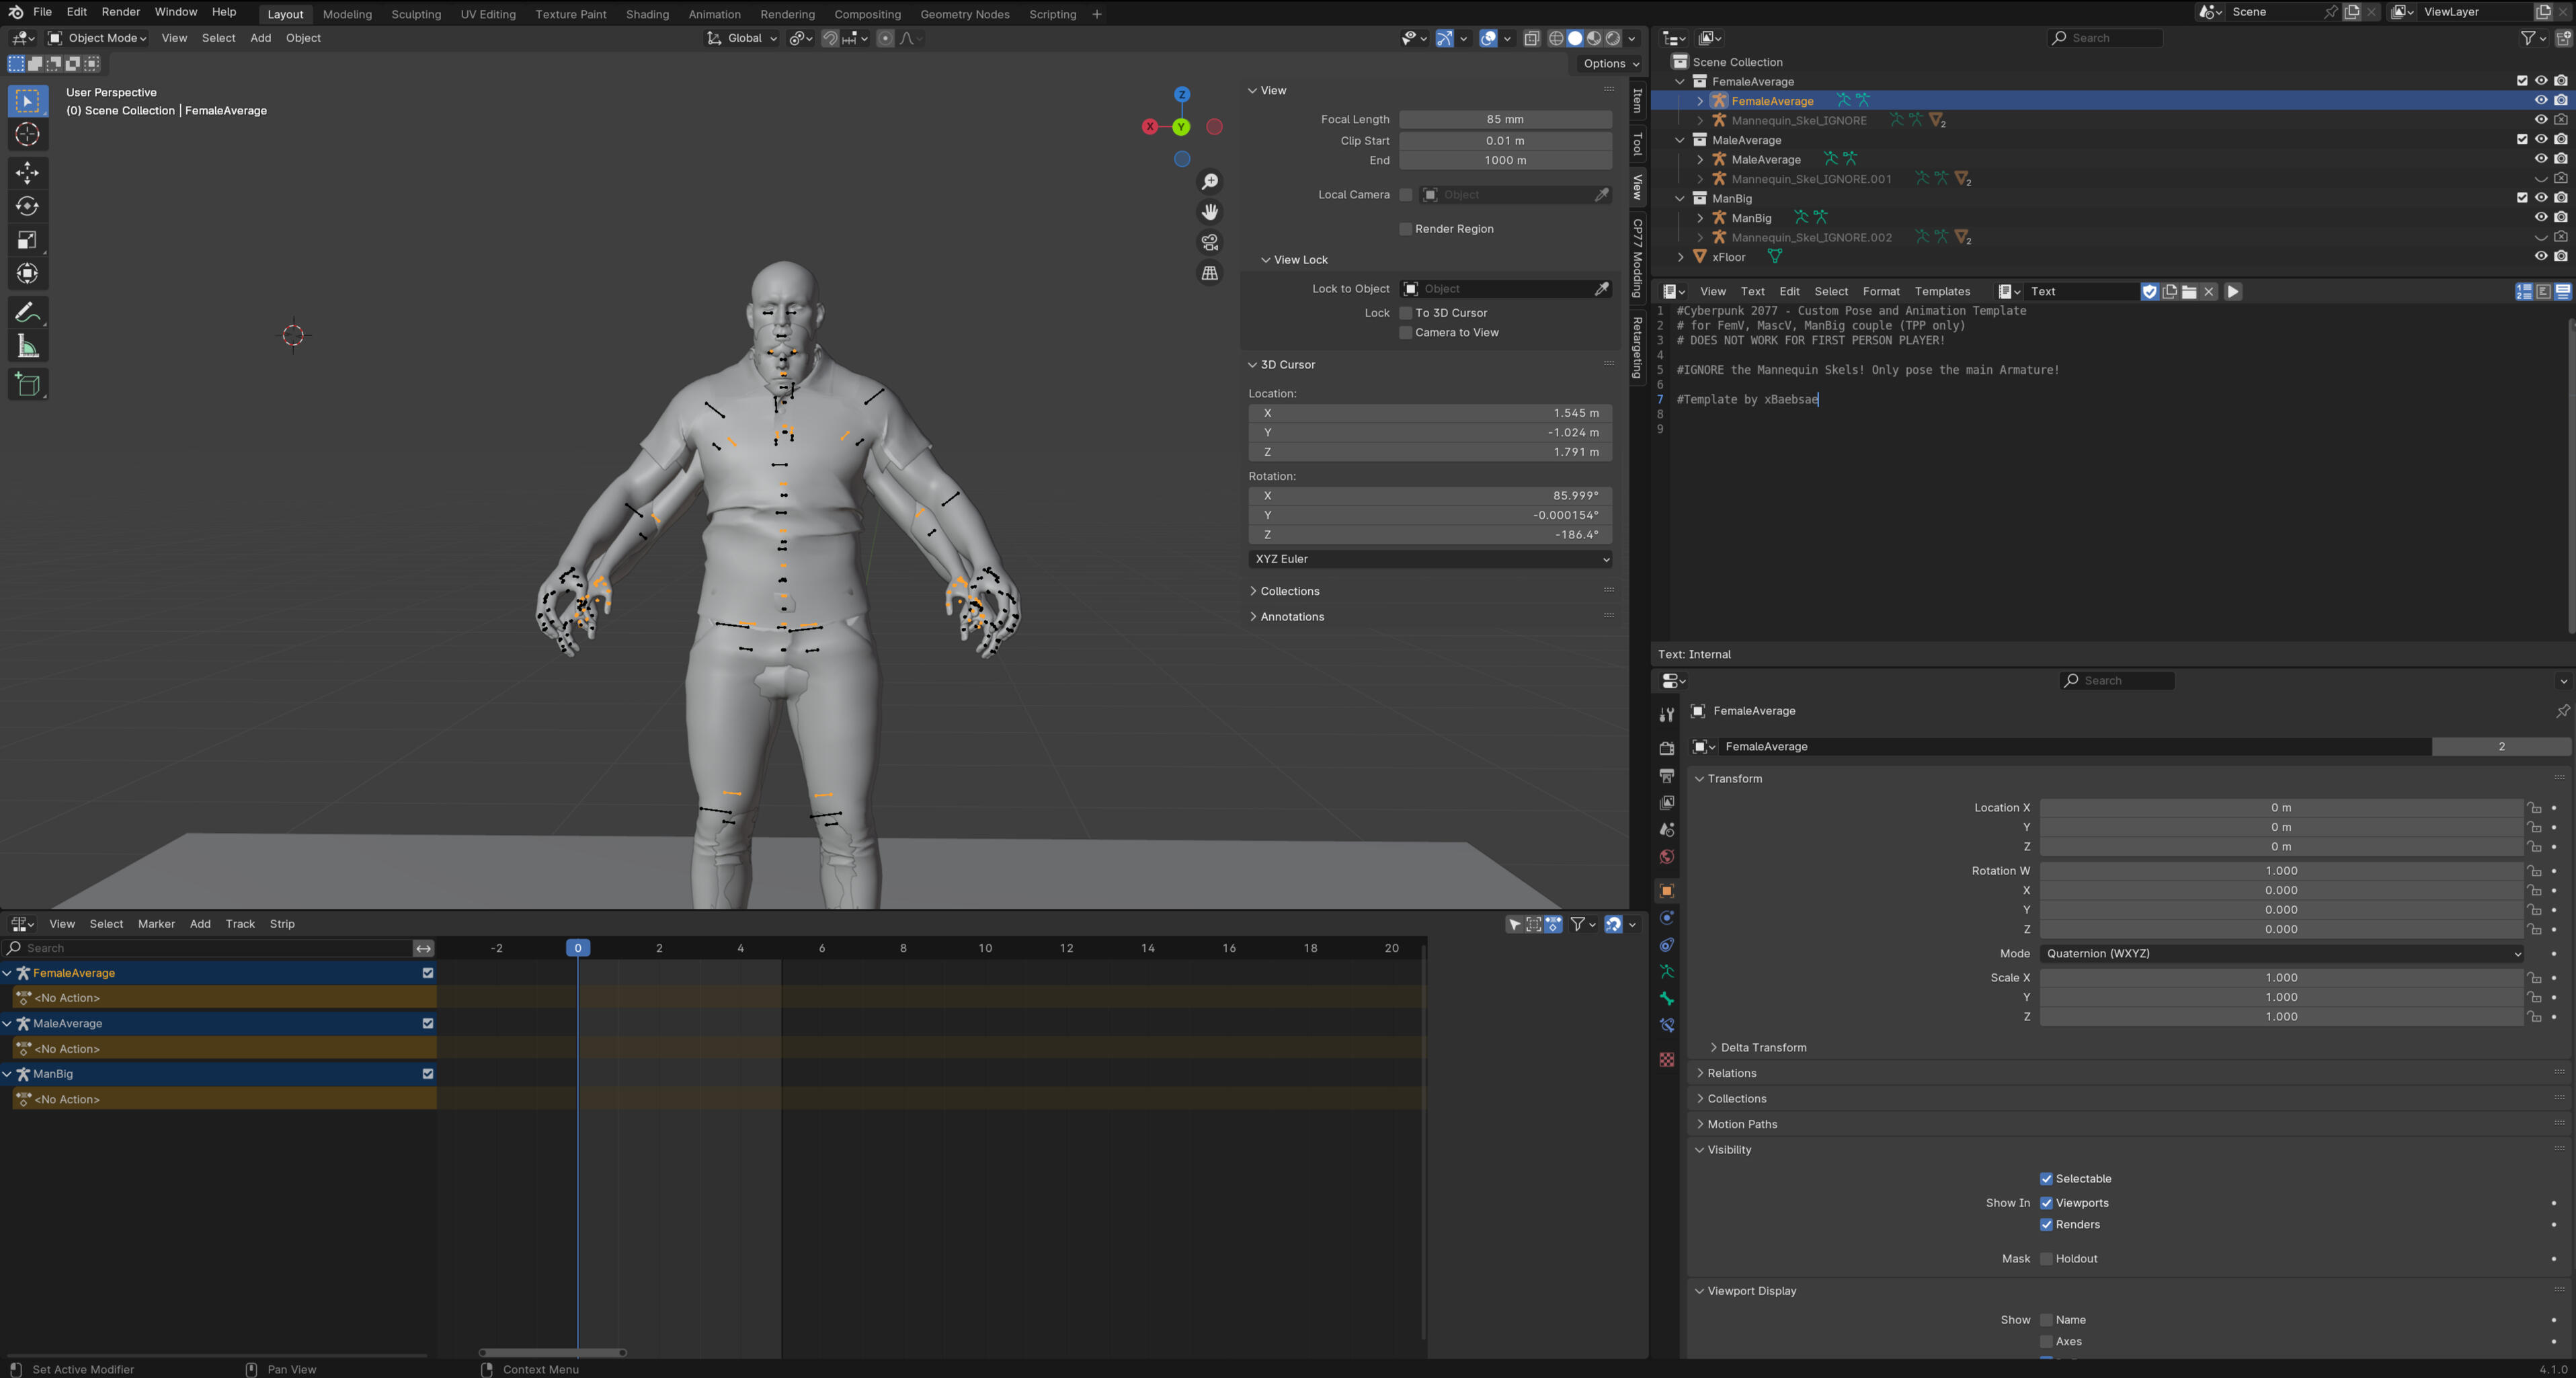
First we have the viewport where we can see our models and where most of the posing gets done. Parts we will be using a lot are the little drop down menu in the top left that says Object Mode, the tab to the right of it called Object and two buttons on the toolbar, the move and rotate tools. I will explain more about all of these further down.On the right we have the "sidebar". I rarely use it for pose making but I know others use it more to check things. I dunno I'm just very comfortable with my way of doing things and it works so I tend to close it. You can do that by hovering over the edge of the window and moving it basically like you would any other window for any other program. You can also go to View next to the object mode drop down menu and selecting Sidebar. Or if you don't have a shitty memory and can remember it just press N on your keyboard.
There are four easy ways to move around the viewport and three of them include your scroll wheel.First is scrolling. Yeah it zooms in and out. Pretty basic.Second pressing and holding the scroll button while moving the mouse around allows you to rotate around the model easily.Third holding shift and the scroll button and then moving the mouse let's you move up and down, left and right without rotation.You will be using the first and second methods a lot during posing. What about the fourth method? Keep reading.
Now there is one last part left in the viewport I wanna tell you about. In the top right you will see this red, green, blue, xyz bubble line thing. It get's called different things by different people so if you ever dig further into blender this thing can be called the xyz axis, the Navigation Gizmo, 3D Viewport Axis or a combination of those things. For the sake of the tutorial I will be calling it the xyz axis.
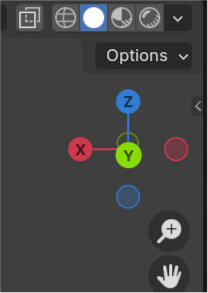
The xyz axis gives us the fourth option of moving in the viewport. While hovering over the axis press and hold your left mouse button and move your mouse around. You can now move the camera basically anywhere. I personally prefer the methods mentioned above but I did want to let you guys know about this method just in case.
Then there is the other thing with the xyz axis. If you click on it the view shifts so you can see the lines clearly. This is great for lining up the poses with the green line (you want to be above it for pose making) and if you want to center the pose the blue line is really helpful as well. You can change the view by clicking the different circles. Red X for left and right view, green Y for front and back view and blue Z for the view from above and below.To get out of this mode I hold the scroll button and move the mouse a bit.
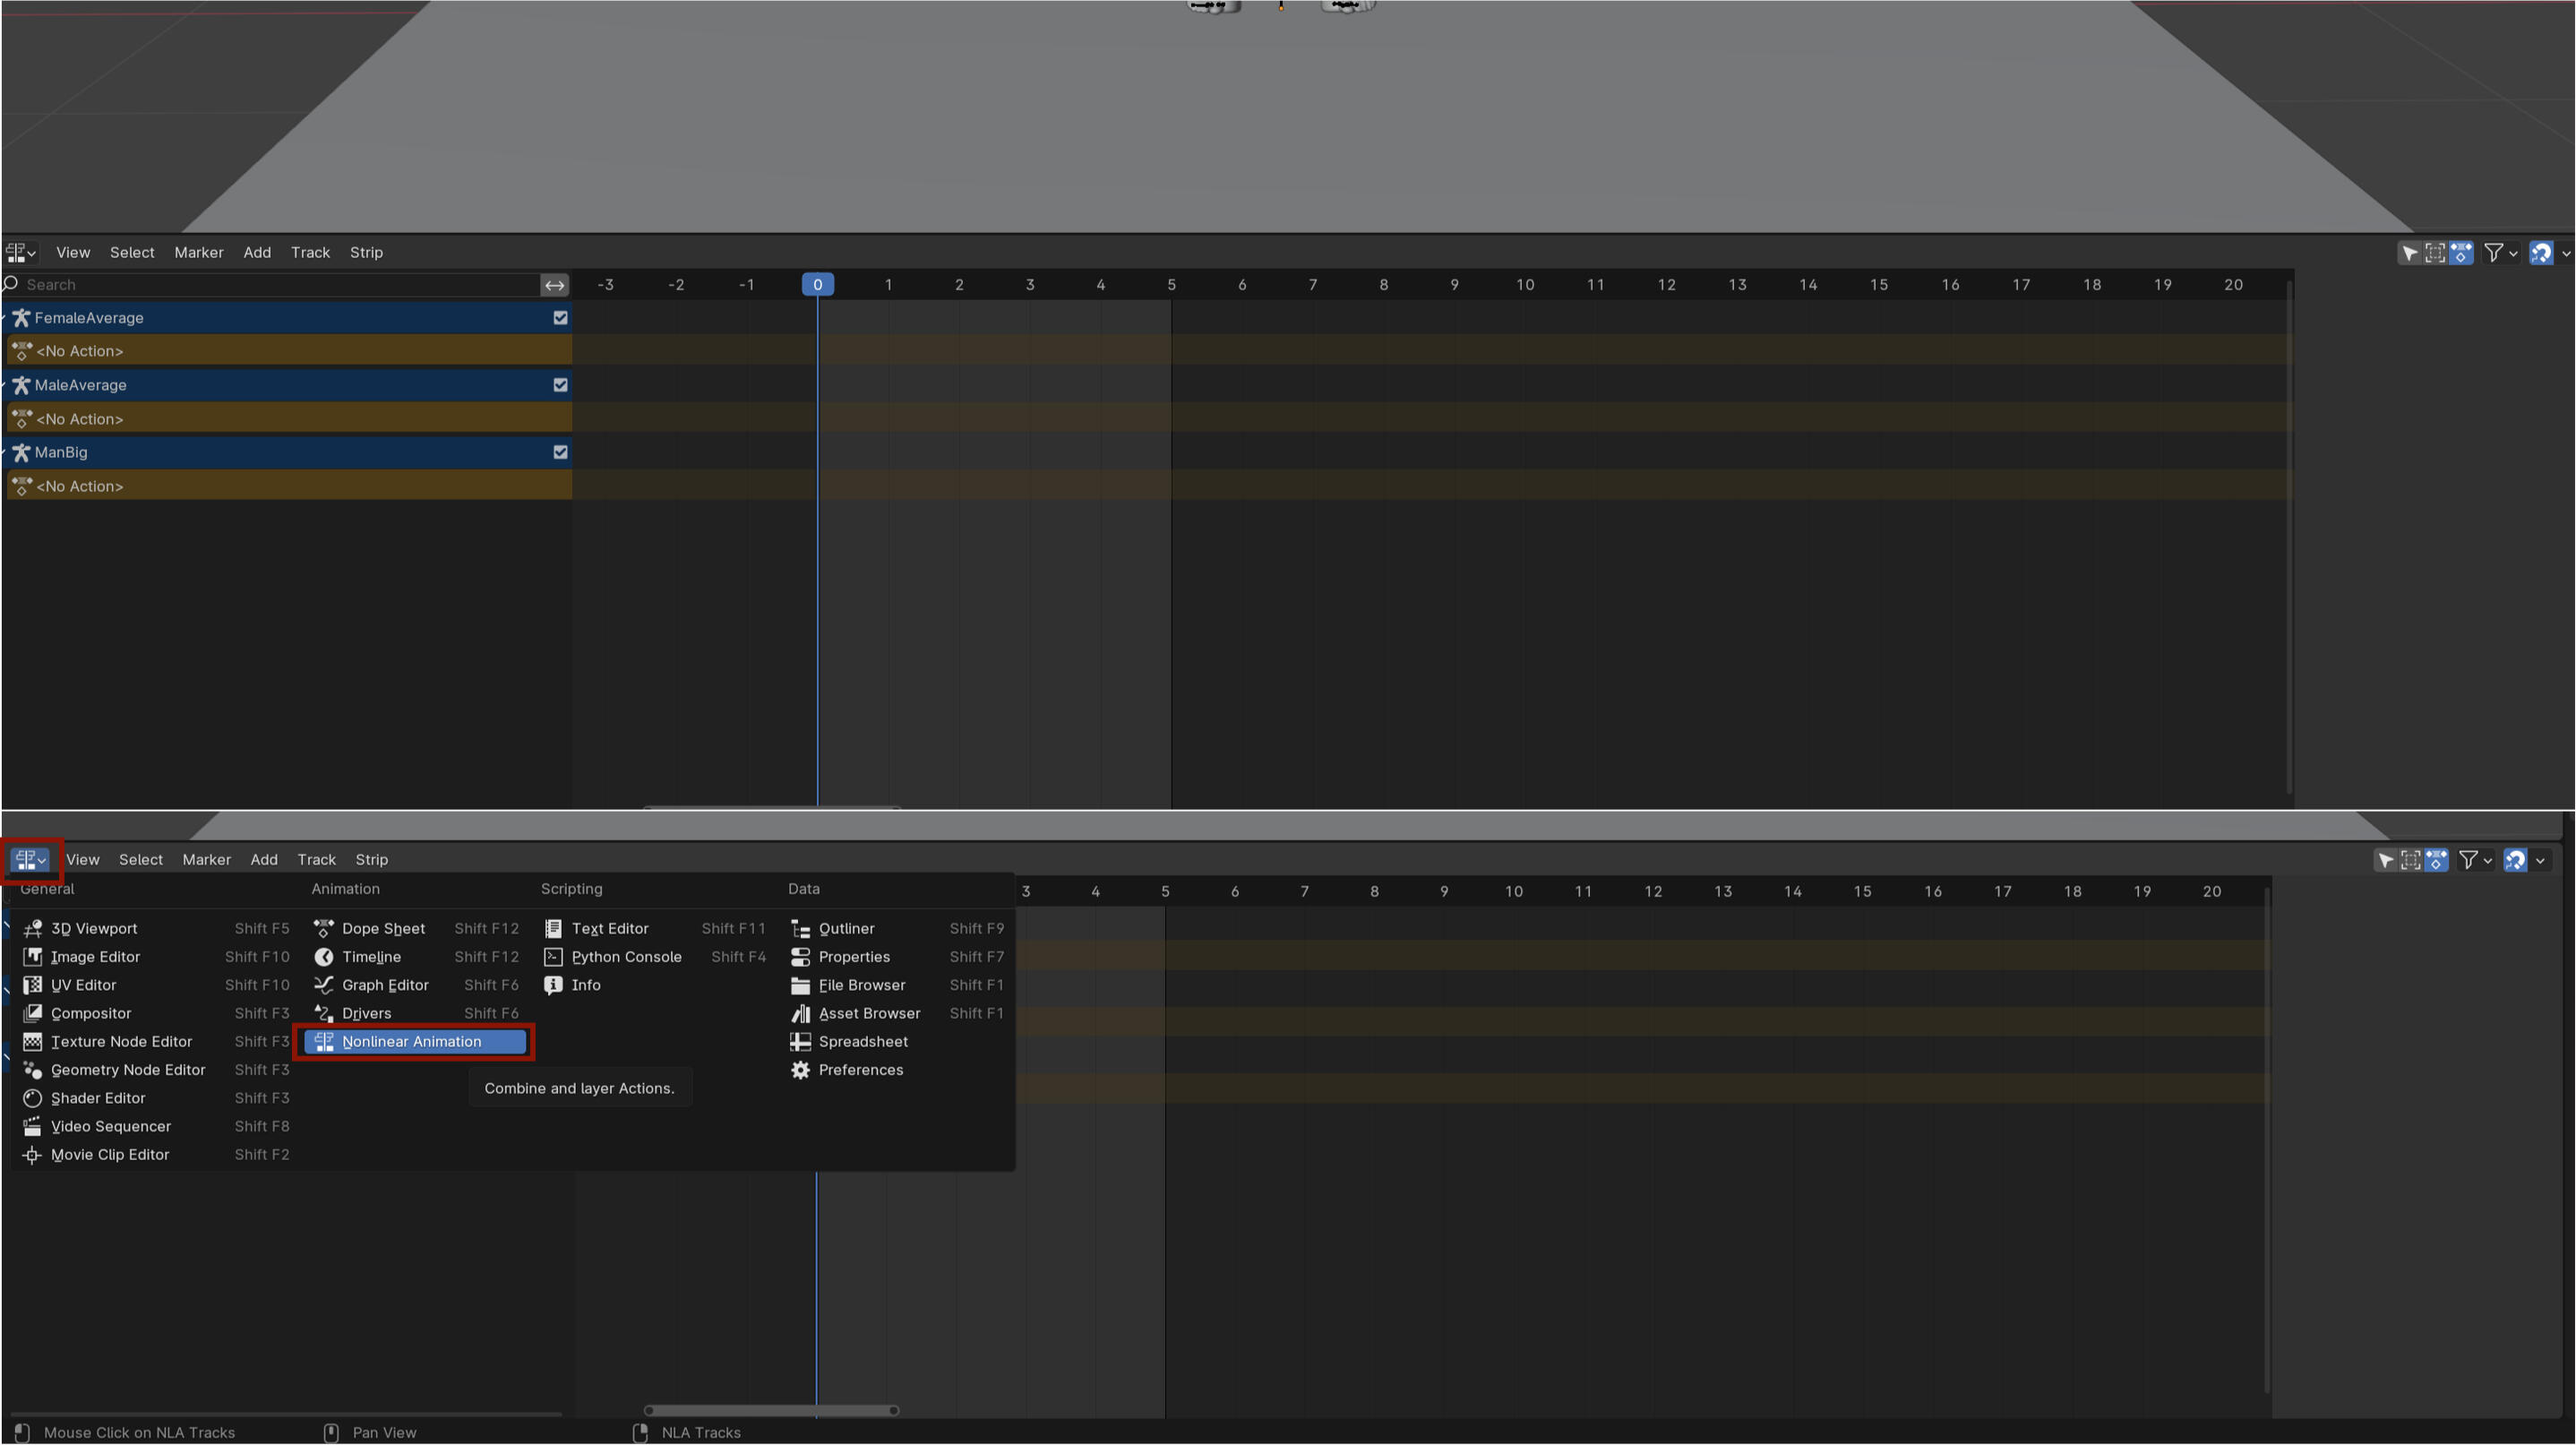
Below the Viewport is the Timeline. It's the window we will need to prepare our animations to export to Wolvenkit. I say animations because that is what the poses count as. You can absolutely make it smaller while pose making by hovering over the outside line and moving it down.If your Timeline looks different then what you see below we can easily fix that! In the top left of the Timeline is a little button next to View that you can press. In the window that opens select Nonlinear Animation. It will switch to the right view.
Alright then the right side. This is considered part of the full editor workspace and they all have official names like the upper area is the Outliner, the middle is Text Editor and the bottom area is Properties. I tend to refer to the Outliner as the Scene Collection cause it says so right there and it makes sense to me, the middle part is just text part to me and the lower part is Settings to me so Properties isn't super far off. I will try to stick to Properties for the tutorial but Outliner is not gonna stick so Scene Collection it is.The first thing I tend to do is close the text part. Either by moving it down or just right clicking and selecting Close Area. It's not needed and I like to have space in the Scene Collection especially if I am working with multiple props and body types.I am not going to explain the Properties area. You don't need it for regular poses but I like having it there just in case. I just scoot it down a bit.
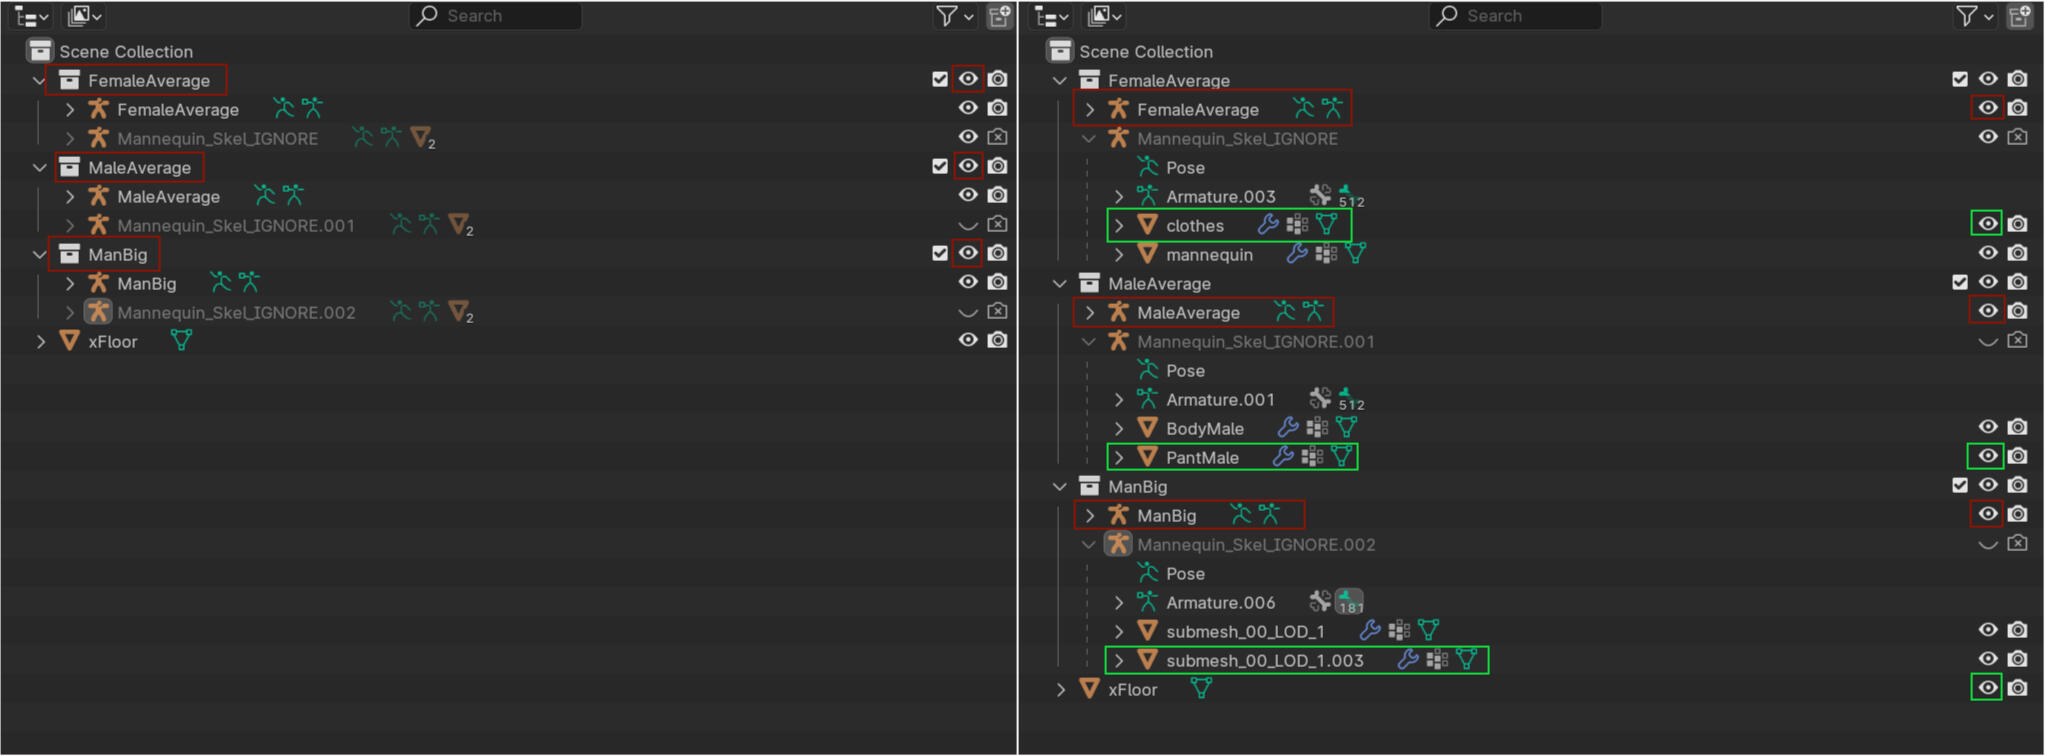
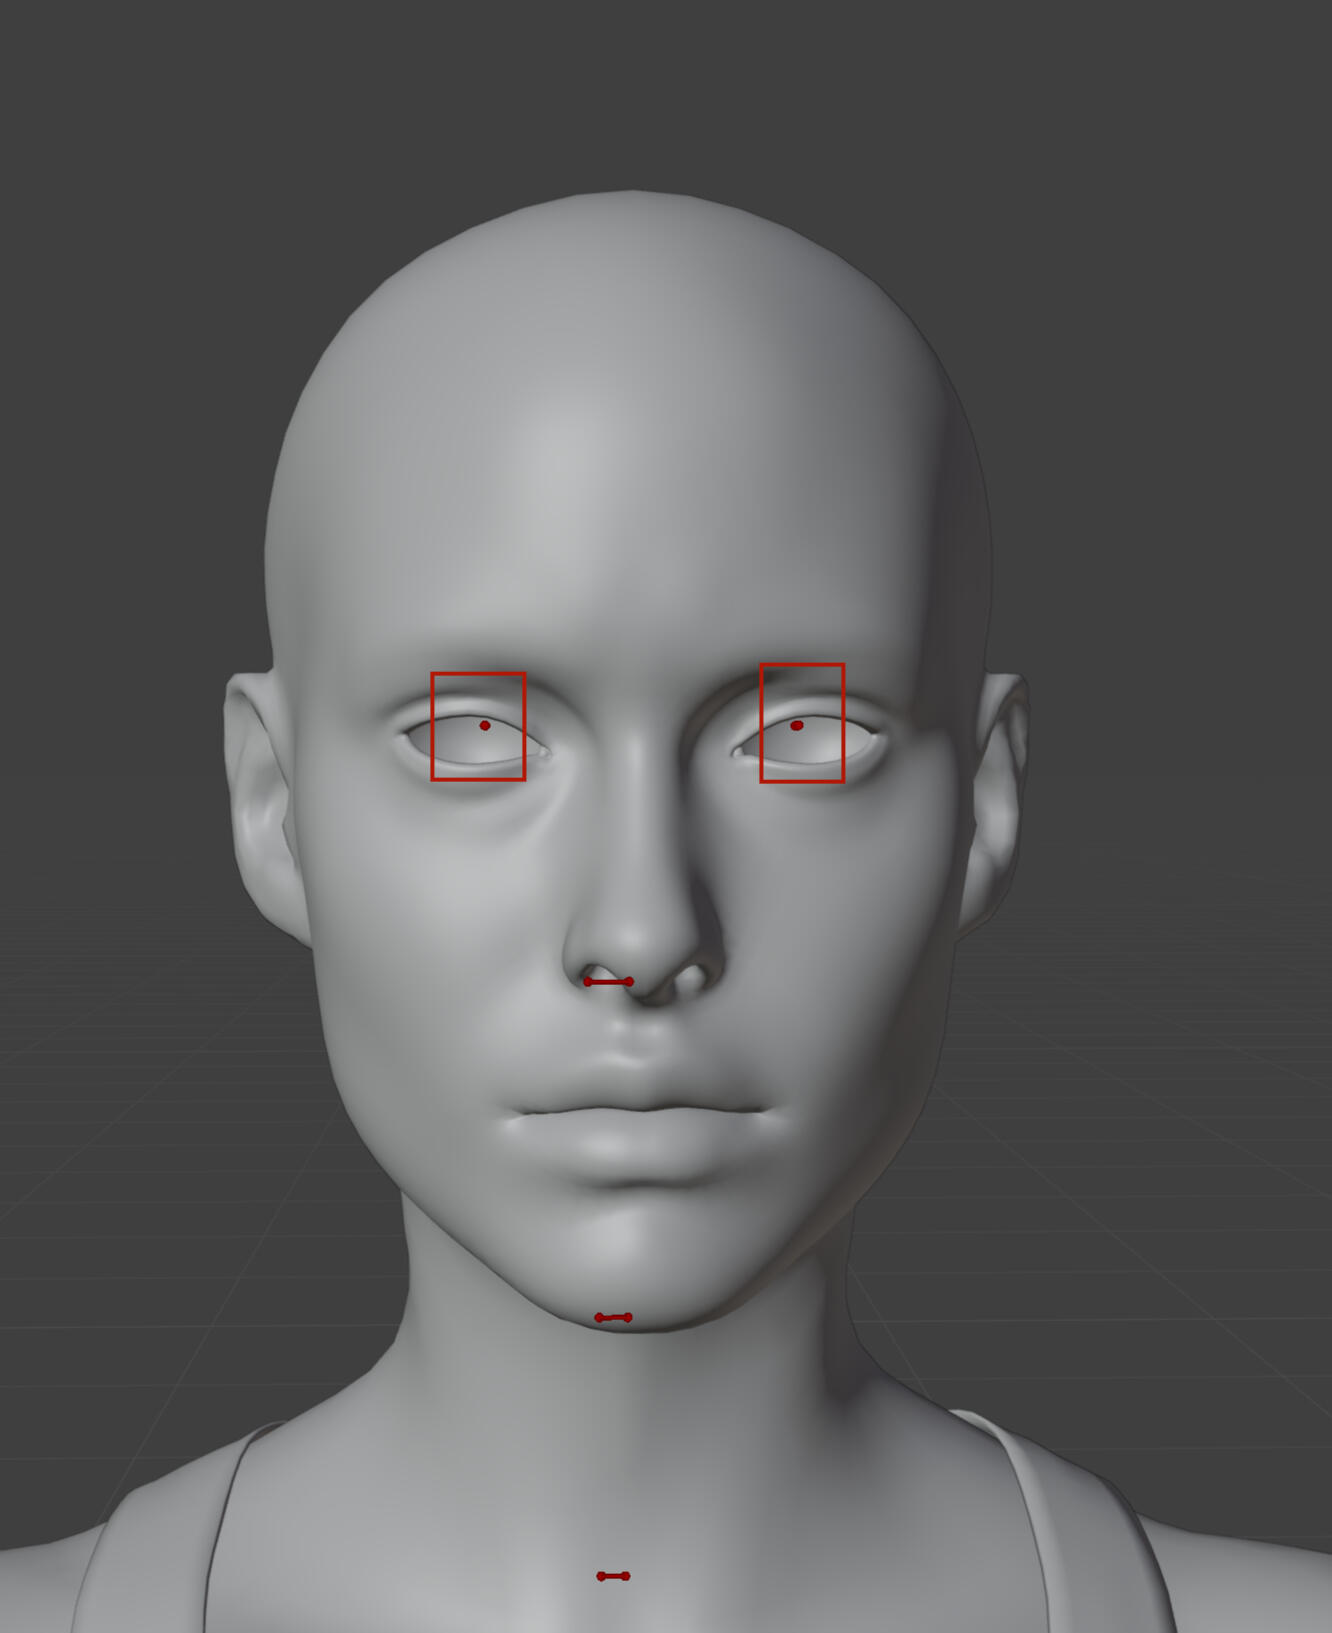
Now Scene Collection I will explain and show some things for. This is where all the stuff for the models is and you can turn them invisible with the eye icon on the right side. This is where your props will also appear if you add them and any other model bodies you may want to add for couple or group poses.In the first still I marked three collections. These hold every single little part of that particular body. You can turn it invisible with the eye icon. Anything you do while it's invisible will not apply to the body. So if I turn Female and Male invisible and just pose ManBig then nothing happens to the other two.In the second shot I have opened some stuff up. Mannequin_Skel_IGNORE can be nice to open up if you want to make the clothes invisible. That's absolutely a preference though so it's up to you! As for the red border ones those are the black dots, or bones as they are called, that will become red when you go to pose mode. Making that invisible allows you to look at a clean pose and take a screenshot without the bones distracting. Not a must but can be handy to know.Now you could open more things up but you absolutely do NOT need to. It adds nothing to your ability to make poses to mess around in anything else.Speaking of making poses...let's do it!
Posing Time
Alright we're going to switch Blender to pose mode. To do that click any of the black dots in the body so they turn orange. This means it's fully selected. In the top left where you see Object Mode click that and switch to Pose Mode. The dots should turn red. You are now able to make poses!

So I mentioned earlier that there are two tools we will use. One a little more then the other. The move and rotate tools. The move tool I use for one thing only and you guessed it it's to move to model around if need be. I only ever use it on the crotch area as that is the area you need to move your model.DO NOT MOVE THE MODEL FROM THE POINT ON THE GROUND.That's your center point/root bone in blender and photomode. You want it where it is or things will go wrong in photomode. Especially if you plan on duo/group things that needs to stay where it is to ensure everything moves perfectly in place. Leave it where it is and don't touch it.
Then there is the rotate tool. Your best friend. The one you treat the kindest of all because it get's it all done for you. Yeah this is what you use to make poses. You can click any red dot/bone and move it with this. Some parts have more movement then others. The elbow for example has less movement because it cannot rotate wherever it wants just like in real life. Play around with it, figure out what part does what. Select multiple things at the same time and go ham.
So very technically that is the pose part. I cannot tell you how to make the poses you want to make, I can just tell you what tools you need to make that happen.However I can give some pieces of advice to make your life a little easier so you don't have to learn the hard way like I did. If you don't care for that though move on ahead to exporting.Deaven's Posing TipsEyes! You may be looking at them in Blender and wondering how you're supposed to tell where they are aimed at and how to see that. You don't. In fact don't touch those eyeballs, leave em alone. Those along with the ground bone you just don't touch. It either adds nothing or breaks stuff.
On the topic of eyes, eye tracking is broken. Basically what happens is when the eyes aren't facing forward to the Y position in Blender they will still snap there in game when using the look at camera option in photomode. So when your pose includes your character turned and looking off to the side the look at camera option will make the eyes snap to that front spot. This may seem harmless but moving them in photomode becomes limited or near impossible with some poses.I tried to capture it in game but this did almost blow up my PC (it doesn't like screen capture and cyberpunk being active at the same time) so it's not perfect. The pose I used is part of a couples pose but can be used as stand alone. The body is moved forward it's like that in Blender as well, I did not rotate it in any way. The head however is turned sideways. When I turn on the look at camera you can see the eyes move to look forward.In the second gif I try to move the eyes back and you can see it takes a while to move and at some point just stops because there is a limit to the slider. While it's fine enough to work with for this pose for plenty of others it can be an issue to not have the proper eye tracking. There is a way to get around it, sort of.
Remember the xyz axis? Yeah that is going to help us in this case. When you open your blender file the model is facing the Y position (the other one is -Y). Make your pose and then click on Y so it switches view modes. Rotate your model so the eyes are facing forward in the Y position. This way the eye tracking will work perfectly and people can easily rotate the pose to however it needs to be for what they have planned.It's a bit annoying and extra work but being able to place the eyes properly is really nice. However this does not help when you have couples poses and the couple is facing each other. In that case it's either screw eye tracking or screw the poses syncing properly together. The only other option for couples poses is using the poses through AMM. The eye tracking does not seem to be affected in AMM but does require a bit of practice to use properly as AMM just works differently from PM.If anyone knows an actual fix for this I would love to hear it! If there is ever a fix I will of course update this page.
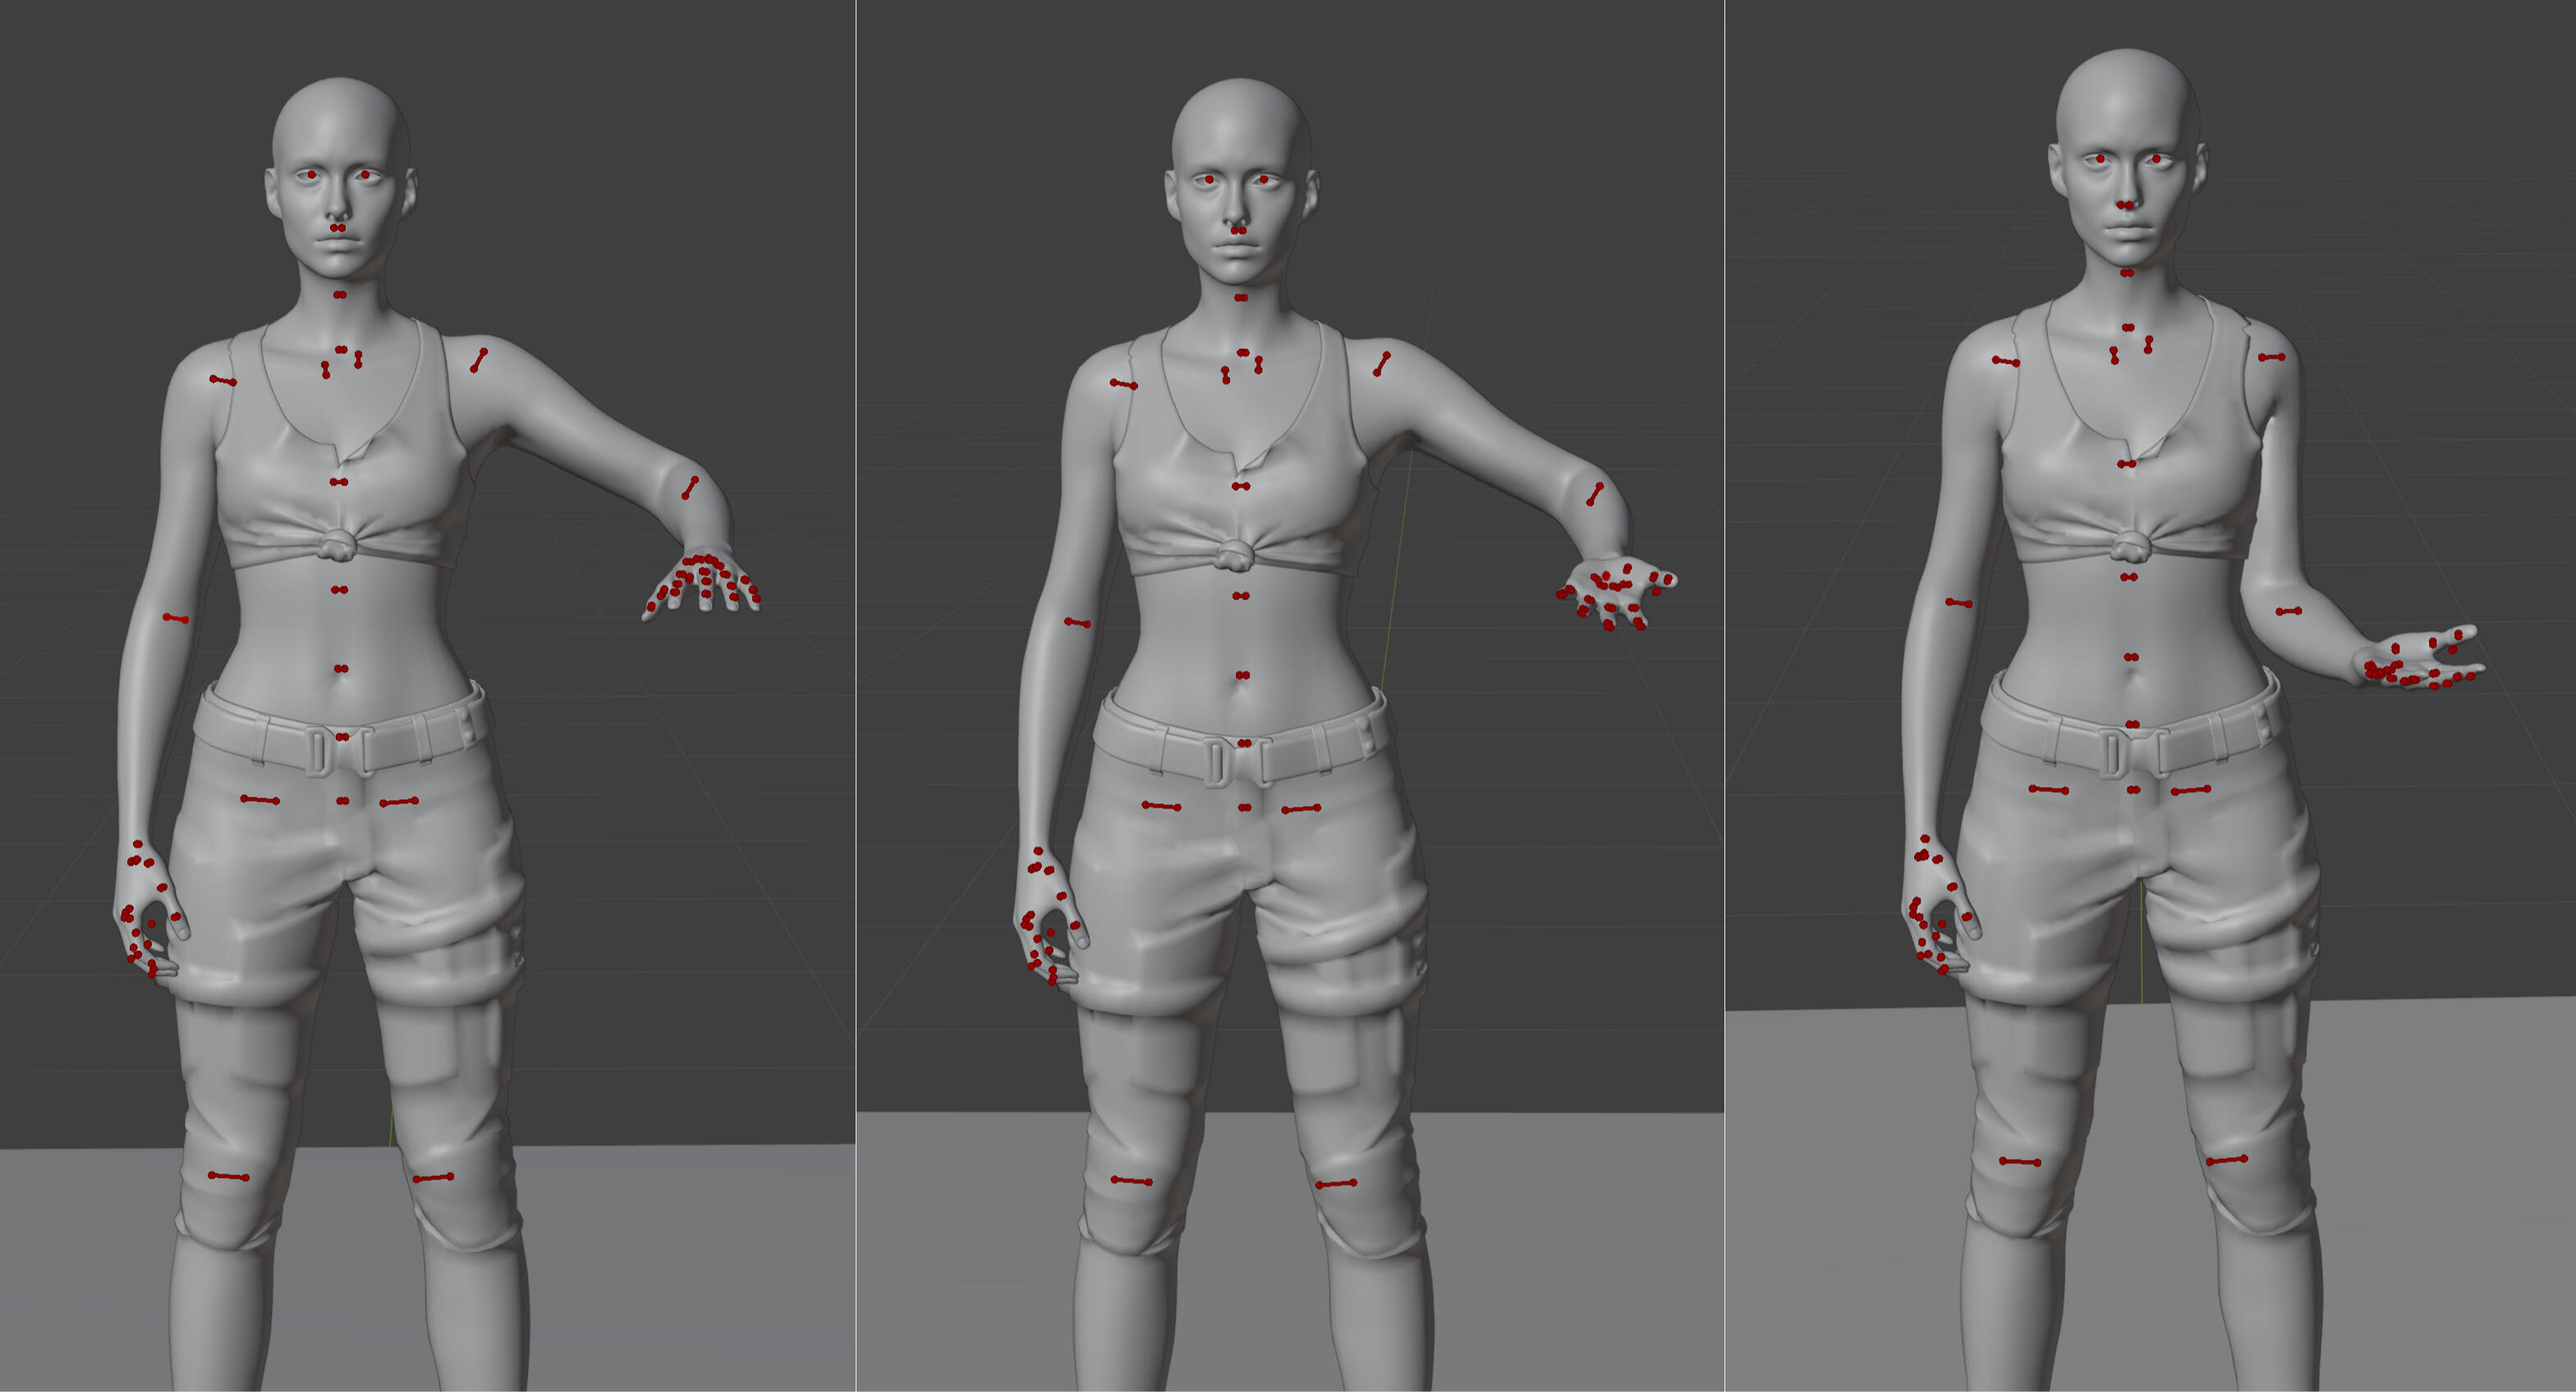
Next tip is if you can try to do the pose you want to make yourself. Reference pictures are great but sometimes doing a pose yourself helps you figure out where body parts actually go. The wrist, elbow and shoulder can be really annoying at times to get right, especially if they are covered by clothes in your reference images.Let me show you just how odd elbows and shoulders can move. Try to copy the first pose below yourself (only if you comfortably can). It's holding your arm up and bended at the elbow with your hand outstretched, palm facing down. Then try to copy the second pose where the palm is facing upwards. You'll quickly notice your elbow will not stay in that position as your shoulder turns with your wrist. Your arm will look more like the third picture. (this is assuming you don't have things like hyper mobility and such)This is why I suggest trying poses yourself. I can turn the wrist in Blender to have the palm face up while the arm stays in place but that is just not how bodies work. Obviously there are little bits you can get away with in posing just to make it look a little bit more appealing, especially since the bodies in Cyberpunk don't have flesh that squishes together it just clips. It's a balance you have to find between realistic and what looks good.
A thing that can really help with moving things into place is grabbing and holding the rotate tool. You can use just the lines but for some parts its easier to just move all three lines at the same time. Just hover the mouse in between the lines like in the image below, click and hold the left mouse button and move the mouse.
Collarbones move! Use it in combination with the shoulder to lift the arm for a more realistic look!
Like above with the shoulder and collarbone you can select other bones together as well. Like below I have the four upper body ones selected and can move them all in one go for quicker posing. Just hold shift and click the bones you want.
If at any point you need to fix things ctrl + z can help and if it's too long ago you can always right click the correct bone and select clear user transforms.Pose making is really just practice. Make a bunch of them and see how they look in game. If something looks busted in blender (the legs and ass with sitting poses for example) don't worry it will look fine in game.We all started somewhere and no one made perfect poses from the start. Just have fun with it and give yourself the space to learn and improve over time.
Exporting to Wolvenkit
Now that you made your poses you obviously want them in game. For that we need to export your poses to Wolvenkit.My process in this is that I make all my poses, saving them separately and then copy pasting them into one Blender file. Trust me this will make sense as I walk you through it. The reason I mention this is because technically you can make all your poses in one blender file but if you accidently mess up and overwrite a pose it's gone and you have to redo it.So assuming you have saved each pose separately let's get started! Open up your first pose and a clean model file. I'm using FemaleAverage but the steps are the same for MaleAverage and MaleBig.
Now we are going to select all the bones from the pose. Just hover the mouse in the viewport, click and hold the left mouse button and drag it over the model to select them all in one go.Then with the mouse still in the viewport (it wont work if it's outside the viewport) click ctrl+c and move over to the unposed file. Click in that viewport and keep the mouse there then press ctrl+v and your pose should copy.If it doesn't work try again. Really make sure the mouse is in the viewport. This might seem silly to hammer on but that is where things go wrong so often for me.There is also a little notification at the bottom of your screen when you copy the pose. If you see that then it should have copied properly.
If for whatever reason you don't want to use shortcuts or can't use them then you can always use right click to open a dropdown menu and select Copy Pose and Paste Pose.
Now close your original pose so you don't confuse them. We will continue working in the pasted version for a bit.In the top left bar select Pose, Animation, Change Keying Set and in the new menu select Whole Character.In the bottom left there will be a little window showing the Keying Set. It will disappear with the next steps and that is fine but then you know it worked!As you get the hang of pose making you may find it easier to have your mouse in the view port and press Shift+K to open the menu but this is how you get there through normal menu's.
Next we will go back to Pose - Animation and then select Insert Keyframe. You will see the timeline change a bit! You have added your pose to it making it an animation the game can read! Now we need to do this twice more to make absolutely sure the pose will work properly.
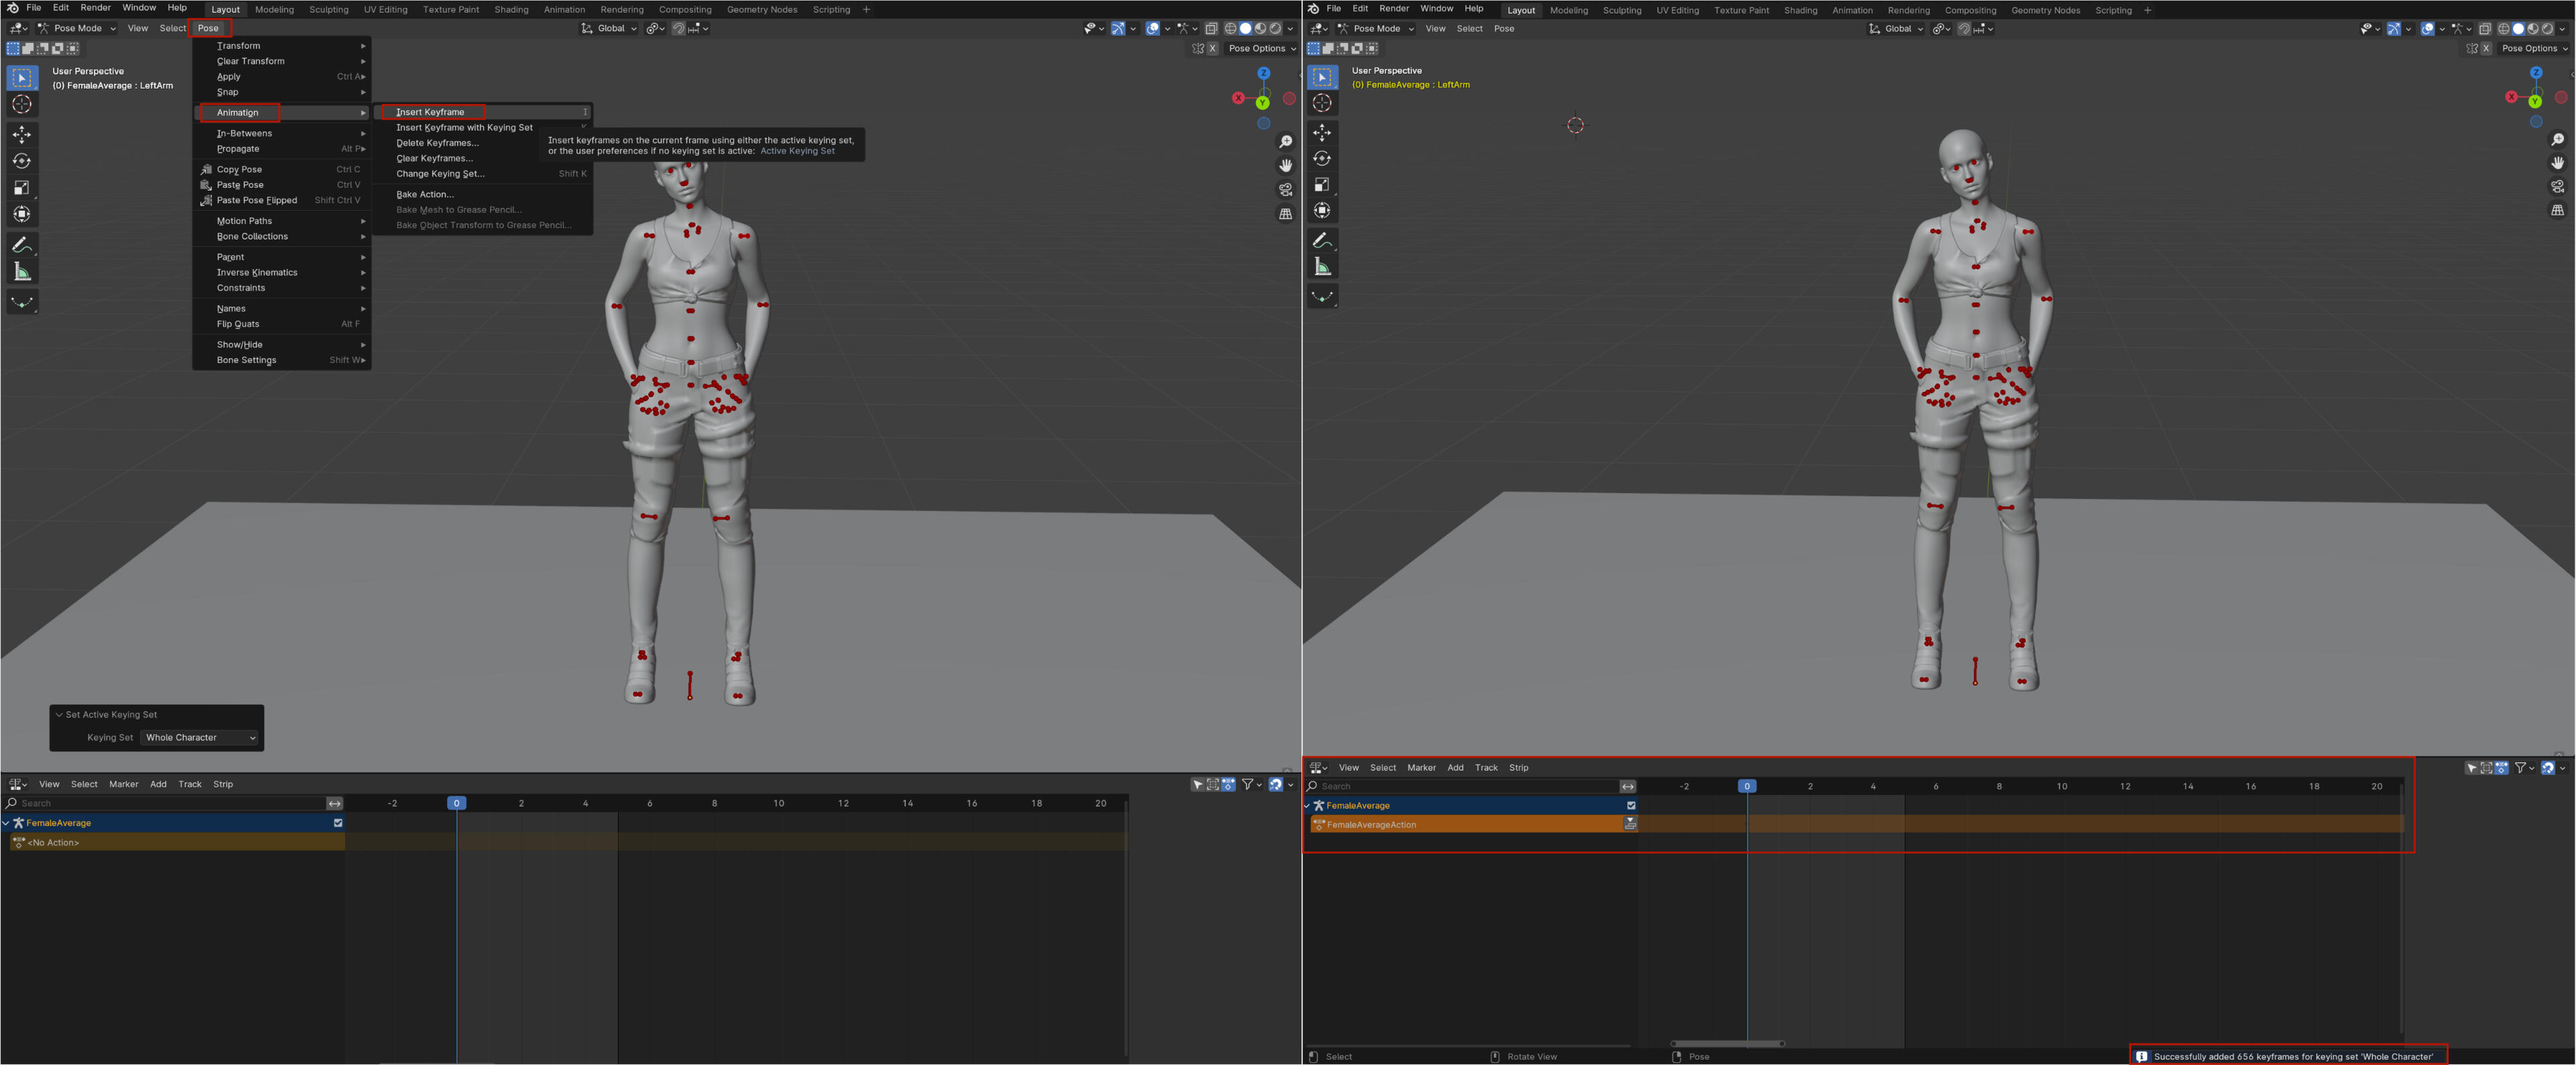
You can grab the blue line in the time line and scoot it over by one and then insert another keyframe. Do it again so you have three of them. Three is good enough but if you really want to be safe you can have four or five of them.

You may be wondering if you need to do this for every pose and yes you do. Now you may think that this will take forever and with this method yeah it would but there is a faster way to do this. I just want you to have the knowledge to be able to do it this way as well in case you may not be able to use the faster method one day for whatever reason. Can't ever hurt to have knowledge of the program you are working with it!You probably noticed that behind Insert Keyframes it says I (i). So that is the first thing we need to remember. The next thing to know is that you can move the timeline with the arrow keys. With those two things in mind here is what you're going to get used to doing.After selecting the whole body in the earlier step, make sure your mouse pointer is in the Viewport and press
I - right arrow - I - right arrow - IAs you can see below, including selecting the whole body with shift+k, this goes much faster. You'll get quite fast at it the more poses you make.
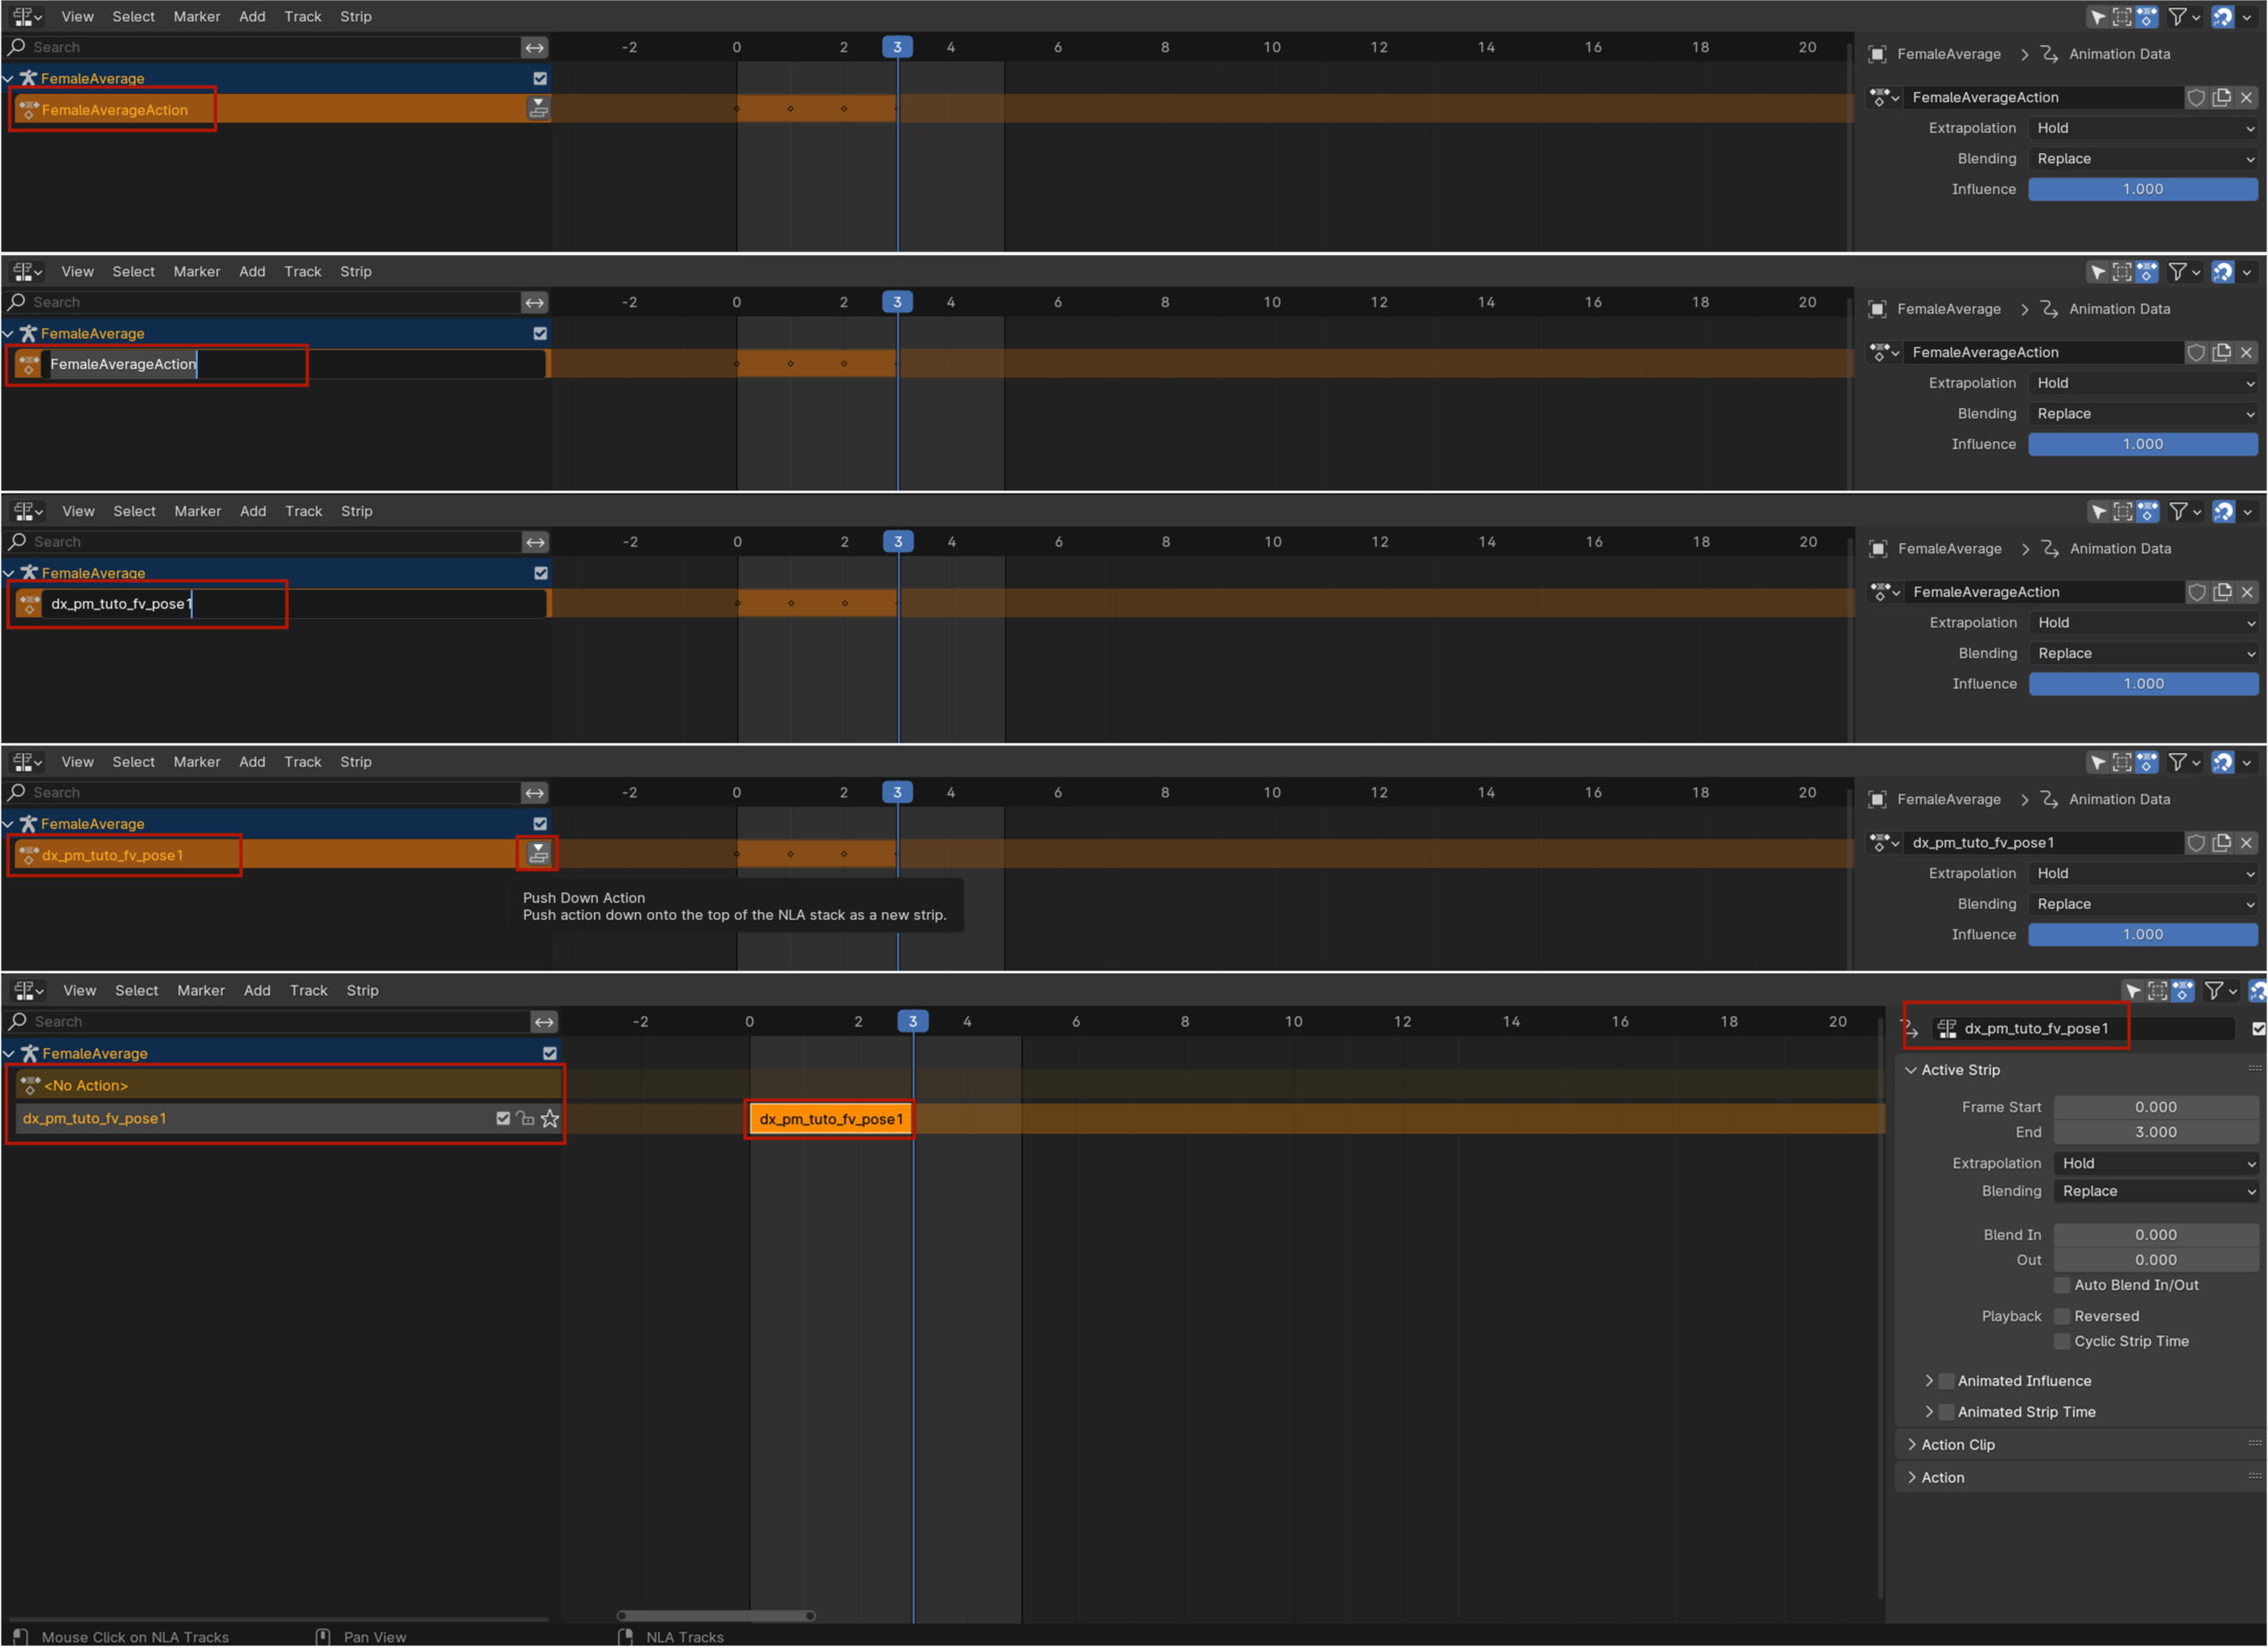
Next we are going to name the pose in a way that we can use later to link to this specific pose and the game will know what to show. Sounds complicated but it's not.Double click on FemaleAverageAction in the timeline so you can adjust the name. Change the name to something unique. I prefer to use my name shortened, a short version of the pose pack name, the body type fv/mv/mb and then the pose name or number if the name is long. You can also just name it the pose name and leave it at that. Entirely up to you.Once you have the name for the pose press enter then click the push down action next to the name. This will move it down as it's own separate animation and allow you to add a new one without losing this one.Lastly check that it's really moved down and you have a No Action tab. Also check that the name you put in matches what is in the middle of the timeline and the name on the right side of the timeline. If all those match then it's all good! If it doesn't match try again or adjust it on the right side till it matches. You can just type there so no worries.
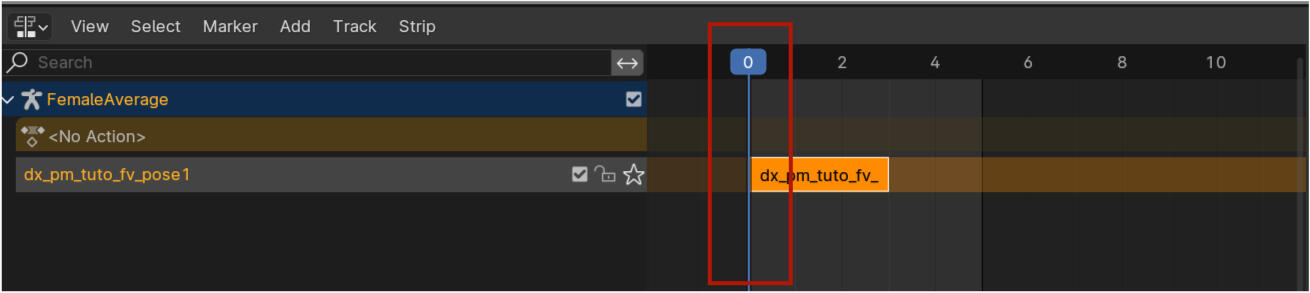
For pose packs we can now continue to add new poses. I'm only doing two FV poses for this tutorial but I will show you so you know how it works to just add more to this file. You can add however many you want if you follow the same steps again and again.Before we open our second pose though move the timeline back to 0. Always do this before adding in a new pose. If you don't then the new pose will just disappear when you move it to make the new animation.So click and drag it to 0 or use the left arrow key to move it back. Don't worry if you forget sometimes, I still forget occasionally after a year of pose making. 😅
Open your next pose! And copy paste it over the one we have been working with!
Now we just follow the exact same steps as above. Pose - Animation - Changing Keying Set - Whole Character (or Shift+K with the mouse in the viewport and then Whole Character).Then Pose - Animation - Insert Keyframe - Move the frame by one - and repeat or just do it the fast way with your mouse in the viewport and I (i) and the right arrow key.
Double Click on FemaleAverageAction in the timeline, change the name, enter and use the push down action next to the name. Exact same as you have done before just make sure to name this one differently. I copy pasted the first name and changed the 1 to 2 in this case.
Move the line in the timeline back to 0 and like this it is rinse and repeat for every pose in your pose pack. If you end up with a lot of them and you want to check you have them all just click the little checked box behind the name in the timeline. Like this you can turn off every pose and see the pose below it.
Once you are done we are going to save this onto the anims file that we exported from Wolvenkit all the way in the beginning (80 years ago).Select any bone in your model then switch from Pose Mode to Object Mode in the top left.

The full armature should be orange in Object Mode that means it's fully selected. If it's black click on any of the black bones so it get's selected.Next we go to file in the upper left corner, find Export and then select Cyberpunk GLB. This should open a new window.Friendly reminder my version may look a little different as I am on an older patch.
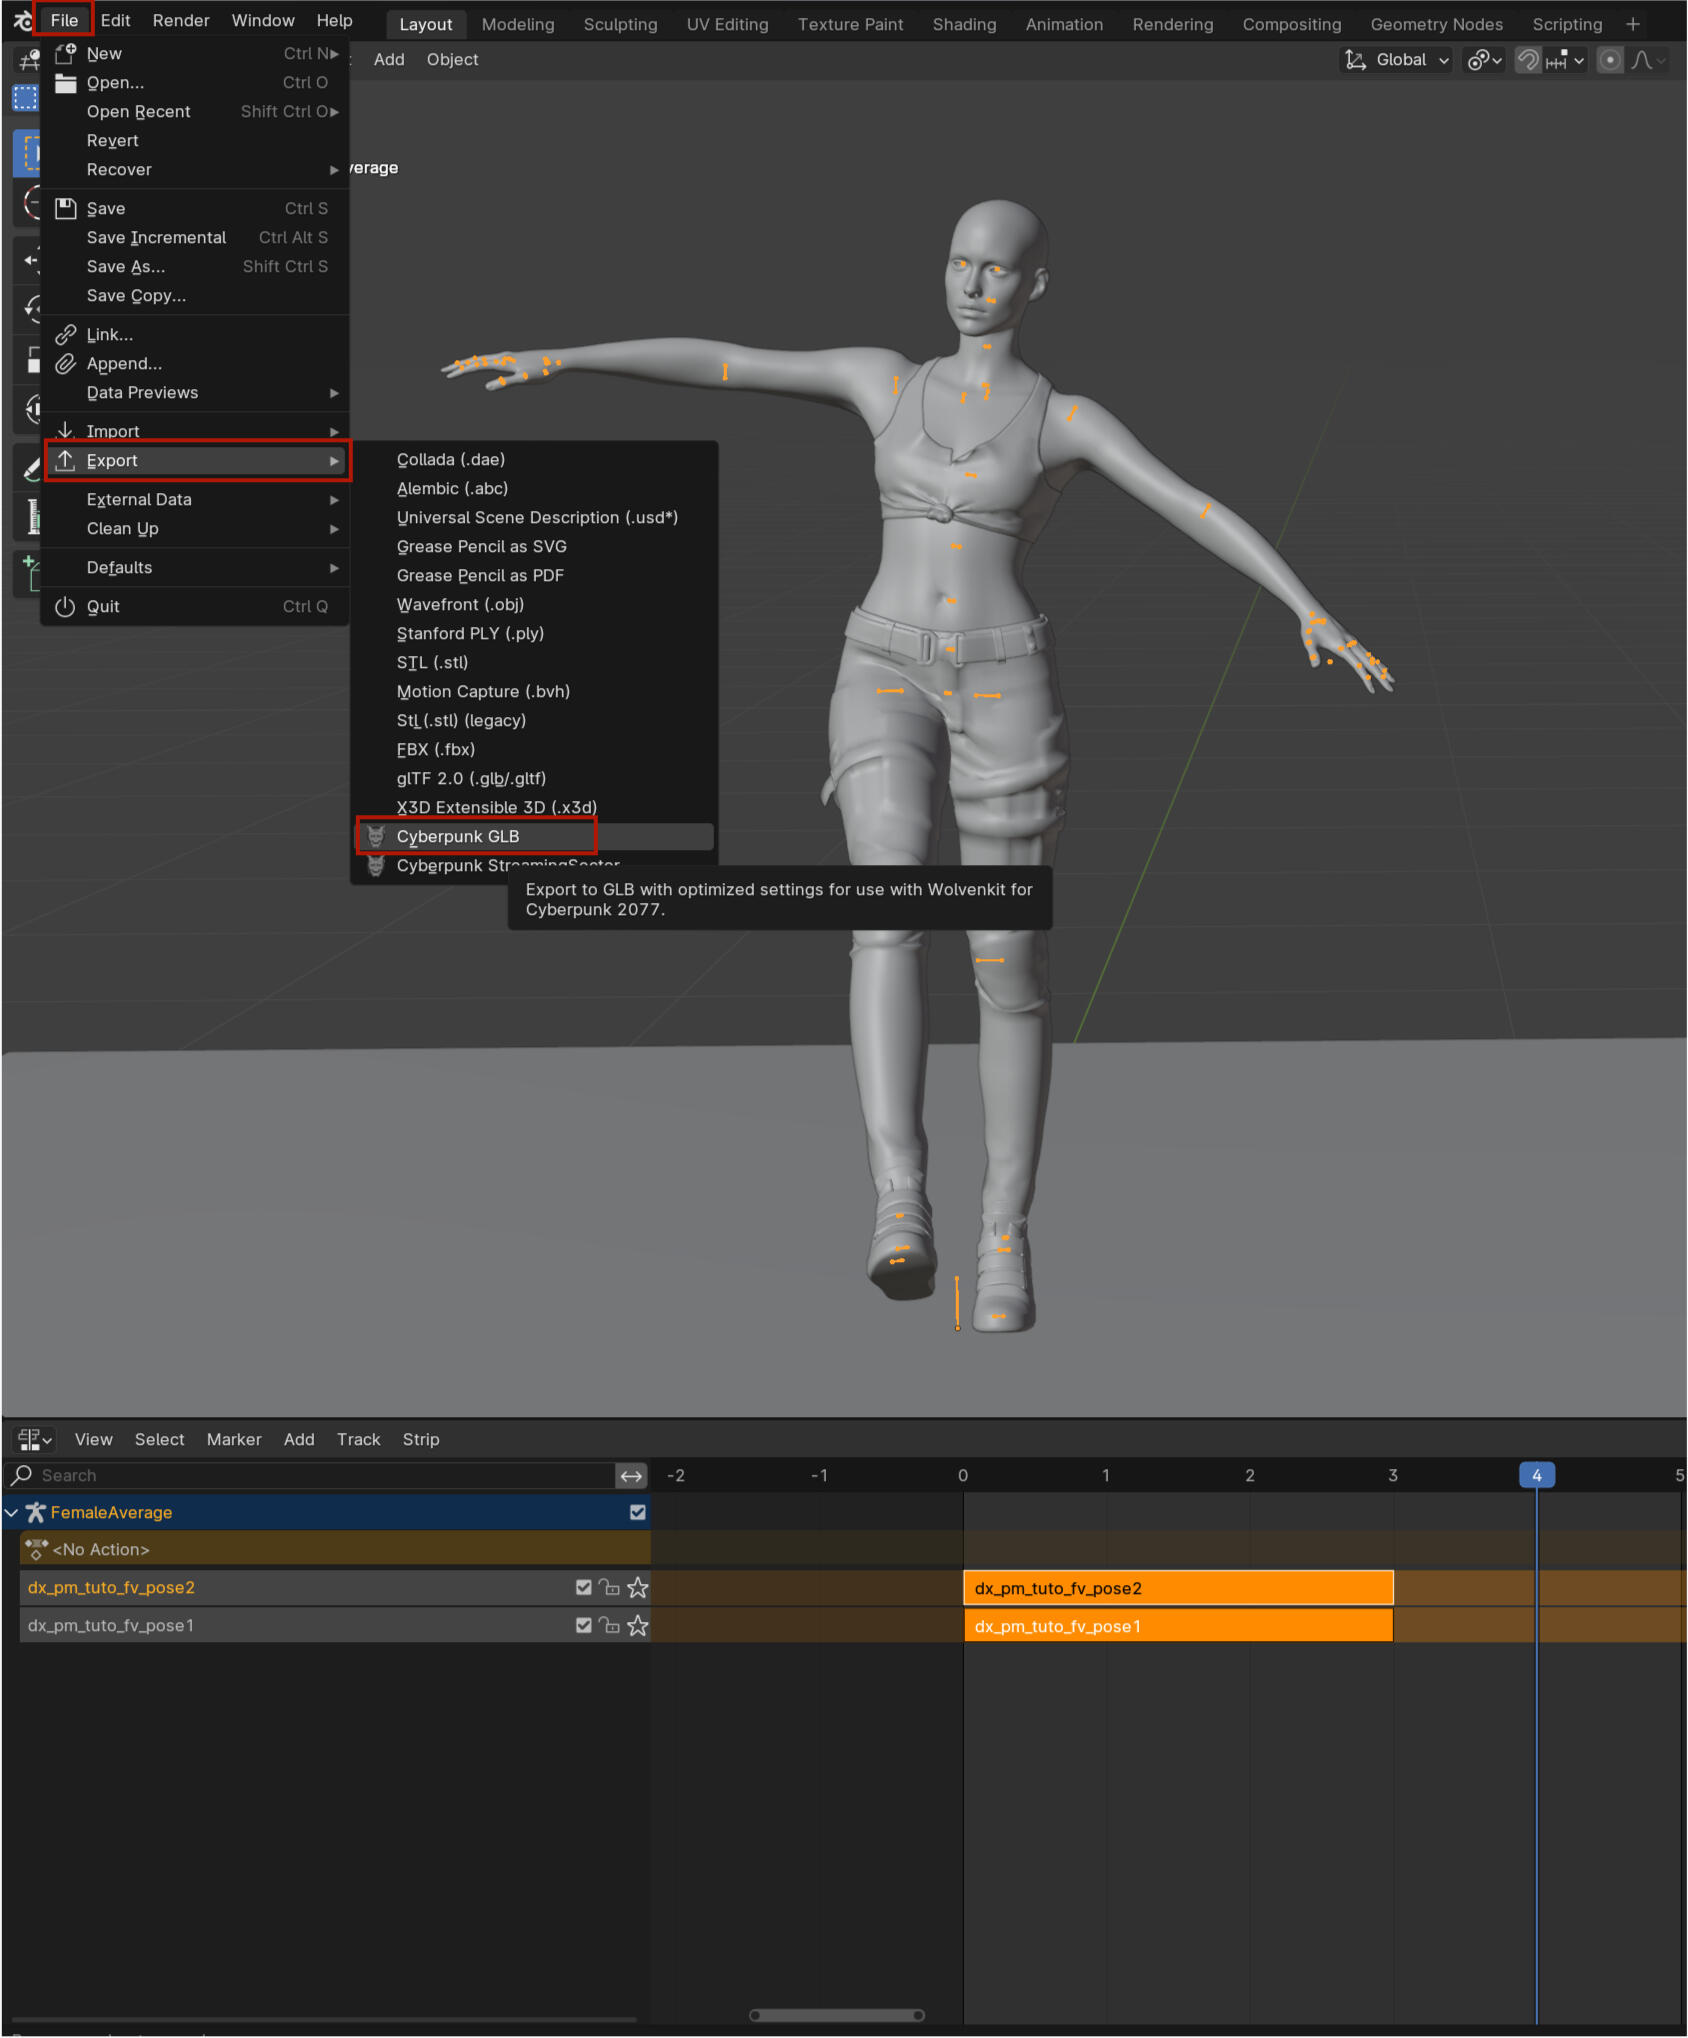
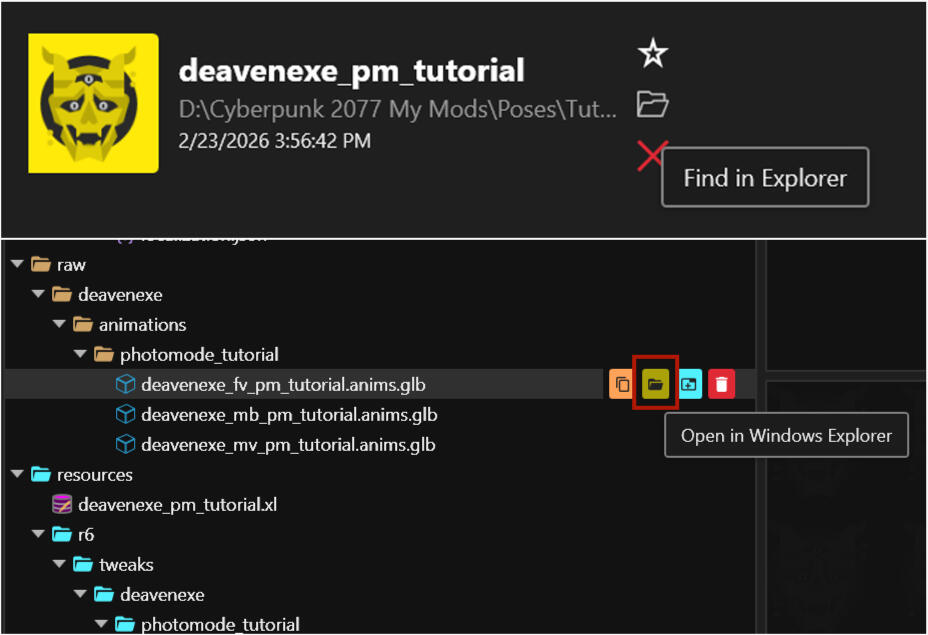
In this new window you want to find your wherever your wolvenkit project is saved. If you cannot recall you can open Wolvenkit.On the main screen before going into your project you can click the little folder icon to go there directly and then just follow what is in the top bar.Or if you want to go directly to the glb files open your project in Wolvenkit and under raw there should be anim glb's from exporting the anim files earlier. The little folder icon is your friend here as well and will open a new window with the files. Follow the path in the top bar.
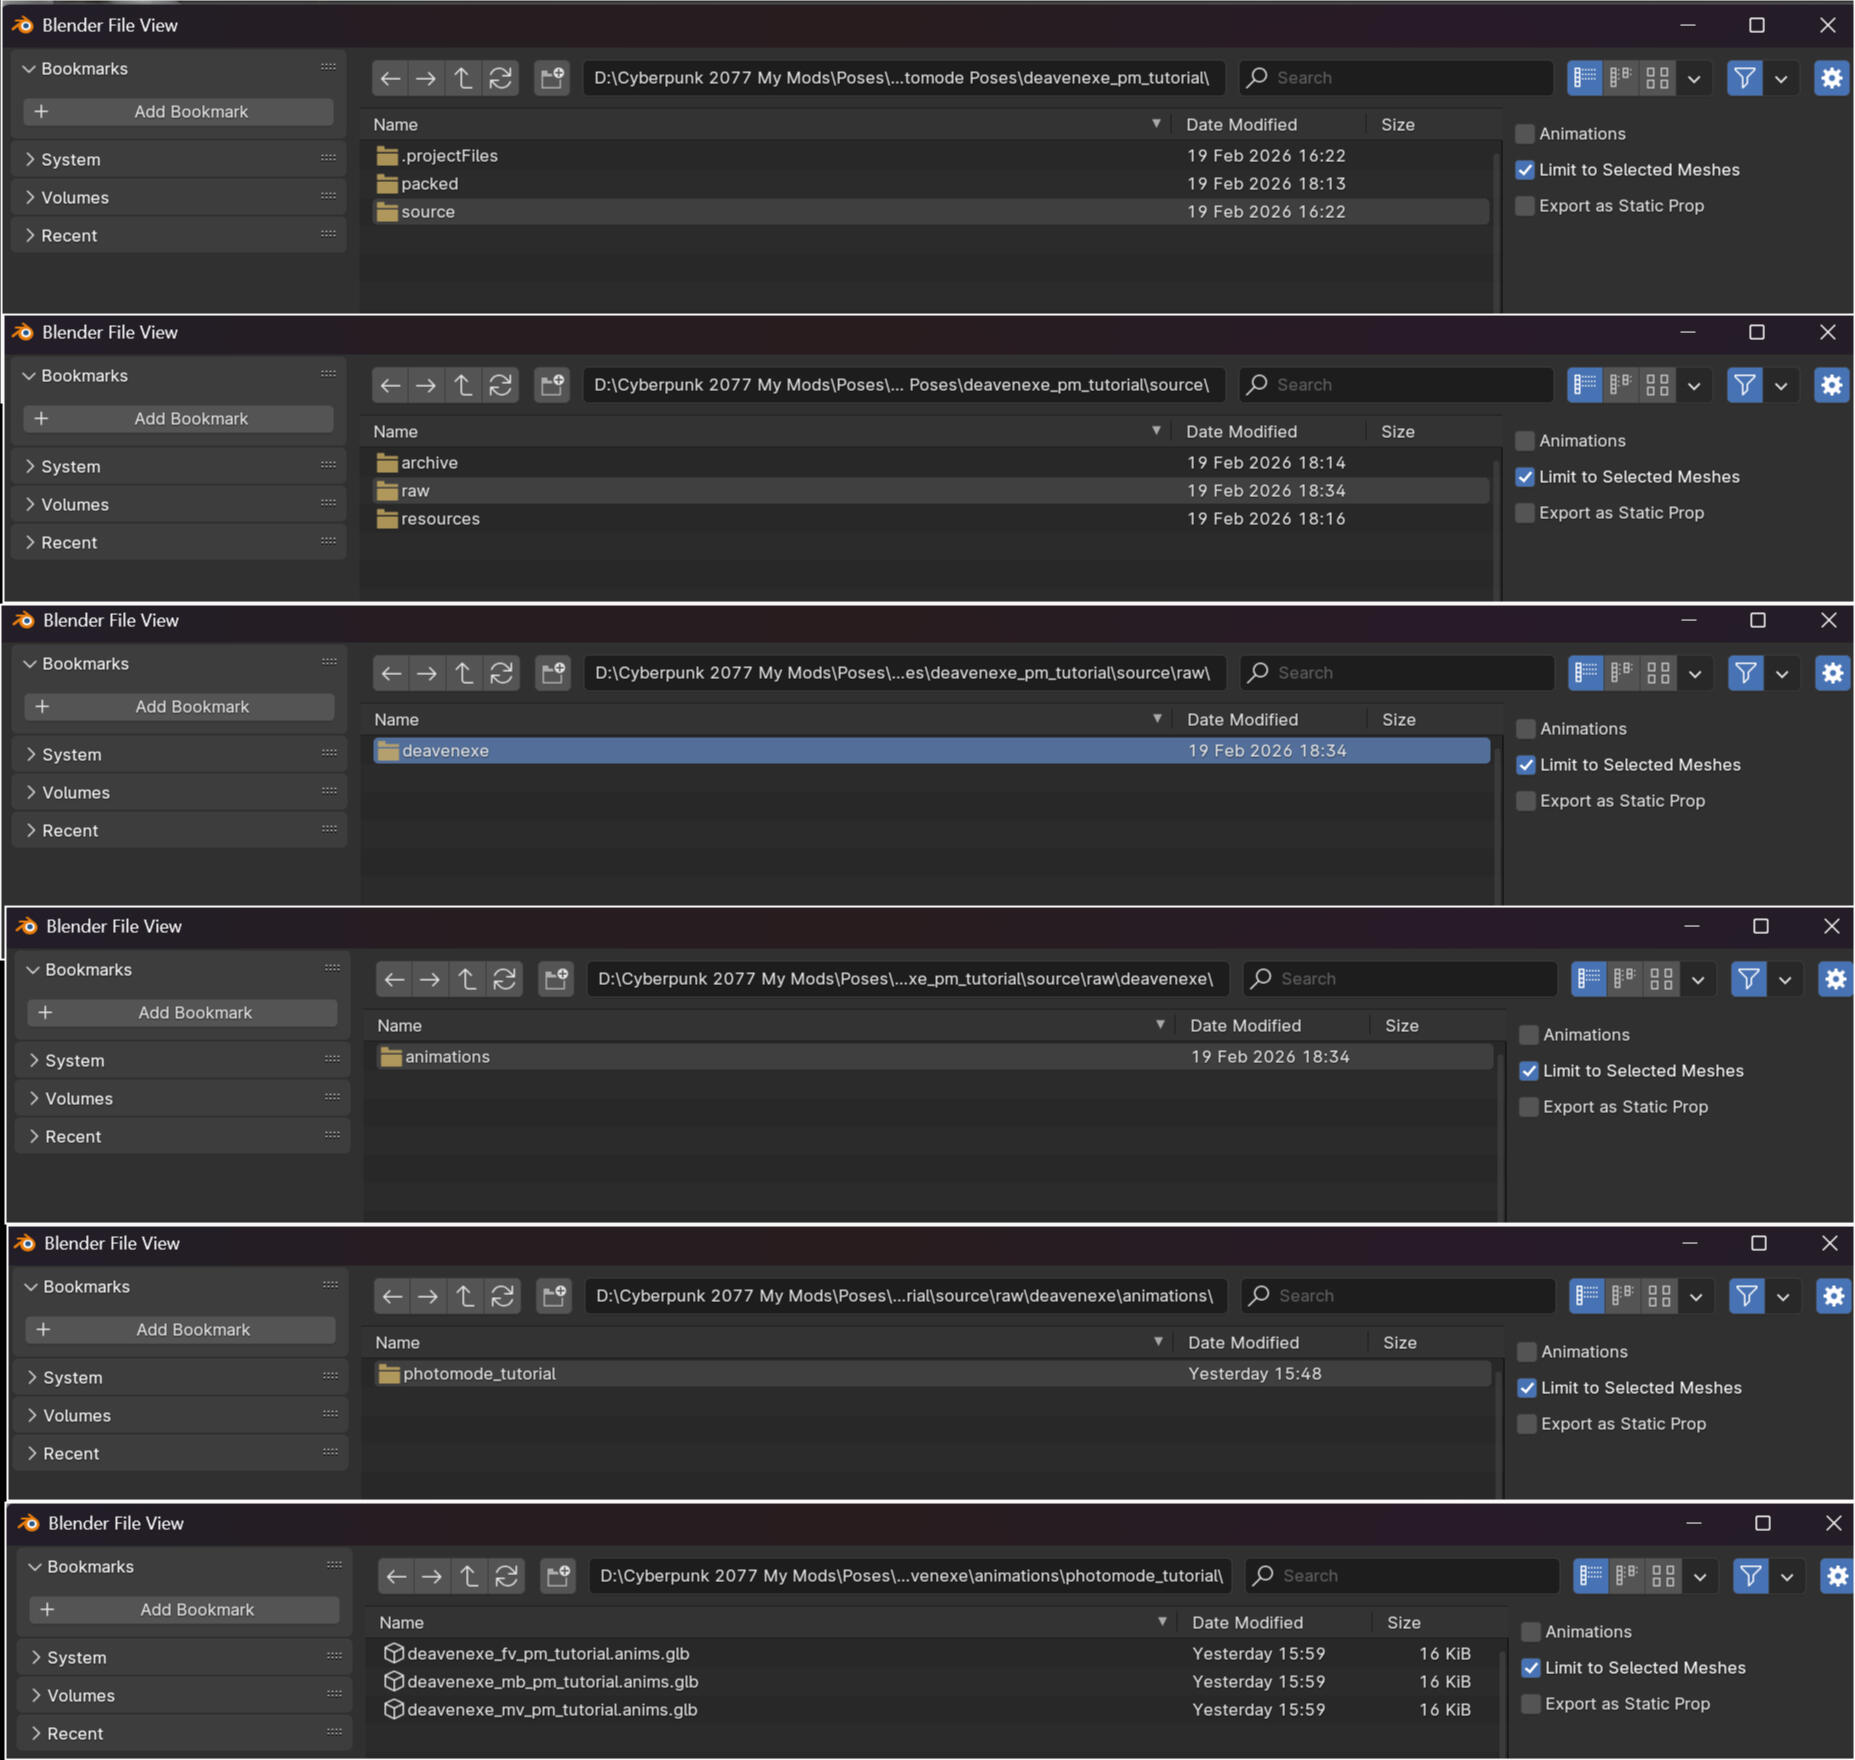
Once you are in the project folder in the blender window we're going to click through a bunch of folders. Start with source, then raw then just the single folders that should be there until you get to the anims glb's
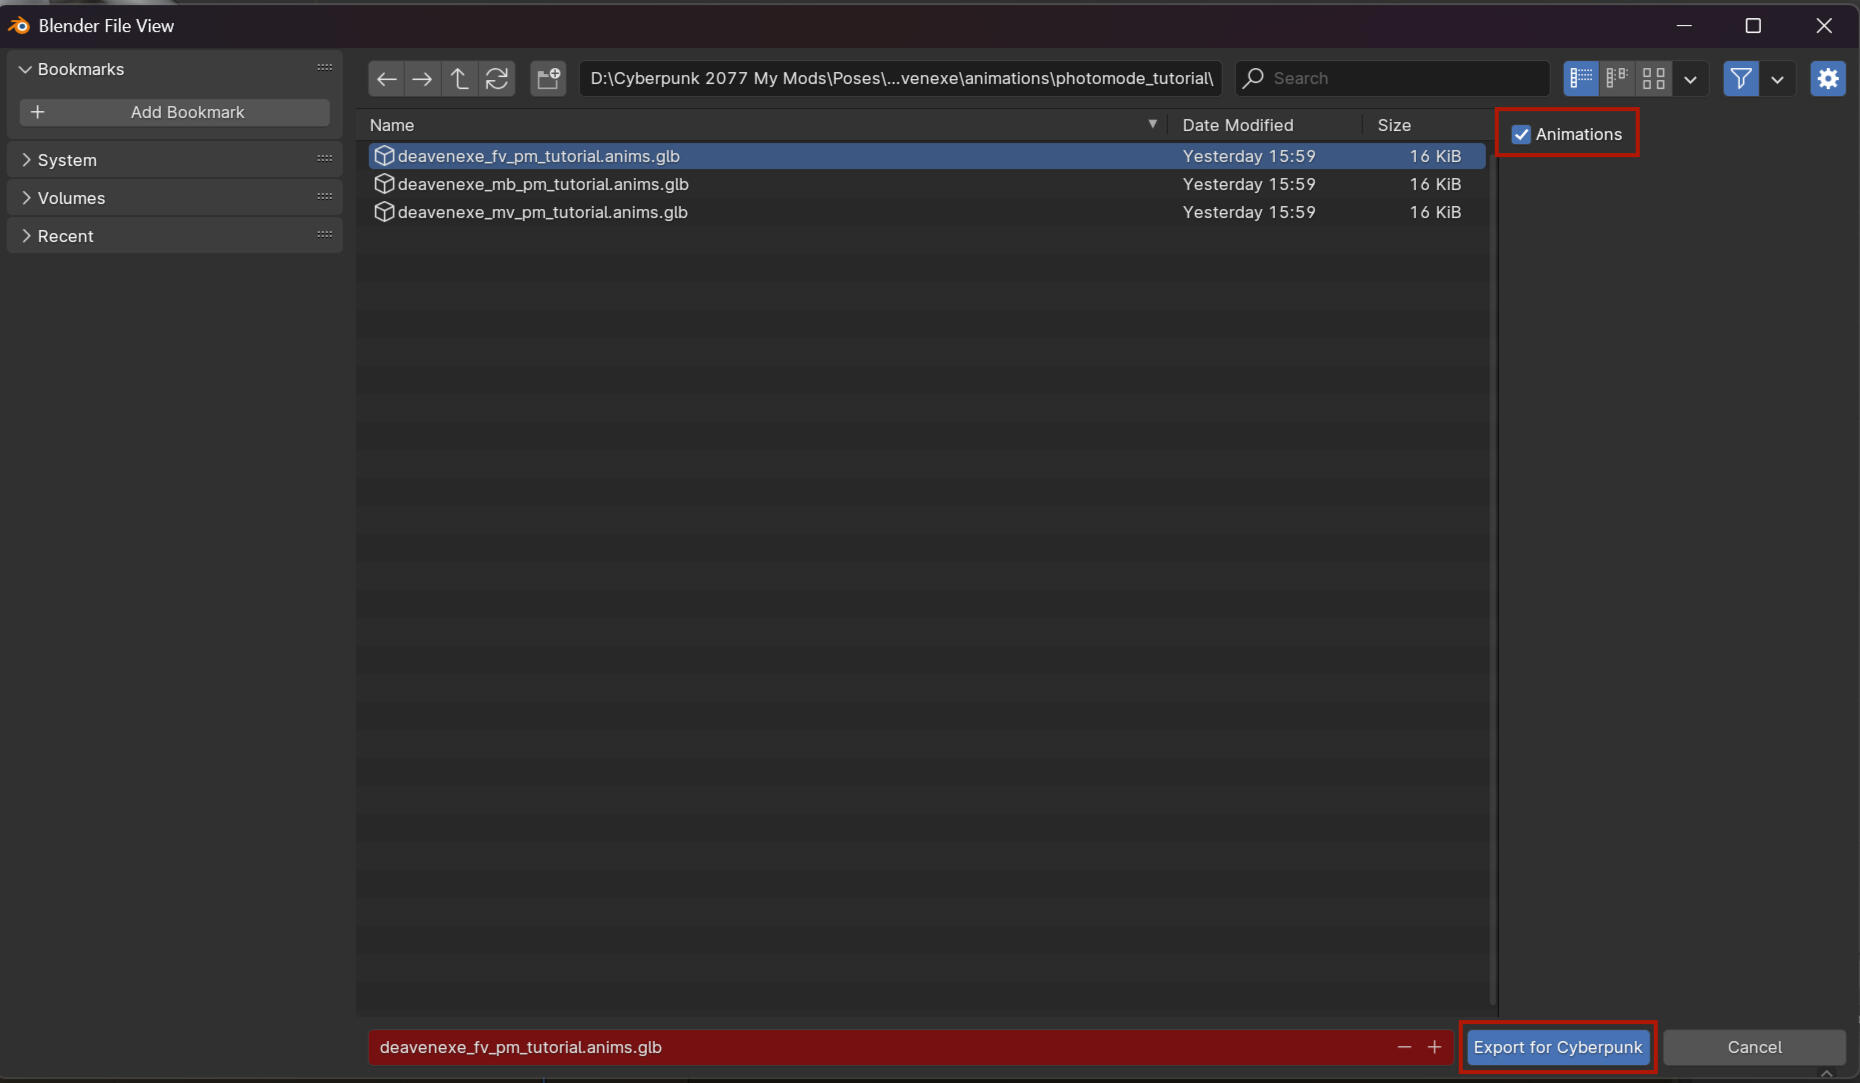
Click whichever file applies to the model. In this case for me its fv so that is what I will go with. Change the setting on the side to Animations! This is important it won't save them otherwise.So with the setting changed to Animations and the right anim glb selected click Export for Cyberpunk! The window should disappear and that should be it in Blender.If however Blender has little screens popping up with text something is wrong. Usually for me its the fact that I forgot to click Animations but it will tell you what the issue is and then you can fix it! Sometimes it even links to solutions so you can follow the links and do what those say. It's never gotten that bad for me though so it shouldn't be the case now either. If you do get stuck with something feel free to send me a message and I will do my best to help!Quick note: Only export one body type at a time on a save. For example this blender file has the bodies for Male and MaleBig in it as well. Do not make the animations for them in the same file as the female ones. This is because ALL of them will save onto whichever file you are saving them on. So if you have all three done and save it onto the FV file then the MV and MB poses will be in the FV anim as well where they do not need to be. That's just extra work deleting things in Wolvenkit later.
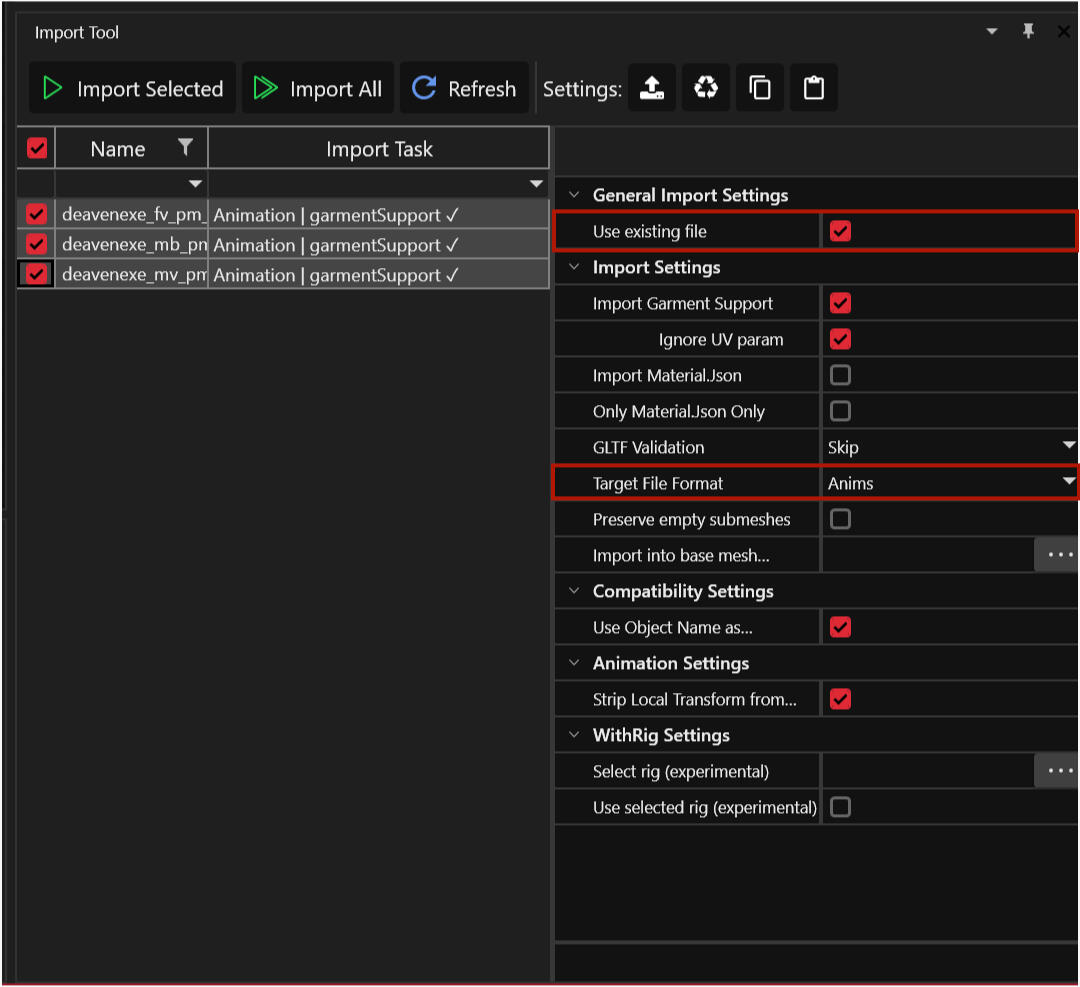
Now we go back to Wolvenkit! Time to import our poses there! Select your files that you want to import. Setting wise make sure existing file is checked and Target File Format is on Anims. If the settings don't look the same you can make them look the same but other then those two it's really not the biggest deal.
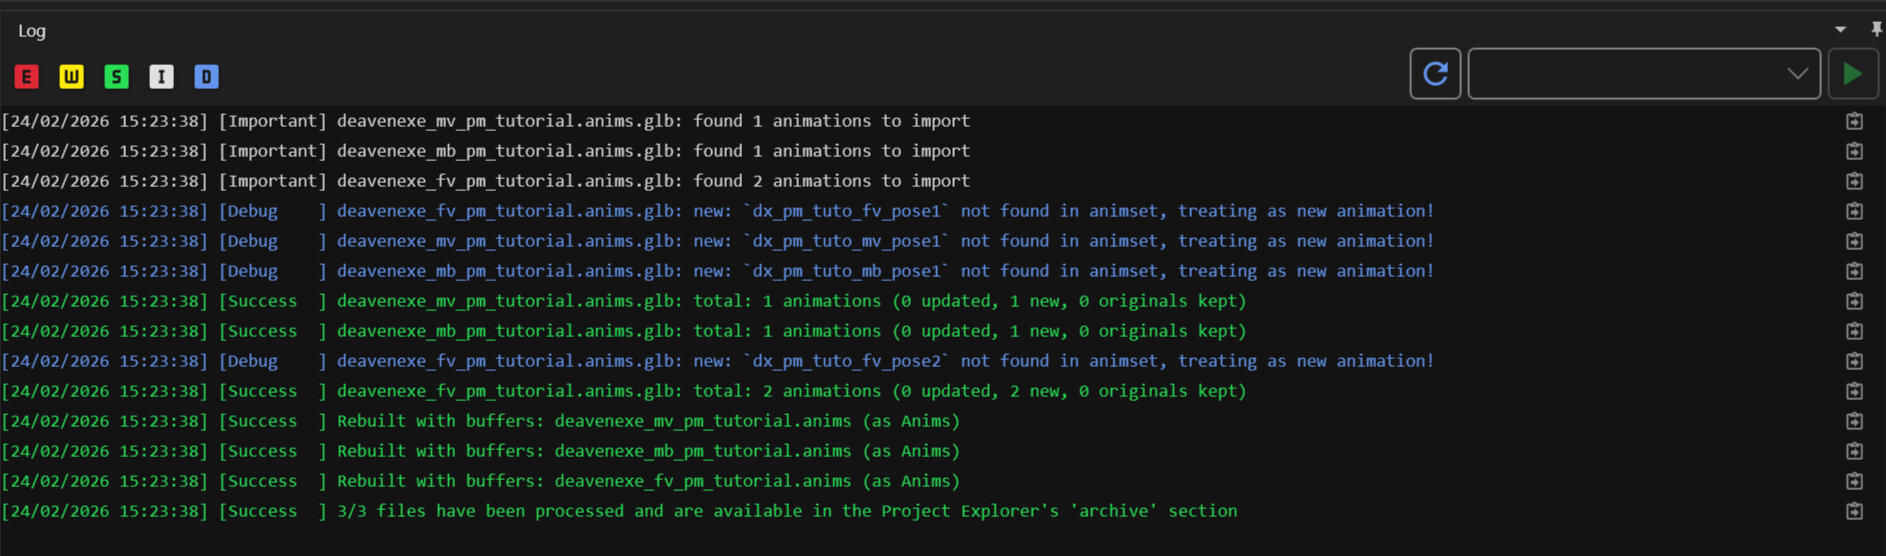
If all looks good click import Selected and Wolvenkit will do the thing! I instantly added poses to mv and mb for later tutorial purposes but this all looks good! As long as nothing is red we are doing great.You may notice the purple parts say its being treated as a new animation which is great. I just wanted to add that it will look a little different if you later fix or change a pose a bit in blender and you import it with the same name again. It will say something about updating it so basically it just overwrites the original pose with the new one. No need to delete or change the name or whatever.
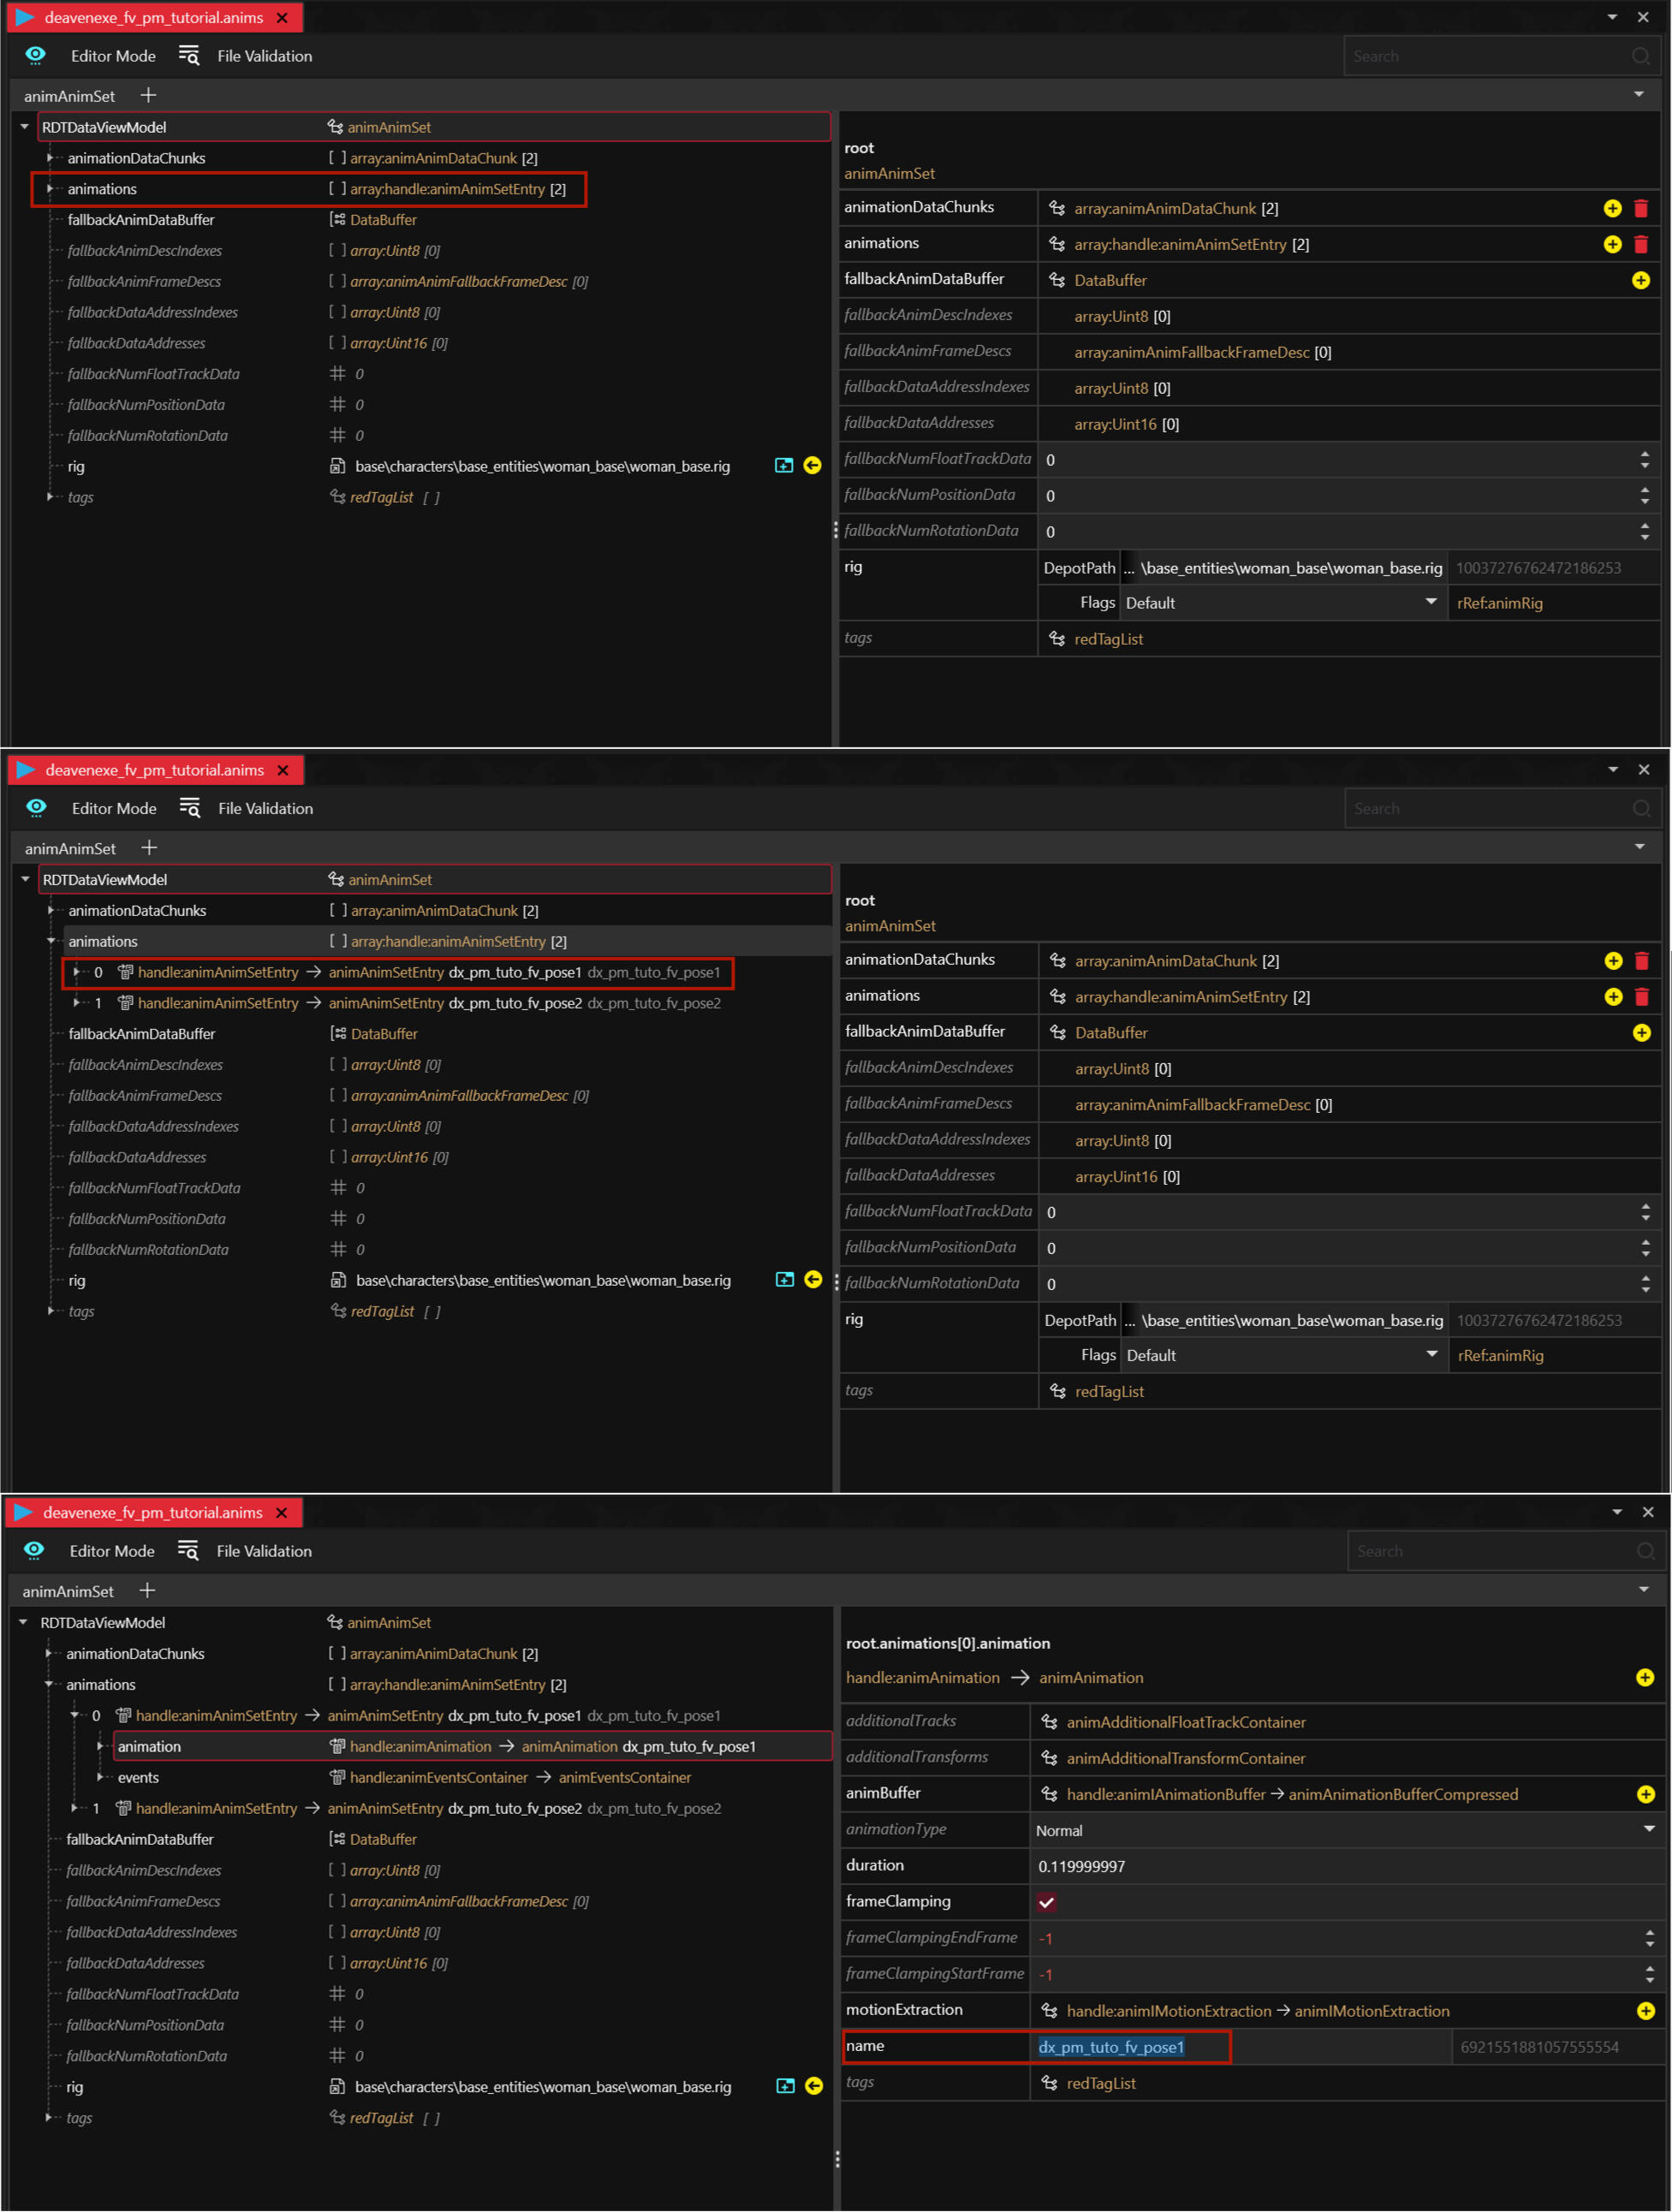
Now double click on any of the anims files. Like the actual anim files not the glb ones. It will open a neat little window in the center of your screen.The first image is what you will most likely see. Open up the animations one with the little arrow next to it. It will open up to a list of all your poses that you just imported!Now there is two reasons we can be here the first one is name changing. Let's say you notice a typo or whatever you can change the name here without having to reimport the pose from blender.Open up your pose further with the little arrow. Click on the new animation line that appeared and on the right side find name. You can easily change it there. Always handy to know.
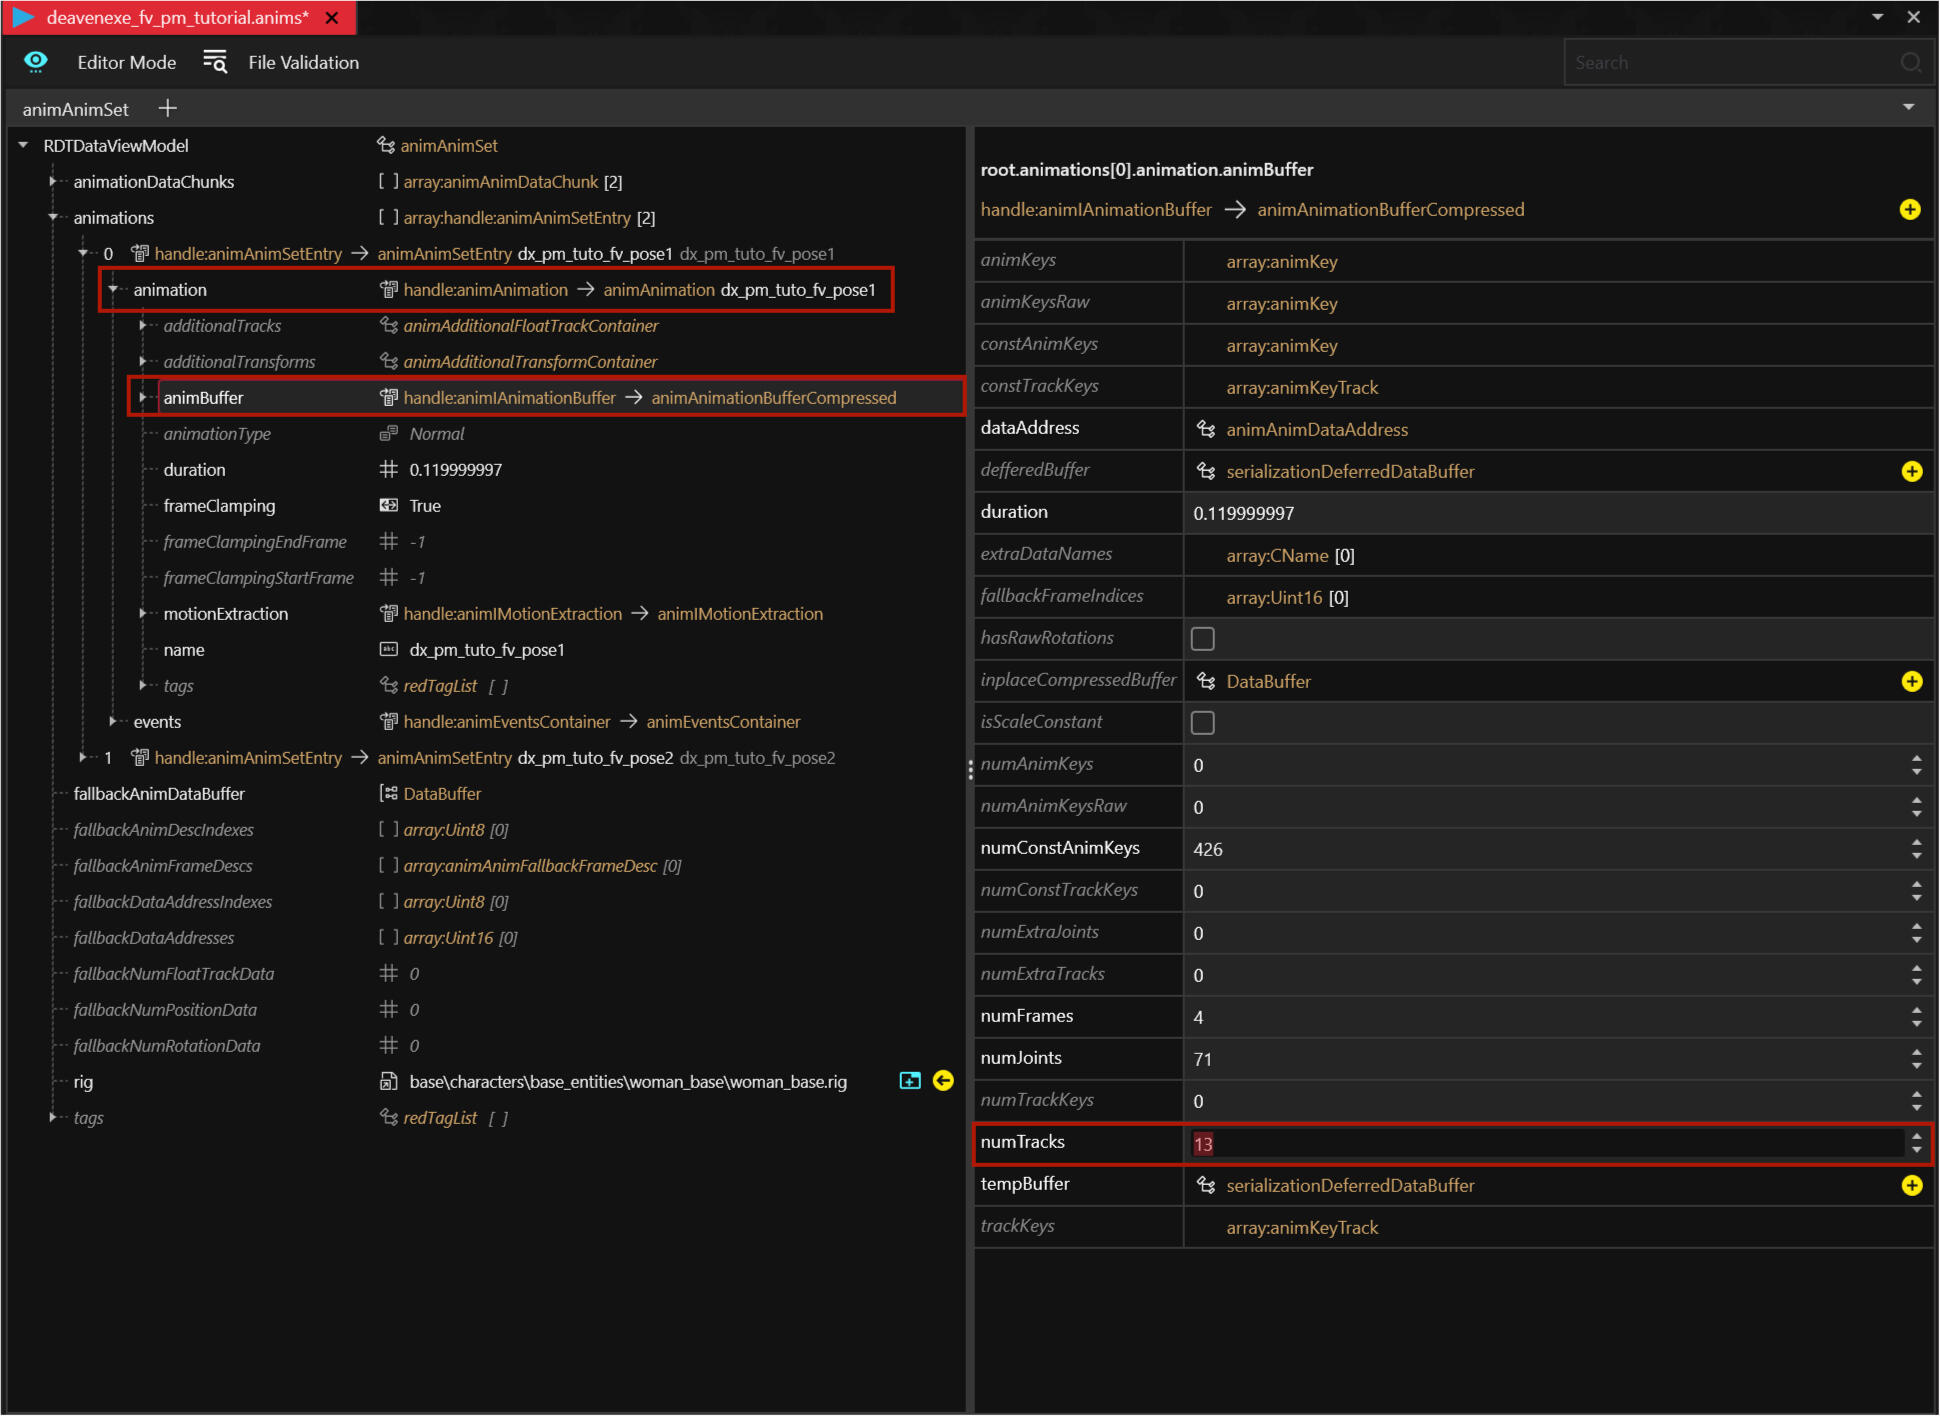
The second reason is the one that will apply every single time we import a new pose.Changing the NumTracks.Open the animation tab that we just looked at. Then click on animBuffer. On the right side find numTracks. It will always be on 13 and we don't want that. We instead want it to be 0 so we type that in.Changing this to 0 stops the character from shaking massively with your pose, usually triggered when using look at options.The downside with this is that you have to do it for every single pose separately ever single time you import a pose. It can be a bit of a pain especially when you have a lot of poses but it's smart to do if you don't want characters shaking like they had five too many energy drinks.
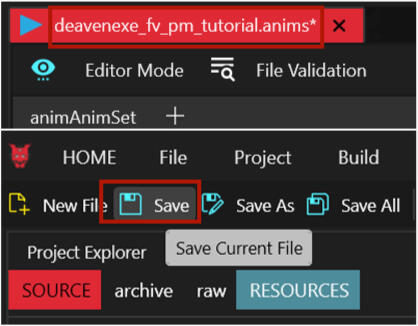
A quick thing I wanted to mention just to be safe is that whenever you change something in your anim file you may notice that a little * appears in the name up top. That is because you have unsaved changes. Press the Save button at the top left to save it before closing the tab! Sometimes it can be nice just to press it while changing NumTracks so if anything goes wrong you won't have to redo a whole part.
Quick Tool Option
So we've been going for a while and I know it looks like a lot so far but it's just a process you have to get used to. Once you know every step from the top of your head this becomes a quick thing to do.However we do still have the paperwork to get into and since this is so much I figured I would mention the option of skipping the paperwork by using the Easy Photomode Poses - Modding Tool. This tool only requires you to have the anim files done with your poses. You upload those into this tool and the tool does all the paperwork for you!Work that could take up quite a bit of time otherwise is now down to less then five minutes depending on how long you take changing the names in the program.I have used it myself in the past and have no complaints, its a great tool. I just in the end preferred doing the paperwork myself because of testing, fixing poses and changing things. I tend to have to edit the paperwork the least once I have it done so it's more comfortable then having to open the program, upload the anims and edit the names and stuff every time I make tiny changes to the poses.Just know it is there if you would prefer to use that at this point and later take a look at the paperwork part of photomode poses. Heck if you decide to never look at the paperwork part and just use the tool that's fine too. It's all a personal preference.
Paperwork
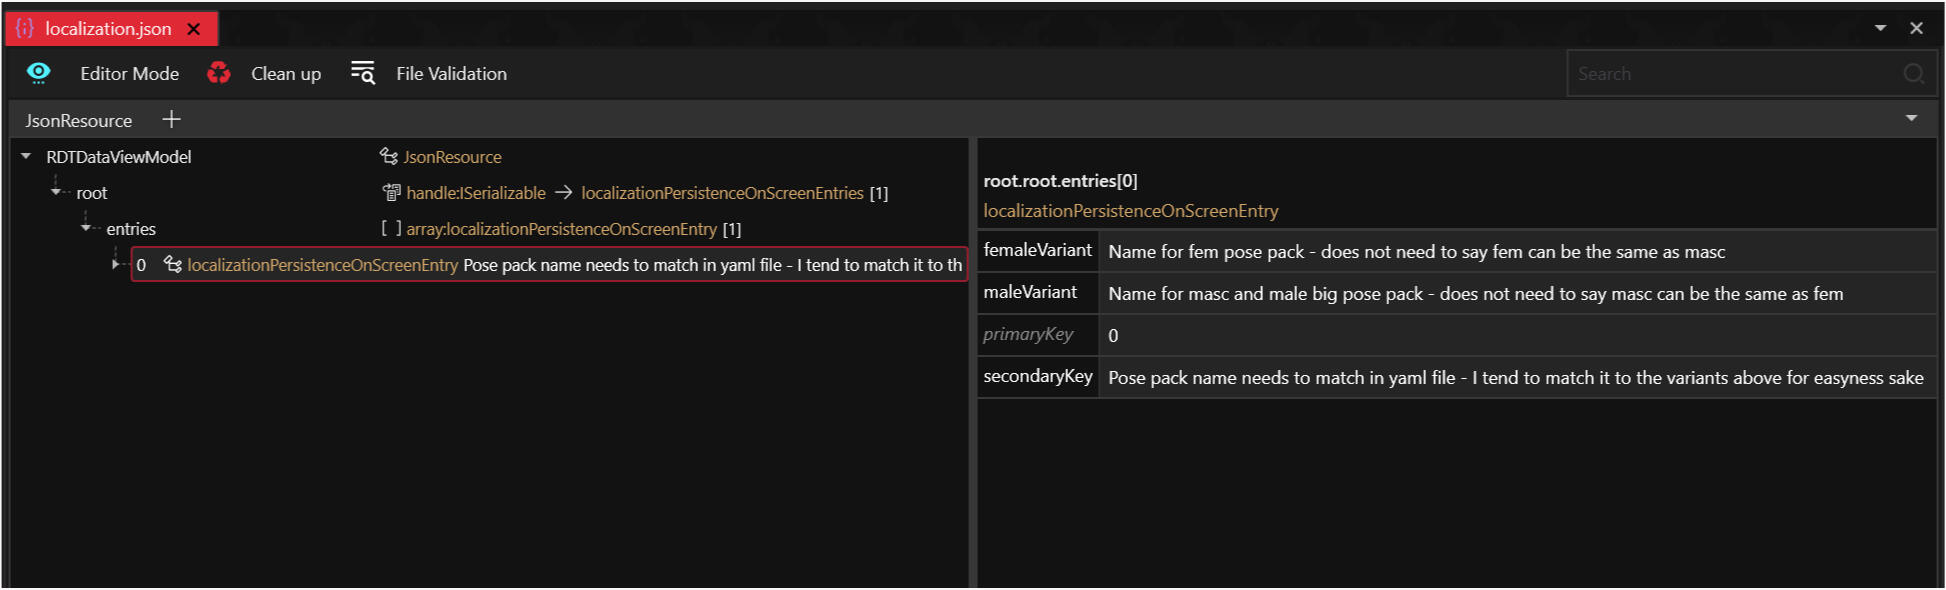
There are three files we have not yet looked at beyond renaming them. The json, the xl file and the yaml file. The paperwork files. Luckily the json and xl file are pretty easy and quick to deal with. The yaml file is the easy but time consuming file of the three.So let's start with the json. Double click it and a window will open in the center again. If you are using the source file I provided there is a bunch of writing in there when you click on it.It kind of explains itself already. If you are only using fem poses you can leave male empty and vice versa. Male Big goes in maleVariant. If you have both MaleAverage and Male Big it uses the same name. Nothing weird needs to be done.
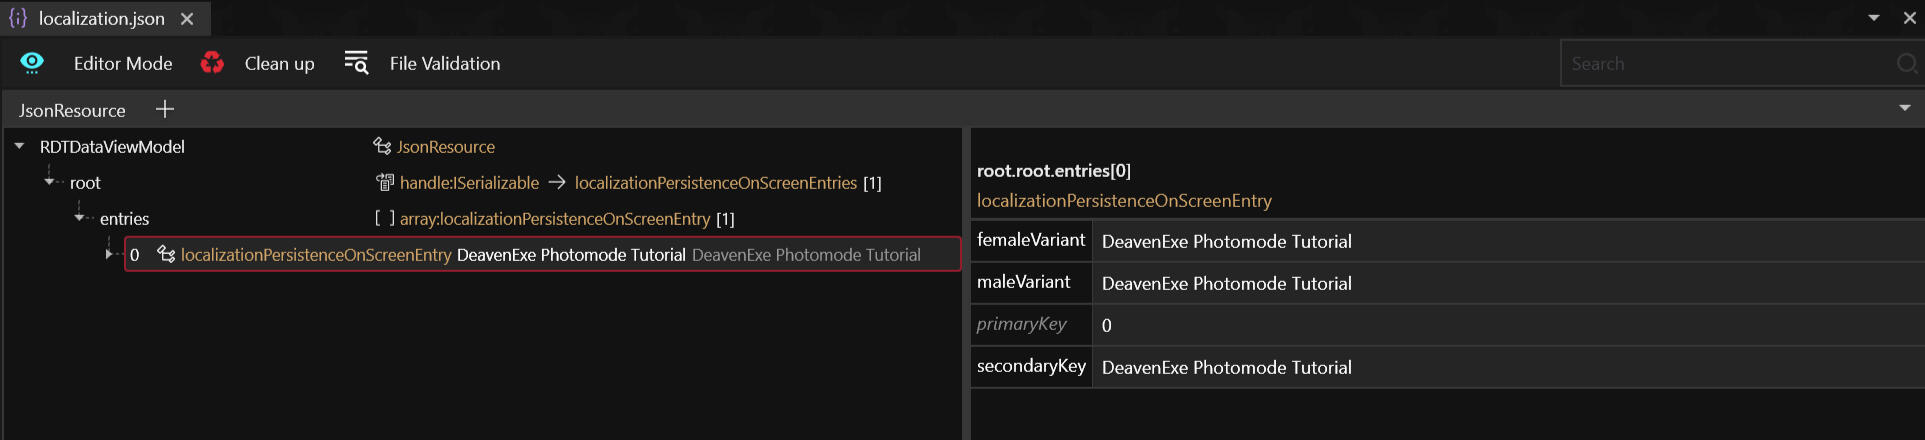
For easiness sake, and the fact that I have had issues with things not working in the past if I made it all different, I always just name it all after the pose pack. Change the names and press the save button in the top left! Then close the json. We're done with editing it.
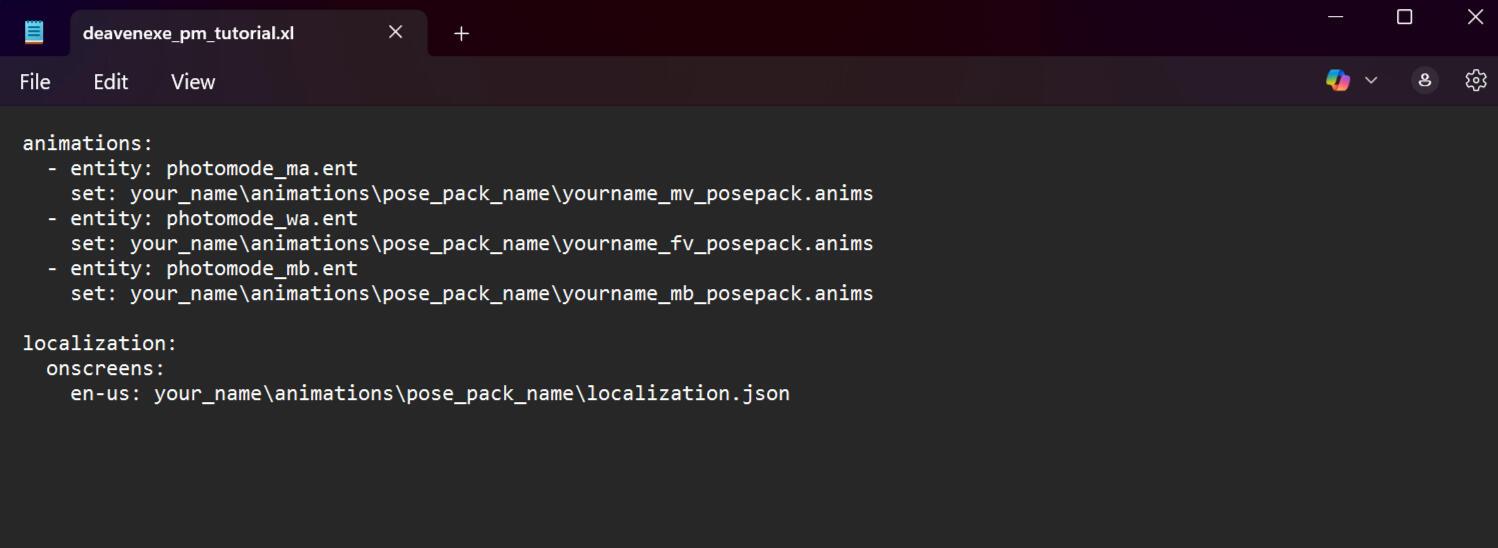
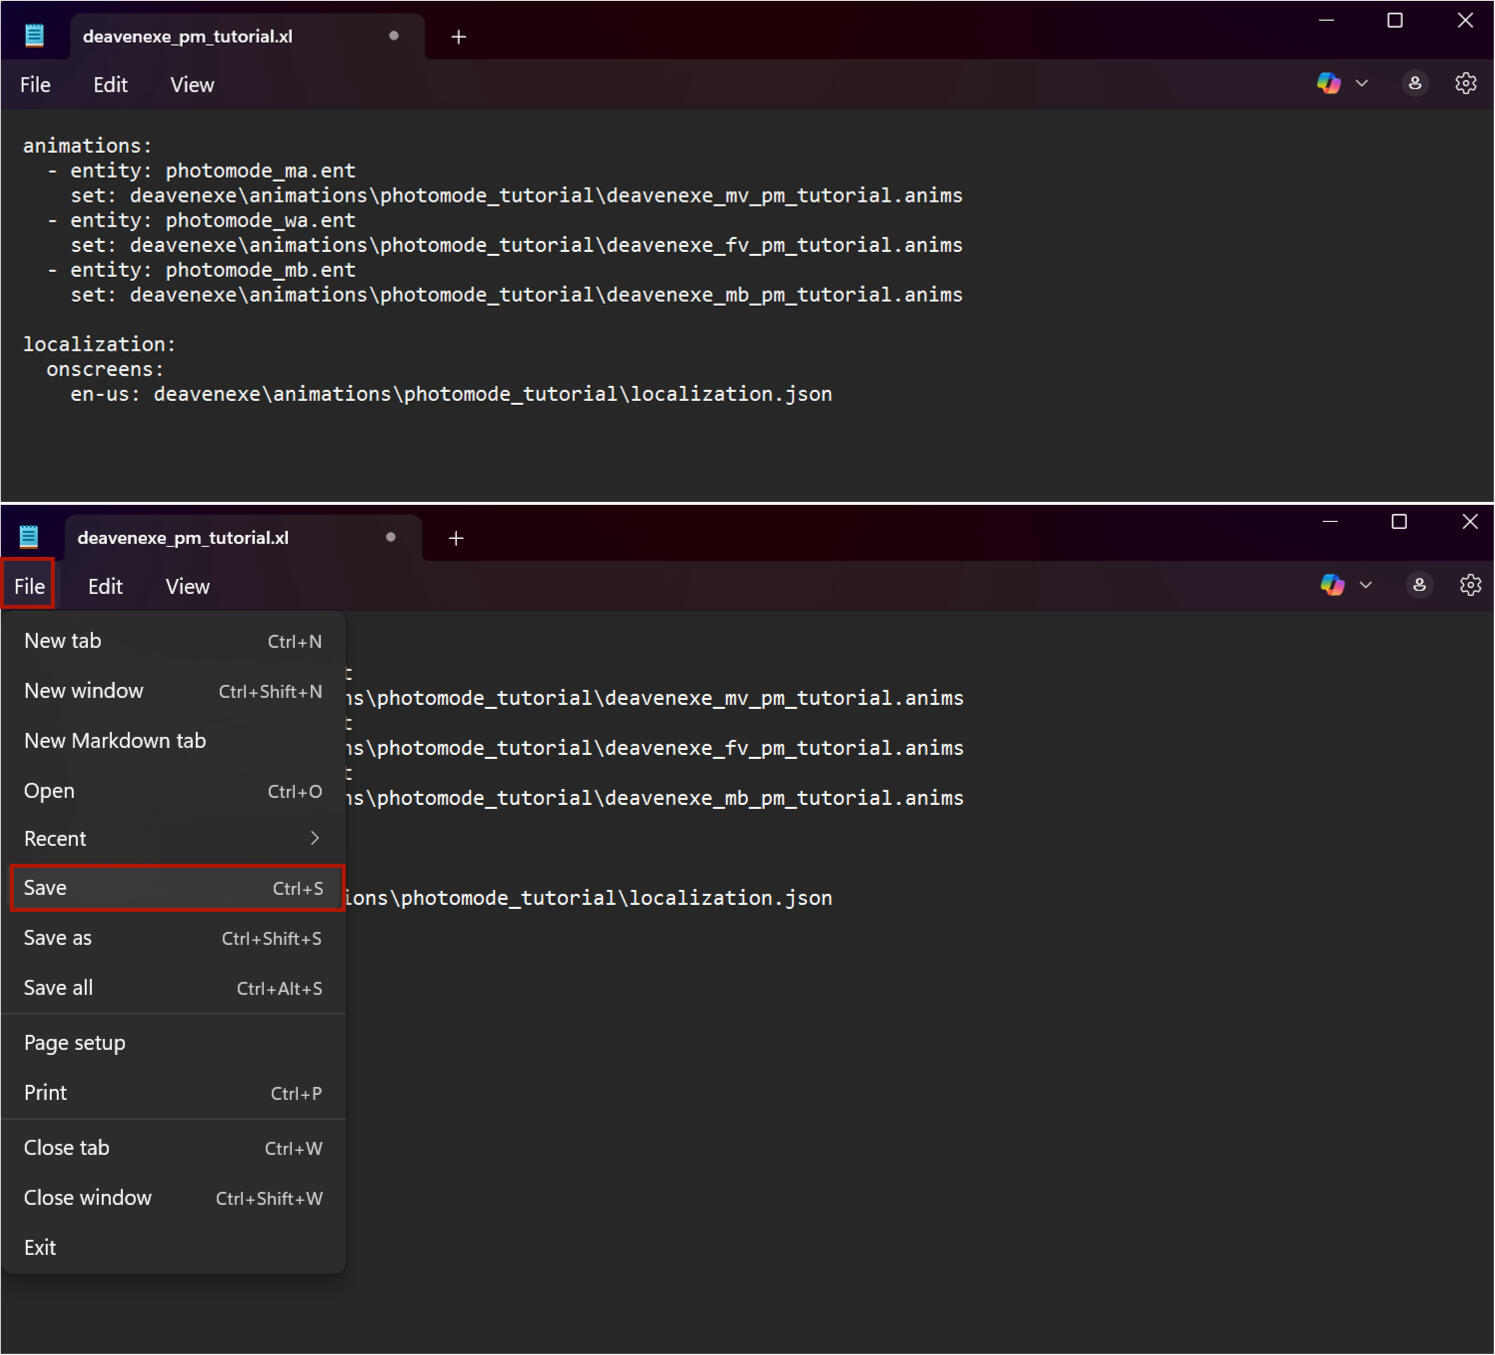
Next up is the xl file. Double click it and it will open in Notepad. Using Notepad is absolutely fine. Others may suggest Notepad++ which also works fine and is free so if you prefer that go for it. Otherwise just use the basic version, I personally do and never had an issue.Alright this file tells the game which ents are needed for which anim and which json is related to this all. The file I included has Male, Fem and Male Big listed since they are the most used bodies. If however you just want to use Fem you can absolutely remove the other two! It won't break anything.You don't have to adjust anything behind entity. That links already and is all perfect so unless you dont use the body type leave it as is.Set and en-us are however is going to need editing as you can see.
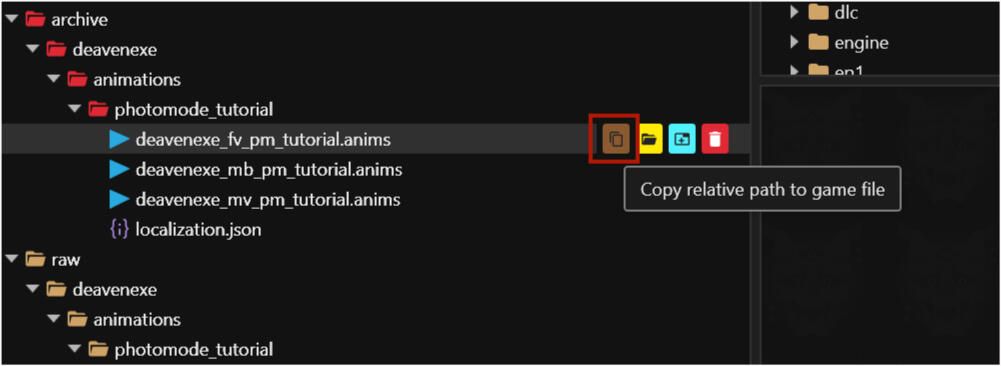
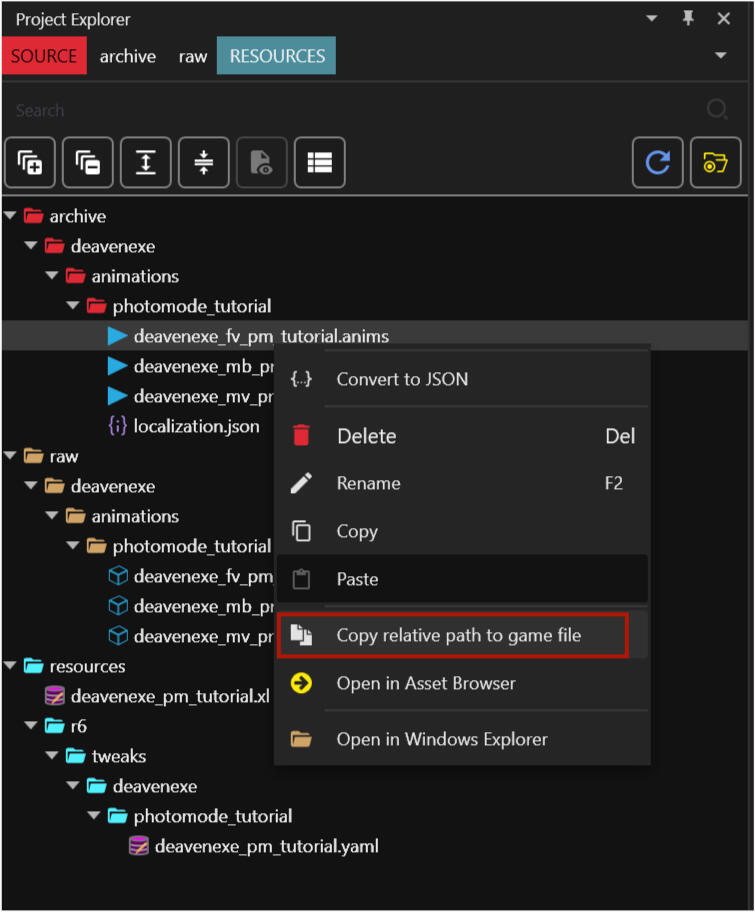
We are going to have to get the right paths for them luckily there are two easy ways to get them. Go back to Wolvenkit.I'm starting with the the Fem anim file. The first way to get the path is when I hover over the anim file and four icons appear behind it. The first icon allows us to Copy relative path to game file. Click that. Now you have the path. If however you do not see that icon there is another way to get the path.
The second way to get the path is to right click on the file and then select Copy relative path to game file. Now you also have the path if the first option doesn't work.
Now go back to your xl file. Select the anim path you want to replace and just paste the new one in. Simple copy from one place and paste into another.
Do this for all the required files. It should look something like the image below. Once the pathing is done just click file in the top left and save then close the file. The xl file is done! Told you the json and xl files are easy and quick to do.
That means there is one file left to work on. This will look a little daunting at first but I am going to walk you through every step and you'll find in the end it's easy it just takes a bit of time to get done depending on the amount of poses you have.So open up the yaml file by double clicking, notepad will open again. As you can see in the image below, and in notepad itself if you have it open, there is a lot and its not even fully scrolled down. I have sorted everything in separate easy to use parts and I will go over each one so it's easy to take in and handle.
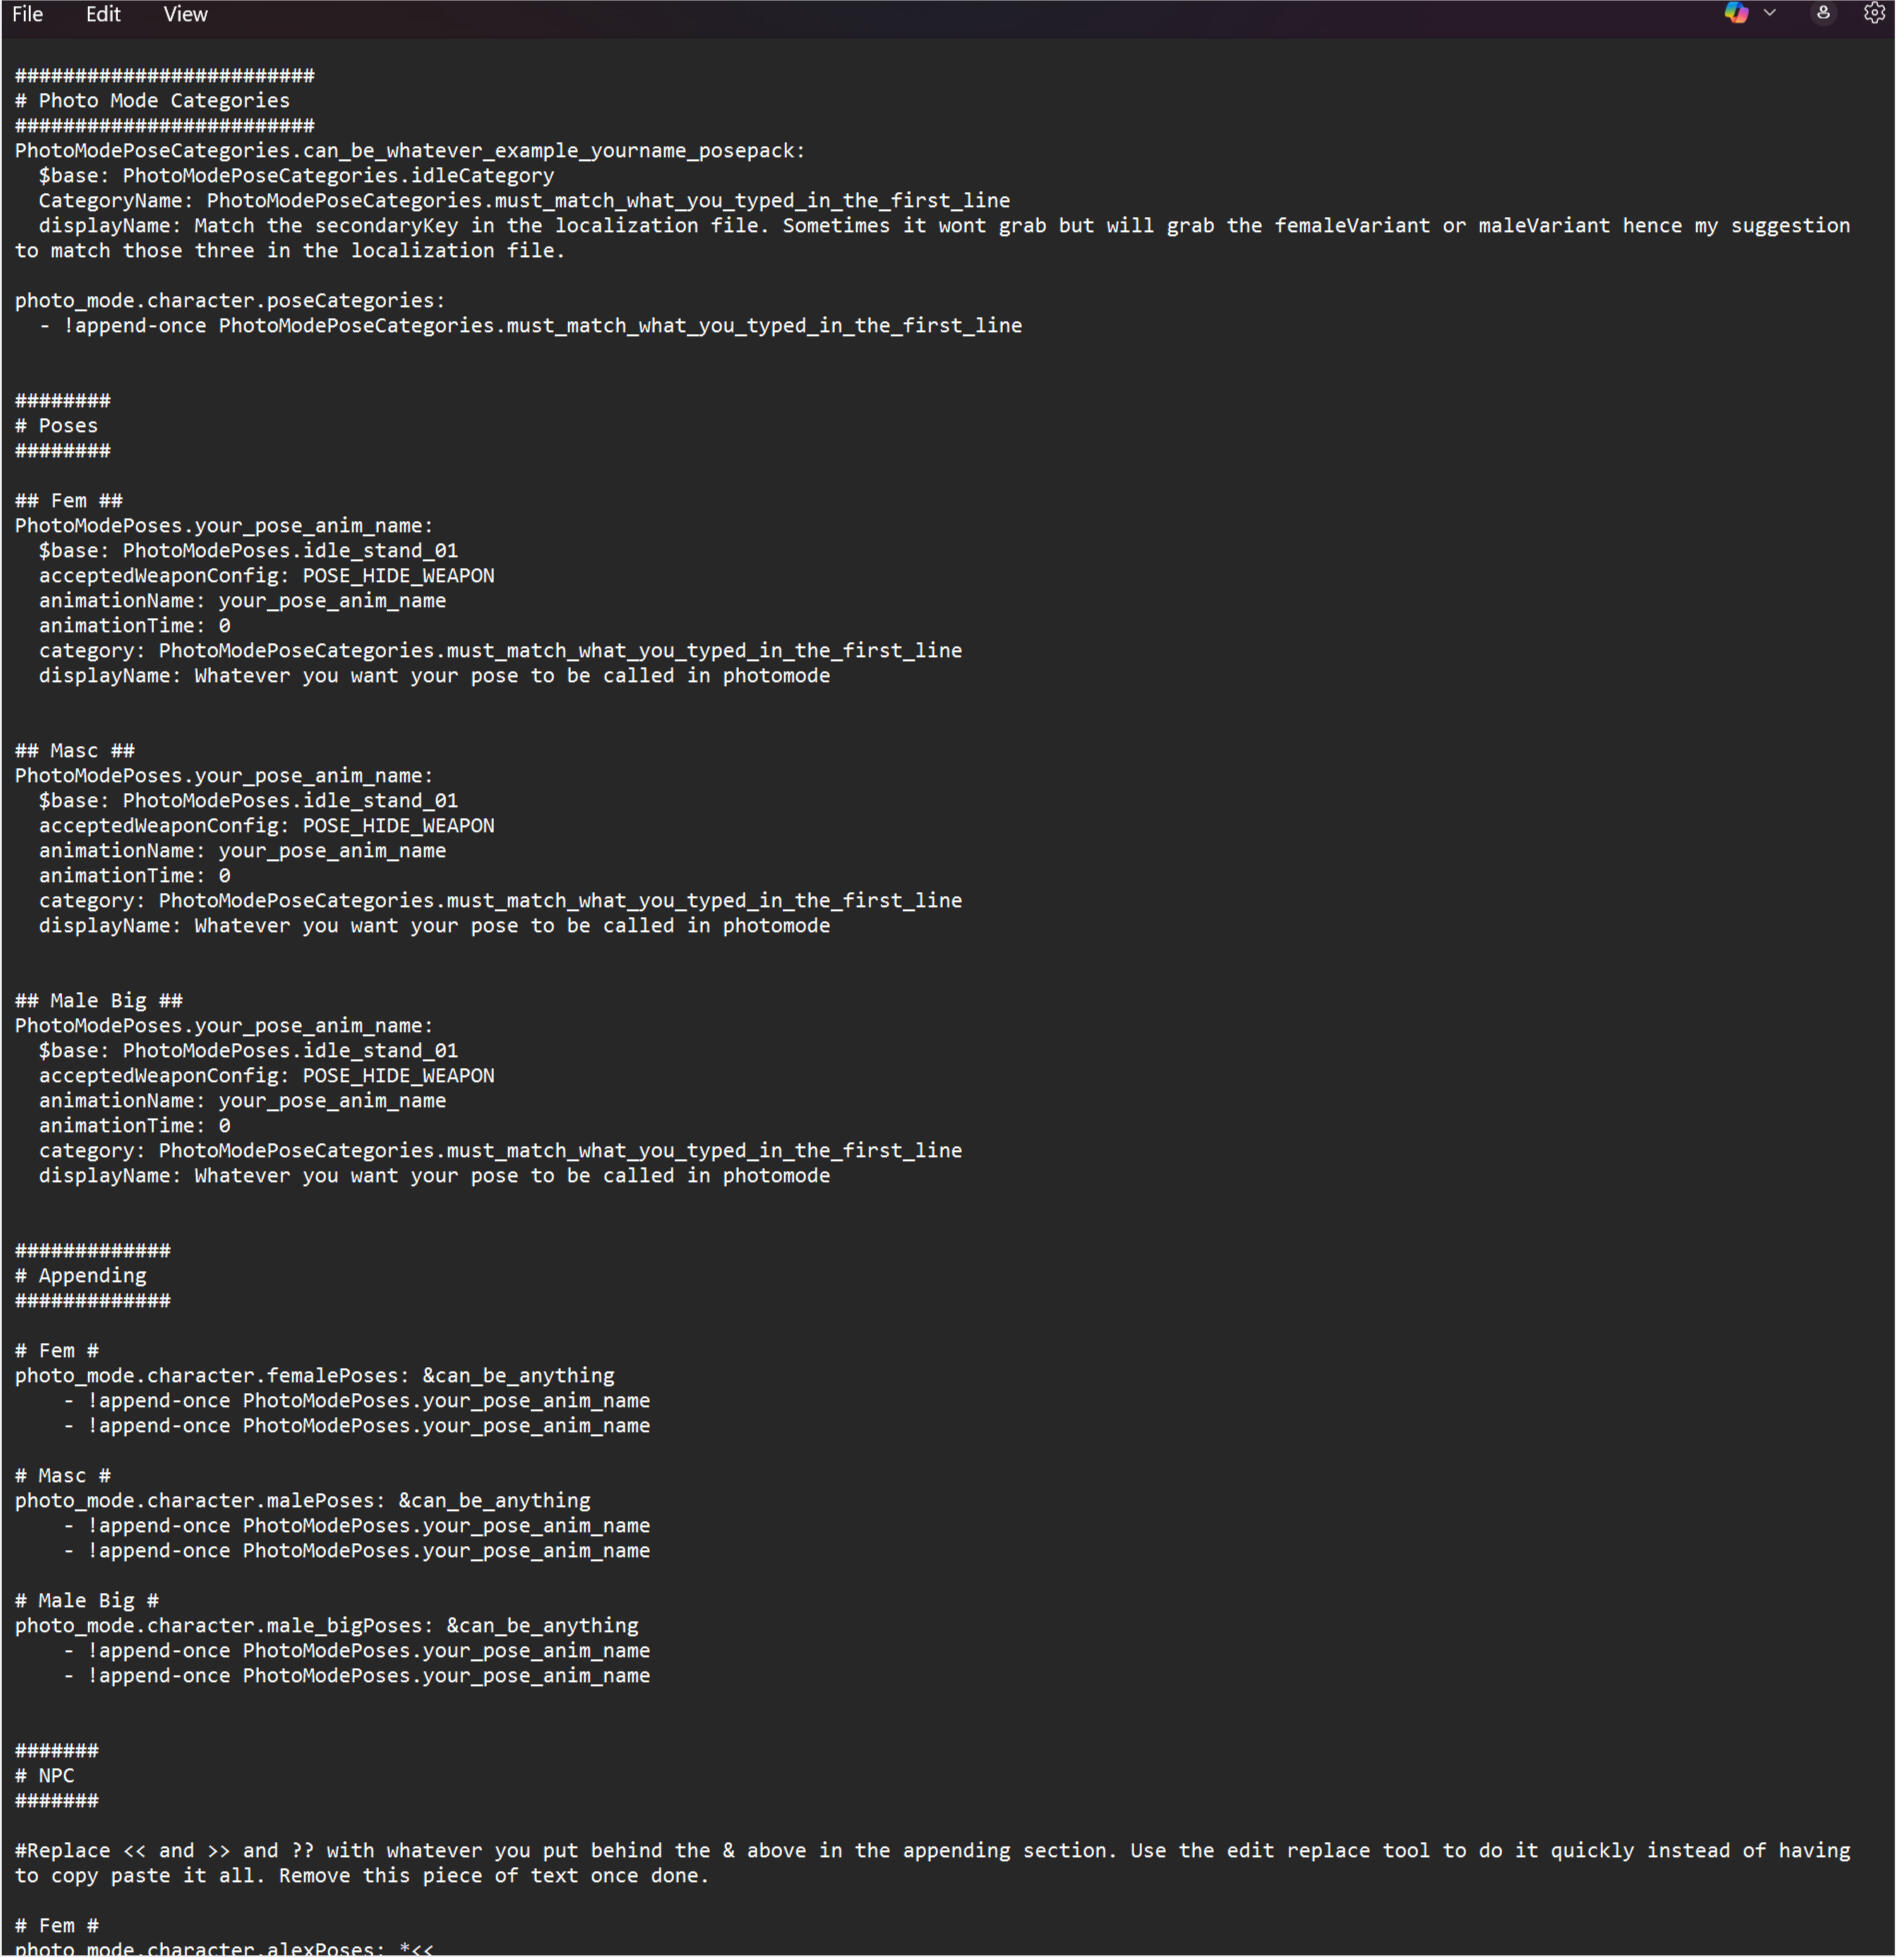
We're going to start at the top with Photo Mode Categories.This is the part that creates the category for you pose pack. It is what will show your pose pack name in photomode and what we will link the separate poses to to be one group.The only part of this that we don't touch is the
$base: PhotoModePoseCategories.idleCategory
We leave that alone entirely.

PhotoModePoseCategories can be found three times in this text and we are going to edit the things behind them to one and the same thing.
I usually change it to shortened versions of my name and pose pack.Make sure what you edit is behind the .The names all need to match so type it once and then copy and paste to avoid typos.
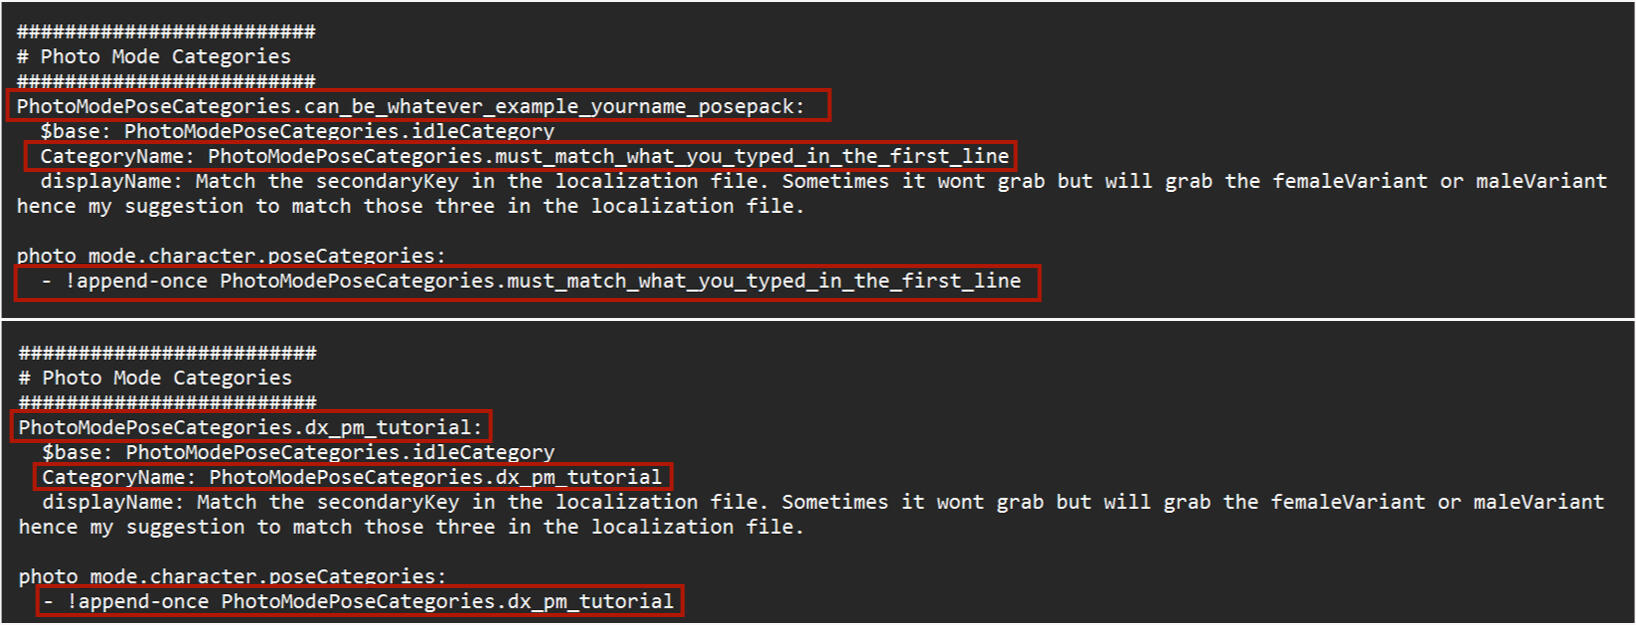
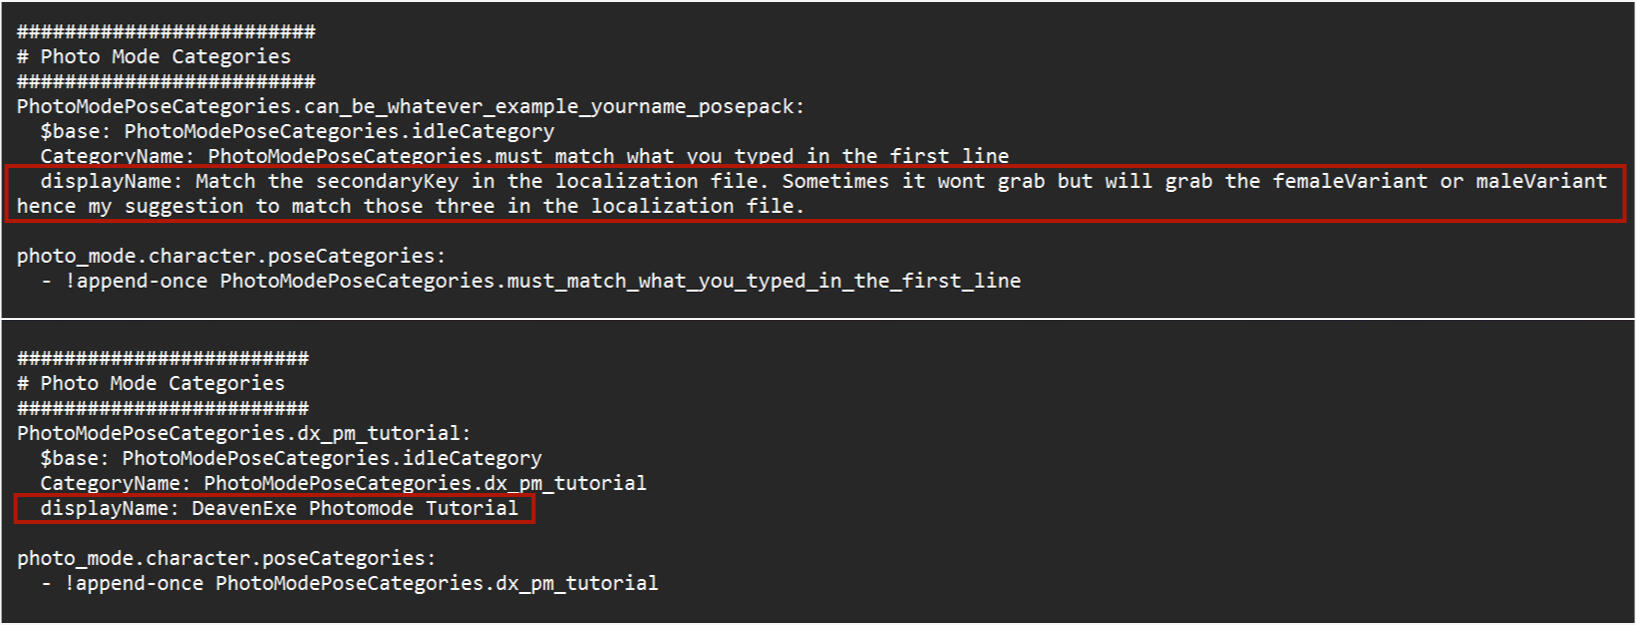
Then we have one thing left in the top part to edit and that is displayName. We want this to match the secondaryKey from the localization.json file.I have had issues with it if the femaleVariant or maleVariant names in the json are different from the secondaryKey so this is why I suggest making it all the same thing. It breaks nothing when it's the same and it's easy enough to do.
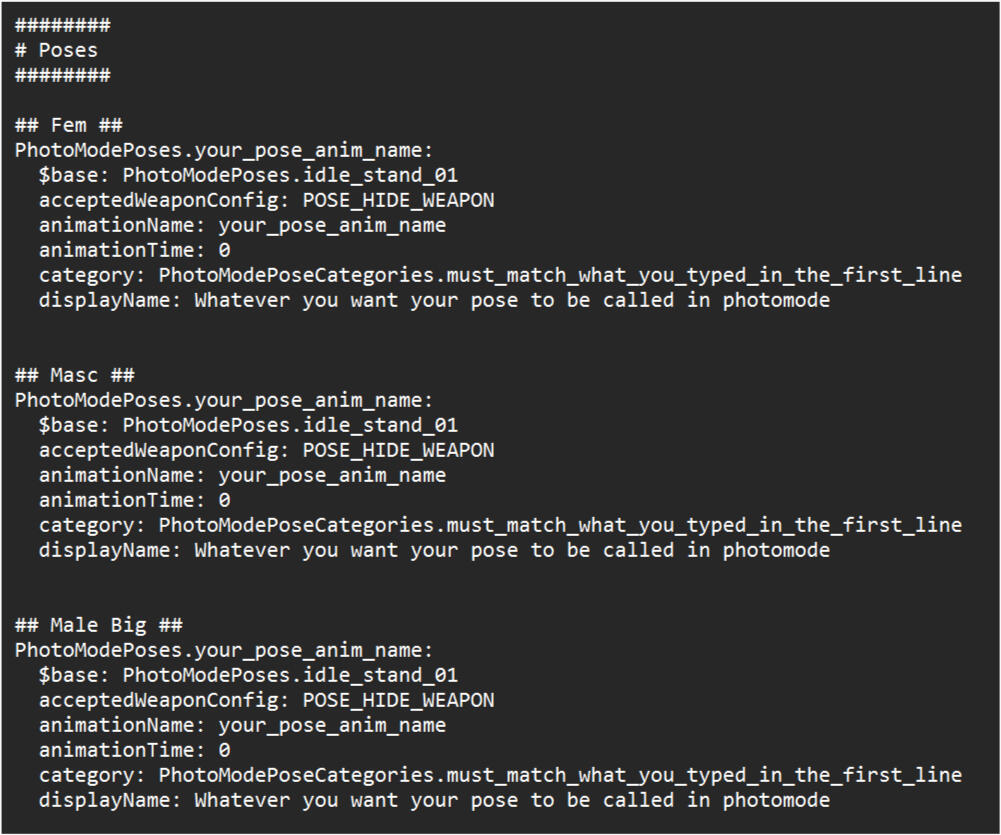
Top part done! Quickly do a file - save to make sure it sticks and then let's move on to the next section called PosesI have this area split into three different body type groups as you can see. Remove whichever you do not need for your pose pack.You need the entire block from PhotoModePoses to displayName for every single pose so you will be copying this as many times as you have poses. See this as the settings part if you will. It will link to the category we created above so the game knows what pack it belongs to. And it will also link to the Appending section below for the actual poses. It's also where you will put the name of each pose so they can have their own unique names.Things we will not have to edit in these blocks:
$base: PhotoModePoses.idle_stand_01
acceptedWeaponConfig: POSE_HIDE_WEAPON
animationTime: 0We just copy them along every single time and don't touch them further.
Since all the blocks work the same for every body type I will just focus on one block in the image to make things clear and easy to see.First off we are going to change category. That will have to match the category we created in the top part of the yaml so just copy paste that. Now those are at least linked together.Just like before make sure that you only edit the part behind the .
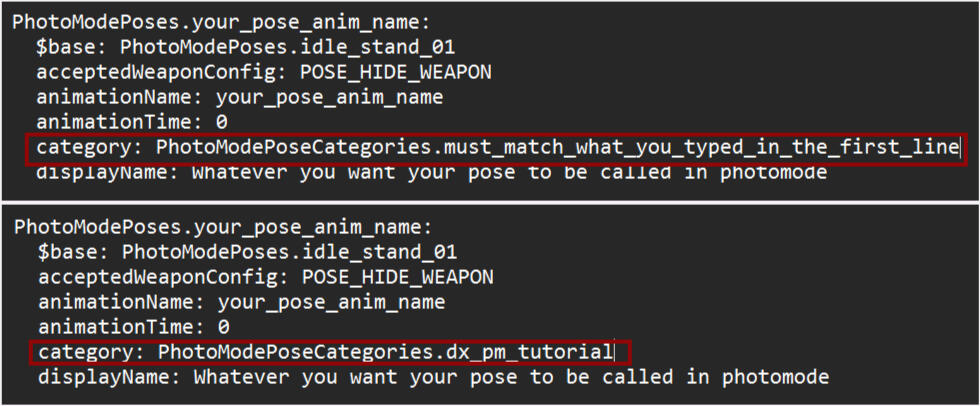
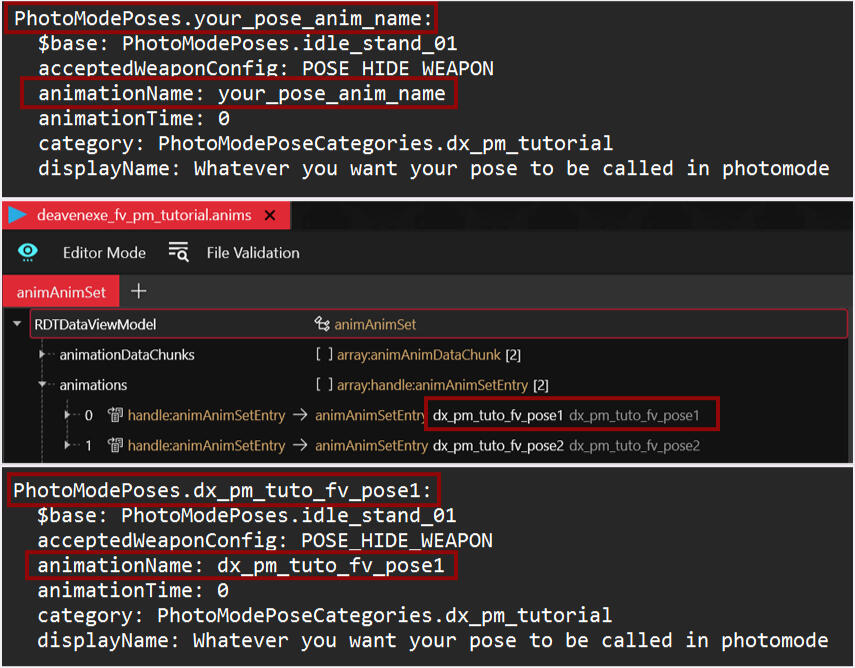
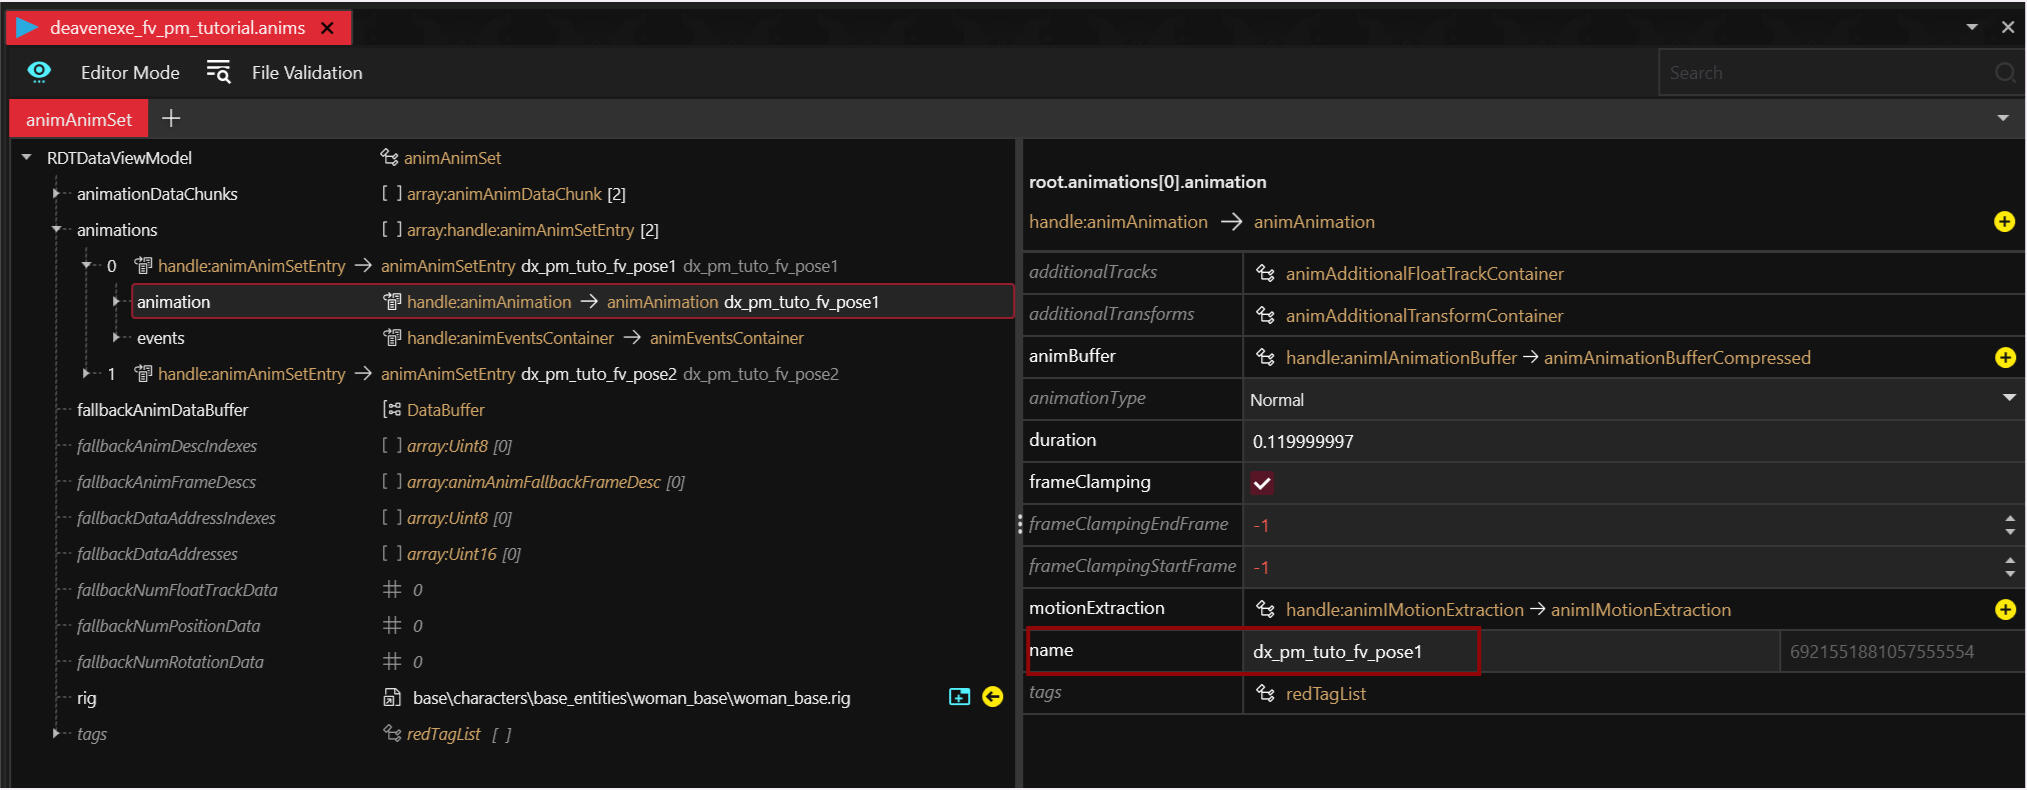
The next edit is going to be PhotoModePoses and animationName.These we are going to turn into the name for the pose in the anim file. Go back into Wolvenkit and open the right anim file. The name under animations is what we want to use here.If you remember further up in the tutorial I explained how you can change the name in Wolvenkit. That same way you can easily get the name to copy for the yaml file. So click the little arrow to the left to open it further, then click the animation line that appears and on the right side you get a bunch of settings. Copy the name from the bottom text field. (image below for clearity)Once you have that name go back to the yaml file and paste it behind PhotoModePoses. and animationName:Mind the . behind PhotoModePoses and the space between animationName and the name. Those need to be there.
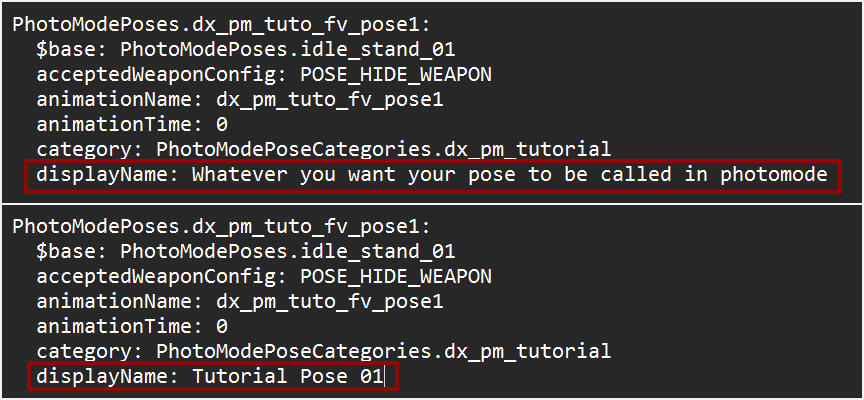
Last thing to change is the displayName. As it already says in the line here is where you type what you want the pose to be called in photomode. It can be one word or it can be a short sentence. It's entirely up to you. Again mind the space between displayName: and the name. That space needs to be there.
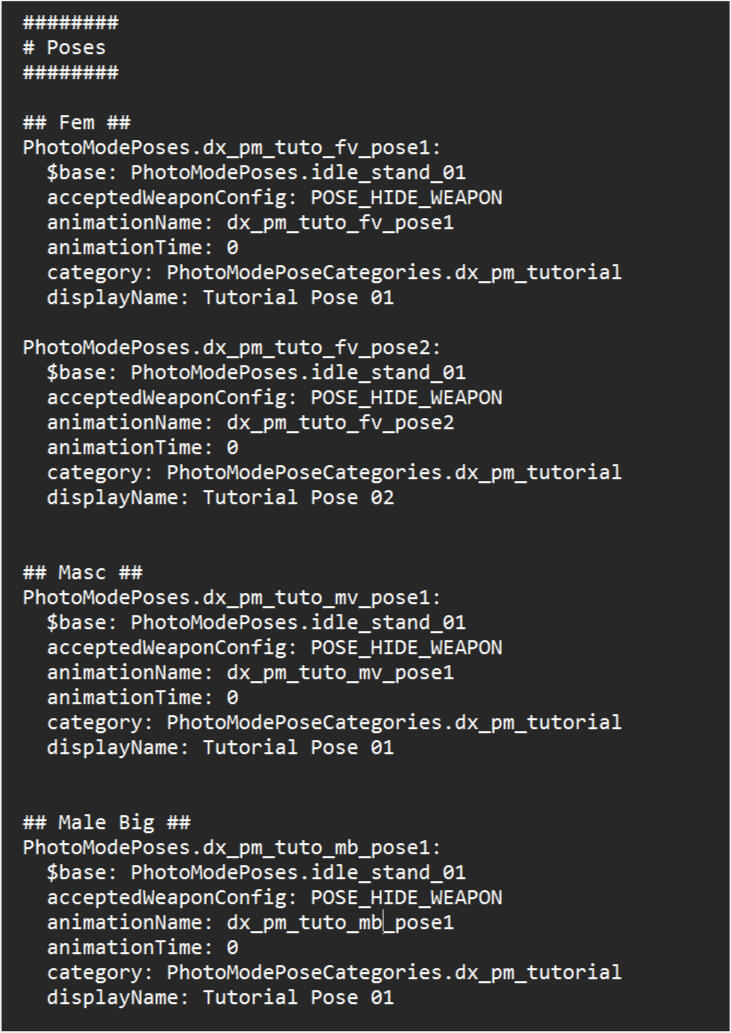
Now this needs to be done for every pose. I always just make one first and copy and paste that one, then adjust what needs adjusting. Because at this point all that would need adjusting is the anim pose name in two places and the displayname since the category doesn't change. This is also why I make my anim pose names this way because all I need to change is the number while everything else stays the same. Saves time and is just easy to do.So I quickly edited my file to also have the male and male big in it and now it looks like the image below for me.The Masc and Male Big ones are pretty much identical to Fem except for the small detail in the anim pose name where I changed it from fv to mv and mb since that is what I put in the anim pose names.
A small tip from me to you when you are dealing with multiple bodies while have similar naming. Make all these blocks for one body then copy paste all those blocks into a new notepad file.Select Edit - Replace. This opens a new window. In the top bar put in what you want to replace and the lower bar what you want it to become then press Replace all. The text will shift down as you can see in the third picture but now all the fv's have been changed into mv's. Close the replace window, copy all the new blocks and paste them into your yaml.Speeds things up a bit. This only works if the names are similar as seen in the screenshots

On to the next part the Appending section. This is where we will make sure that your poses show up. It links together with the poses section. This is also where we set a quick way for NPC's to use the poses in the NPC section below.Remove the Fem, Masc or Male Big section if they do not apply to your pose pack.Let's start with the &can_be_anything line. This part will allow us to link the poses easier to the NPC section and we will have to copy and paste the line a whole bunch of times so I personally like to keep it short, sweet and fitting the pack. Make it whatever works for you.Leave the & infront of it though! It has to be there to work.As for the lines underneath, the append-once lines we adjust to have our pose names from the anim file at the end.
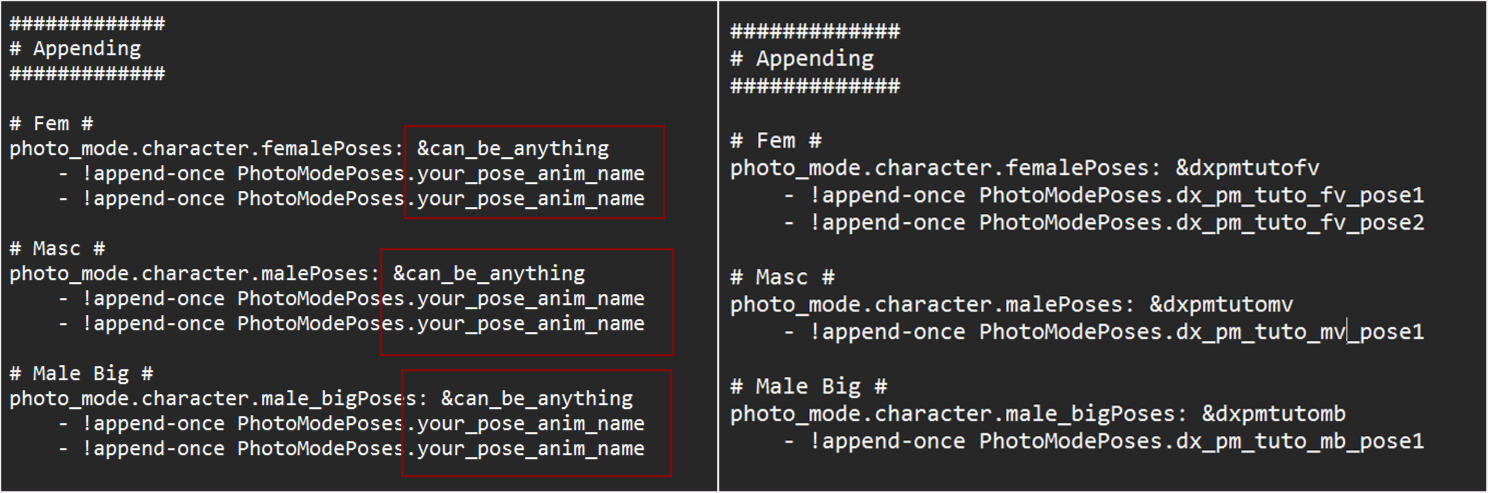
You are going to need a line for each pose so just copy one line, hit enter, paste and change the name.Like before with the pose section if you are doing multiple body types make it for one first, copy and paste it into a new file, use replace to change the parts that need changing and replace all then copy paste that under the right section. Assuming all that needs changing is like an fv/mv bit.
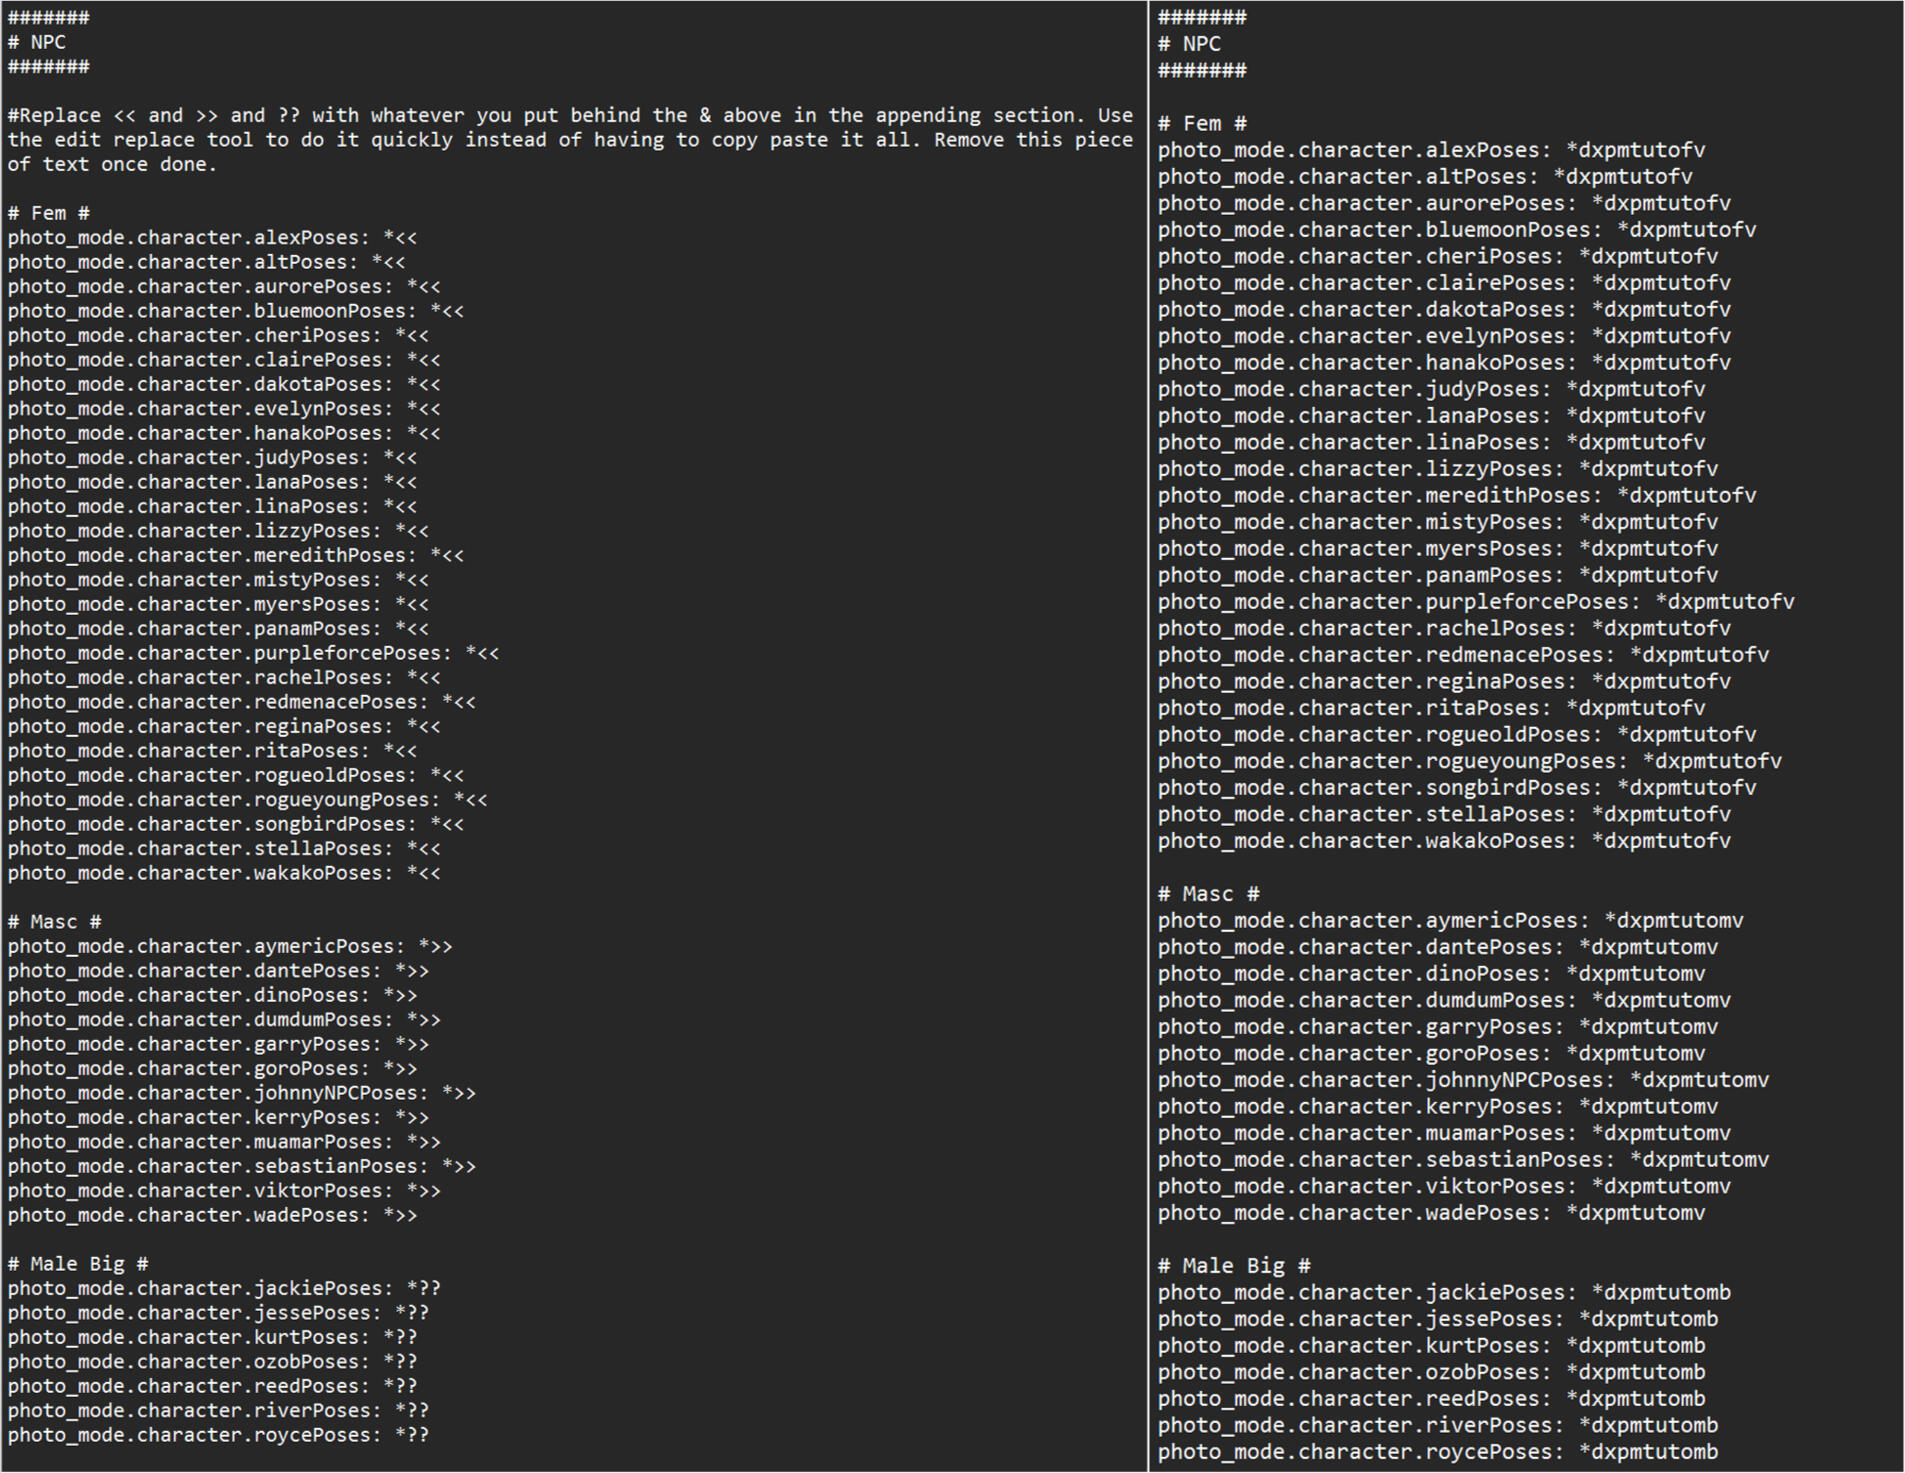
That's the appending part. Once you are done move on to the NPC section.This is where we make sure that the NPC's in photomode can use your poses! Remove whichever section does not apply to your pose pack.So I set this bit up a little differently then the rest to make it fast and easy to use. We're gonna grab whatever we put behind & in the appending section and then use the replace tool to replace << and >> and ??. We do not remove the * and we do not add the & from the appending section.Then just remove the sentence that explains what to do and click select file - save in the top left. You're done with the yaml file!
Last Things
Now head back to Wolvenkit. You should have everything done at this point! So click Install and Launch in the top. If it says anything else just click the arrow beside it to open the dropdown menu and select the right option.

If every step was followed you should now have a new pose pack in photomode with your poses!If anything isn't showing up the issue is often the yaml file and spelling. If anything is spelled wrong it will just not show up so double check if all the things that are supposed to match are actually matching.If that seems fine check your xl file that everything is pathed right.If that also seems fine check the yaml file again by throwing it through a checker like yamllint. It may be that something got moved in the process when it shouldn't have.If all that comes back as good and the pack isn't showing at all then there are other things to look at but listing them all would take a while. In that case just shoot me a message so I can better help you out to fix it.
Maybe you notice some parts are off with your pose and you want to fix them. That's a matter of going back into Blender with the pose you want to fix things on, fixing it and exporting it back to Wolvenkit again. If you make sure it has the same name as before then Wolvenkit will override the old not fully correct version with the new one. You do have to go back in to change the numTracks to 0 or the pose will shake. Then just press install and launch again and check if it's correct now!You may notice a bunch of clipping with clothes and you can see it above as well, especially with Vik you can see it. The thing is that is never going to be perfect. There are too many clothing options and your poses wont always fit for everything. I always try to leave just a bit of space between the body and hands in blender to allow for some playroom without it looking odd if there is no clothes between the two. At some point you just gotta say f it good enough.If you want to add more poses to an existing pack just make the poses, export and import into Wolvenkit, change the numTracks, add them into your yaml file and press install and launch again.Once you are happy with your pose pack there is one thing left to do! In Wolvenkit press Create Zip. This will create a ready to use zip file that you can share with others so they can have your poses in their game as well!

You'll be able to find your zip file in your project folder. It will contain an archive, xl and yaml file. The three things needed for others to use your pose pack.
And that's it! That is how you make a Photomode Pose Pack. I hope this guide was useful to you! It's a long one but hopefully everything is clear and you can make pose packs from now! If you have any questions at all you can always send me a message!There are several more things you could learn about pose making, I didn't want to make this any longer then it already was but I do have a few more guides that relate to pose making that you could check out:
Multi-Character Poses
Item Extraction and Posing
Adding Props to your poses
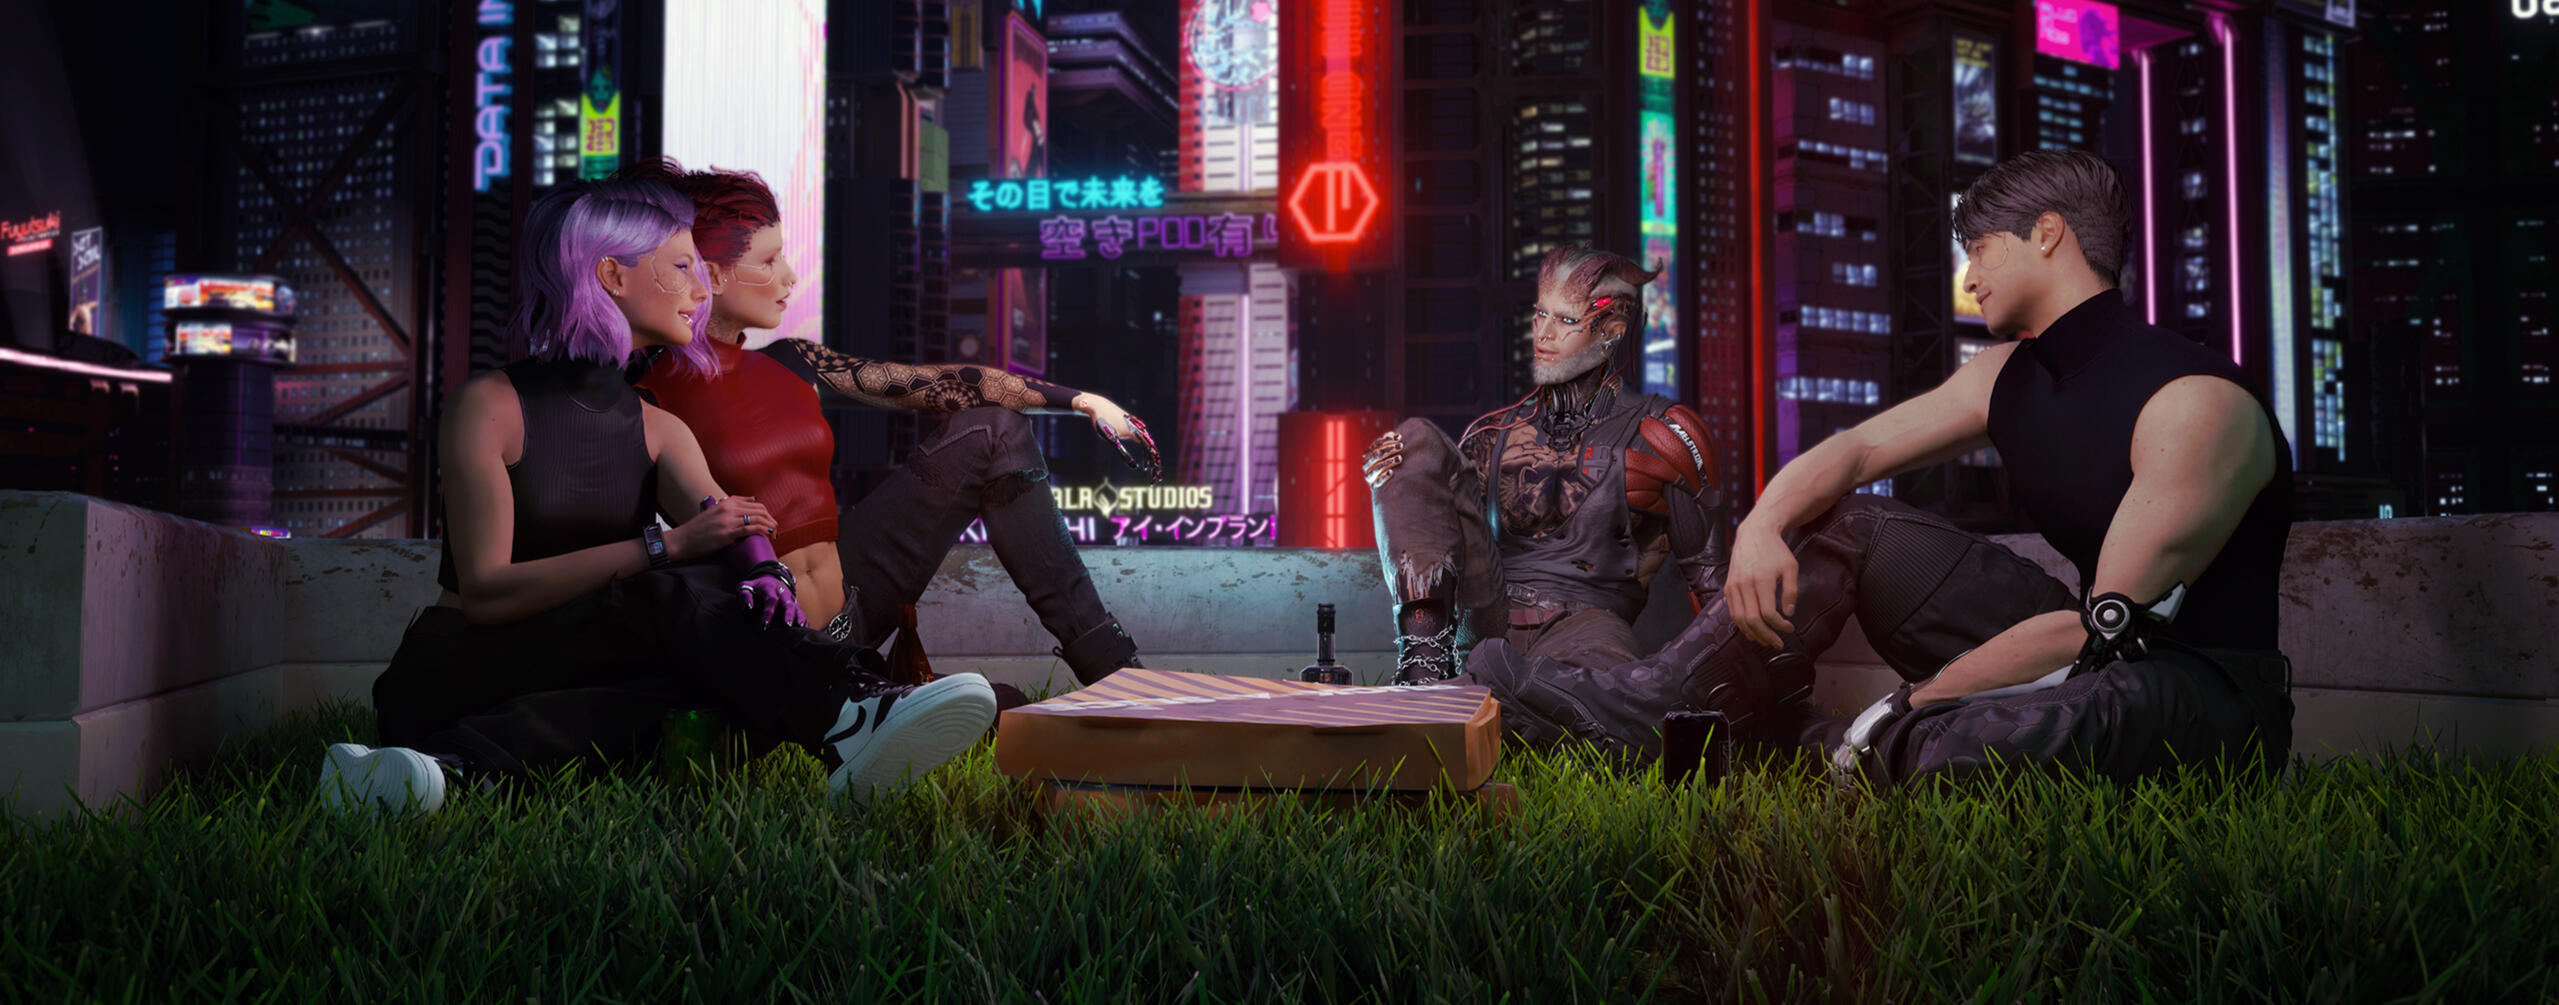
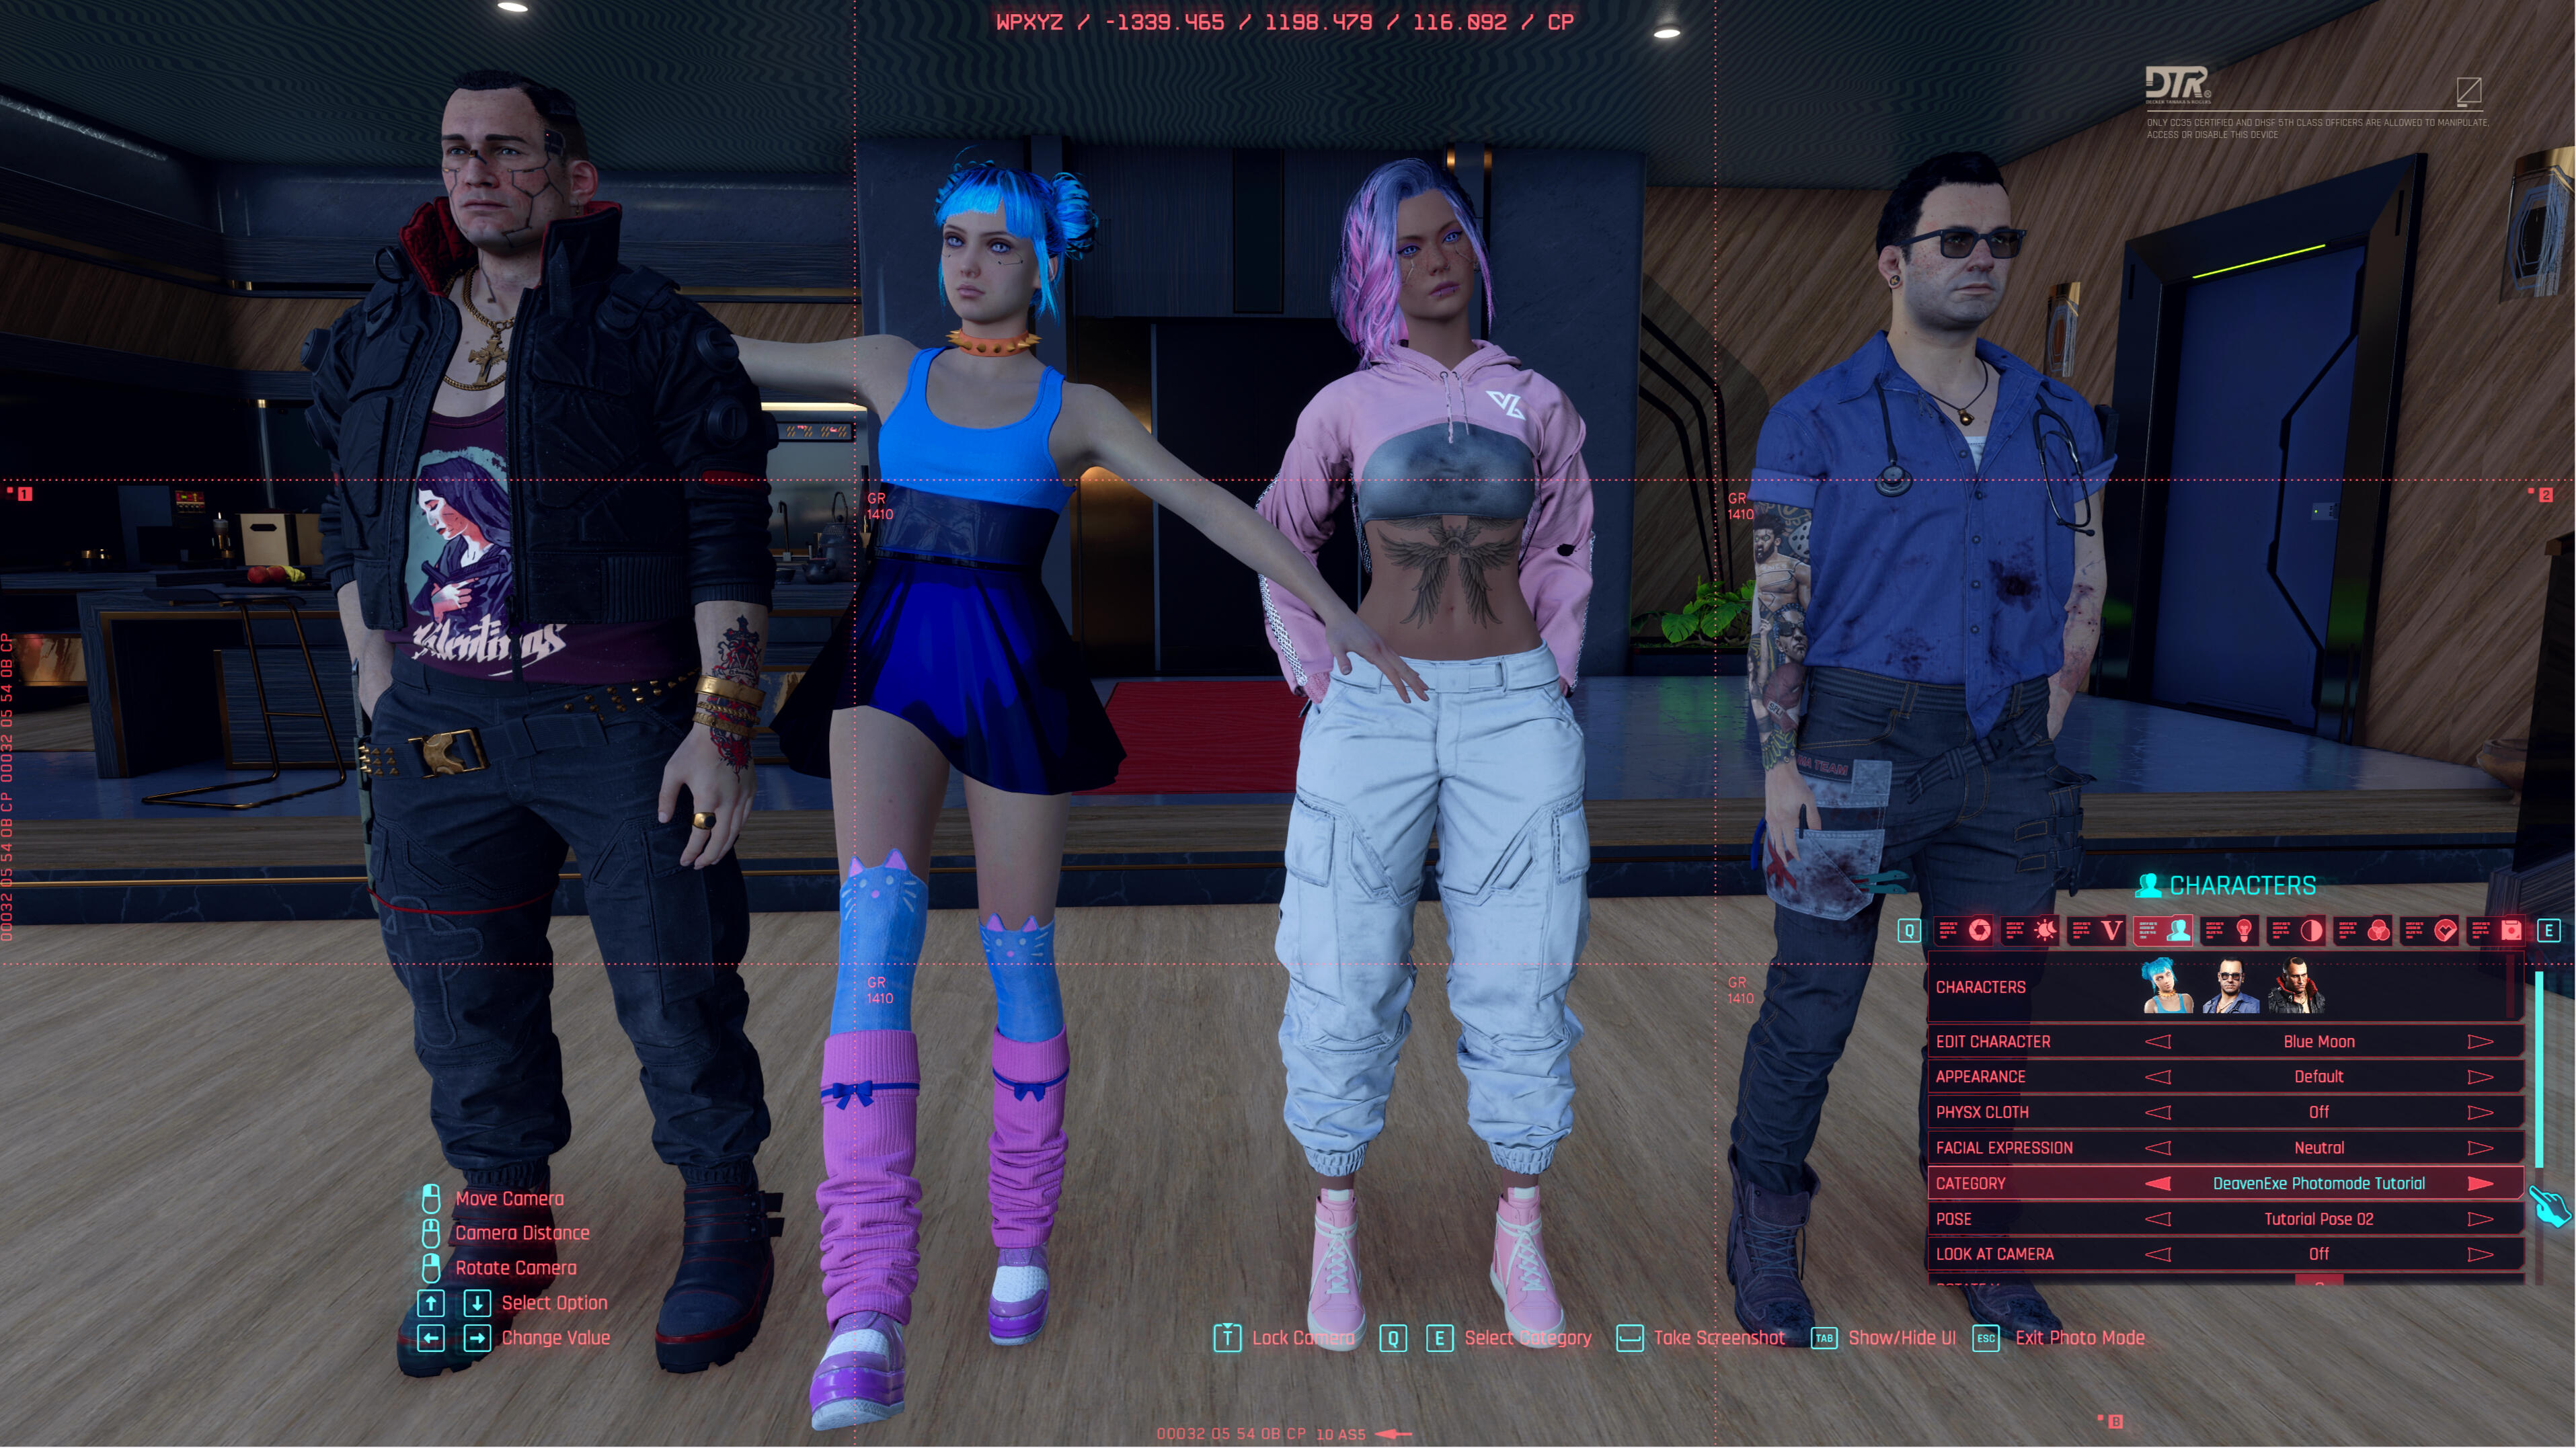
Ruby and Vngel (left belong to me), Blue (right front) belongs to NightCitySteve and Ivarr (back left) belongs to Dreamskug. Poses from my Sitting Collection Part 6 pose pack.